In the article below, we will take a closer look at the process of creating CPA campaigns.
Block Administration #
Once you have created an advertiser account, you need to launch a CPA campaign. Click the Create — Campaign button.

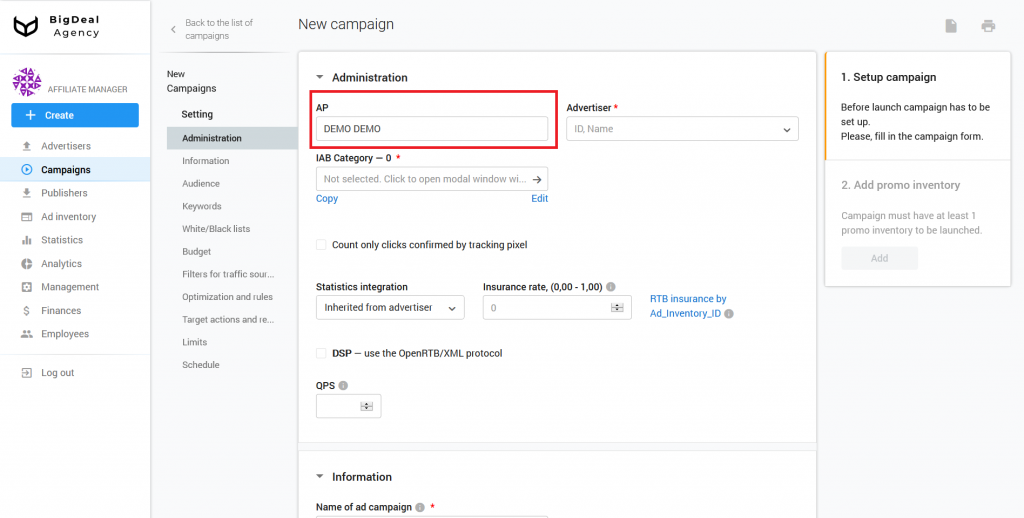
You will see the settings page. Let’s create a campaign. As an example, we’ll take the advertiser example. He is attached to the DEMO DEMO affiliate program, so select it in the AP field.
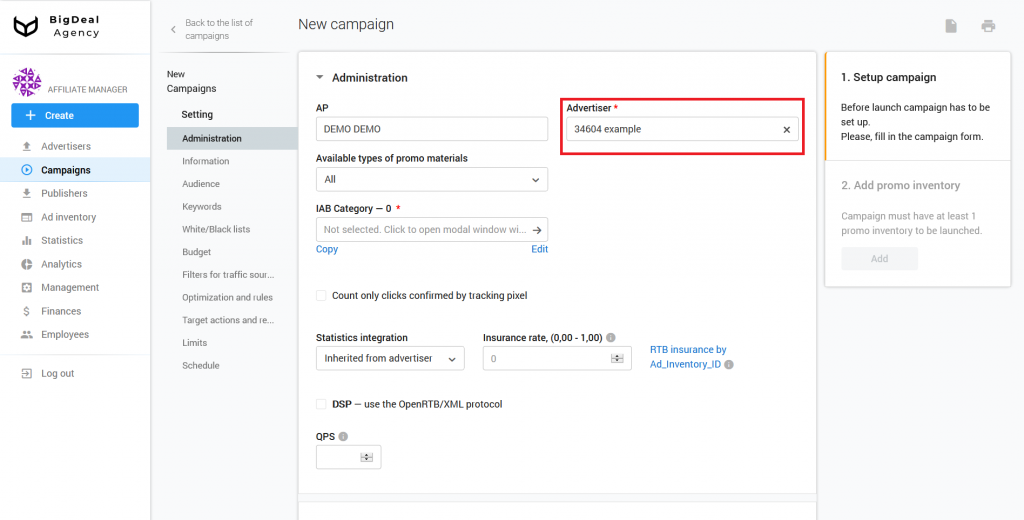
Specify example in the Advertiser field. Here you can write down both the name of the advertiser and his number (ID).
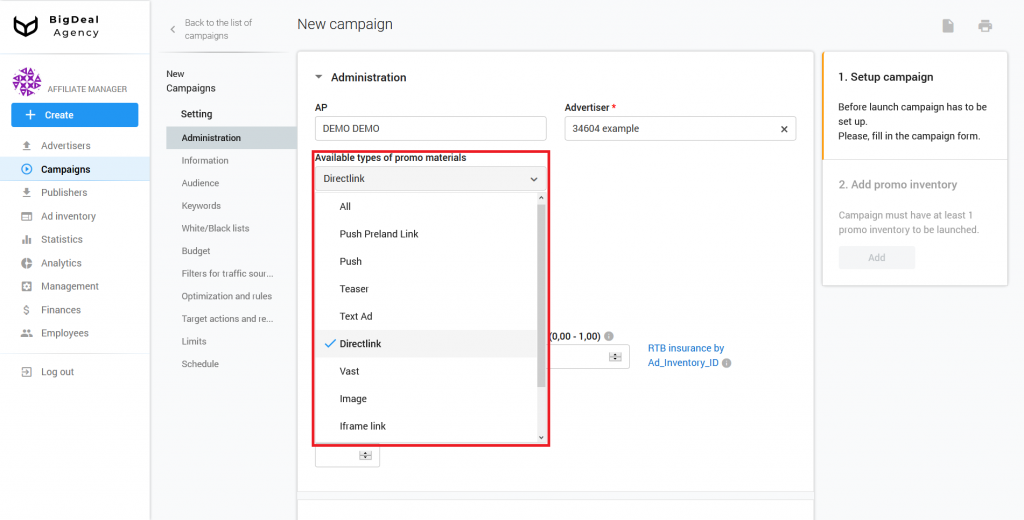
Select the appropriate type in the Available types of promo materials drop-down list. It depends on the advertiser’s offer.
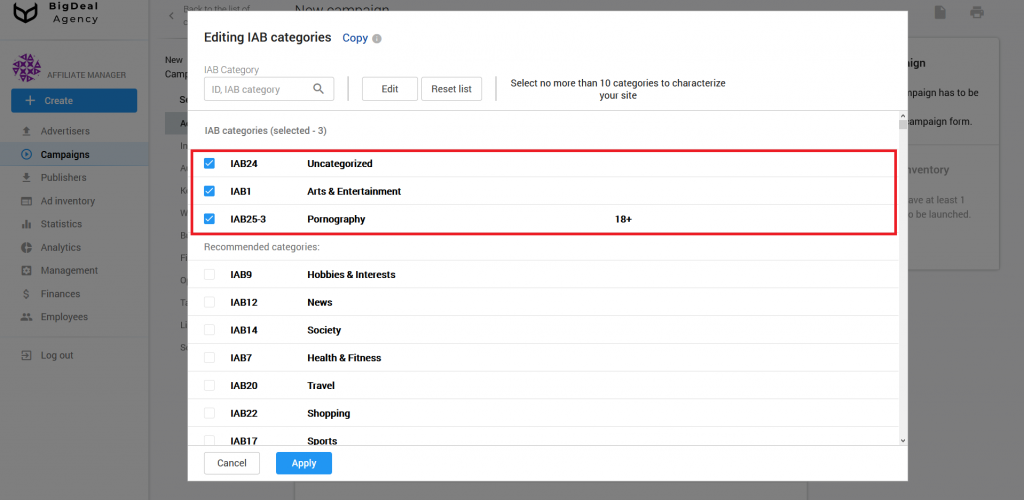
IAB category is a required setting. Indicate one or a few categories to which your campaign belongs. We recommend selecting no more than 10 categories. IAB categories are required for more precise targeting.
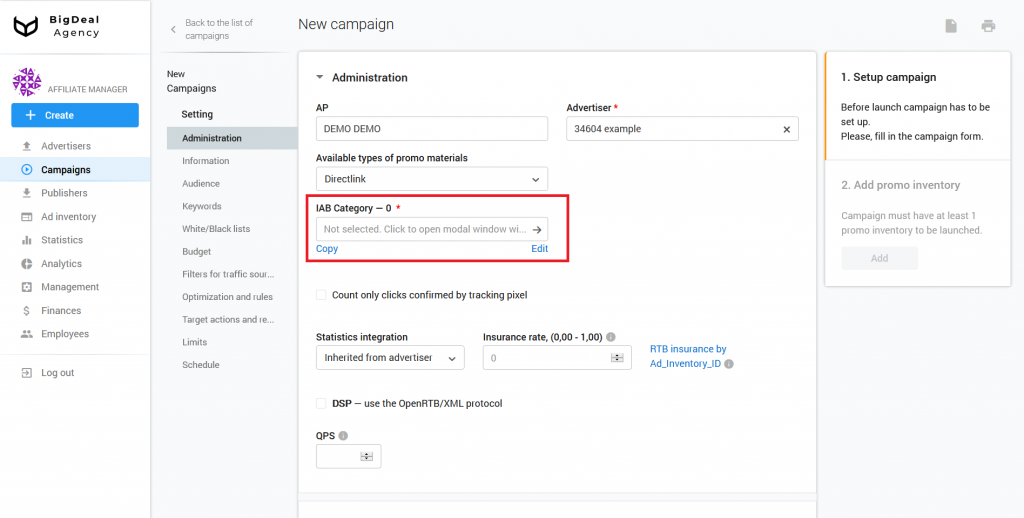
If you can not select a category, set the IAB24 – Uncategorized or IAB1 – Arts & Entertainment, because they have a very broad definition. If the campaign contains sexually explicit material, select IAB25-3 – Pornography. In this case, only adult sites will display the campaign.
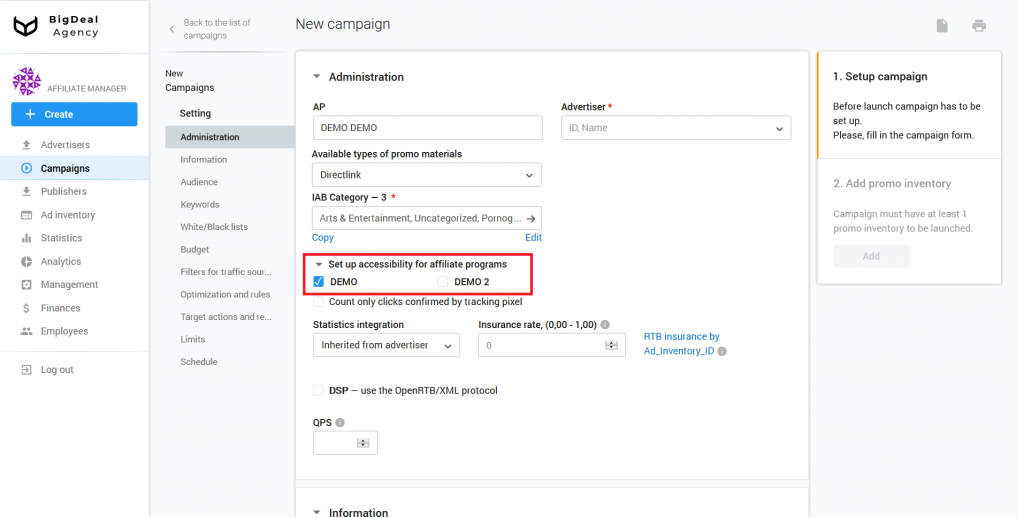
If you have purchased the Multibranding service package, you can set up accessibility for affiliate programs. We will select DEMO DEMO as an example. The traffic will go to the campaign from the chosen affiliate program.
Please note: the list of affiliate programs may vary depending on the access rights of your account on the platform.
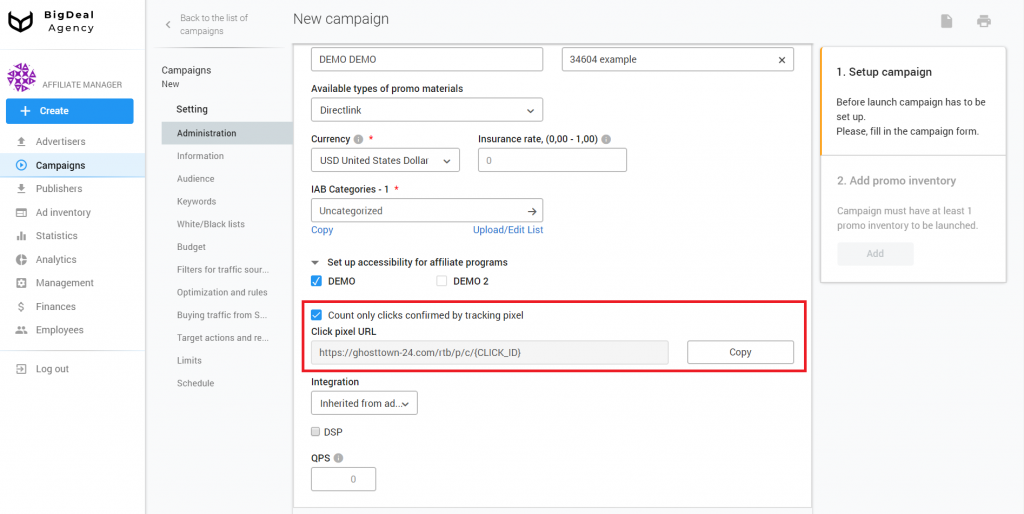
Pixel click is a link that allows you to track the number of clicks on promo material. A pixel is a 1×1 transparent element. It is added to the advertiser’s landing page.
We will skip the pixel click as it is an advanced setting. Below you can read about the installation and operation algorithm.
More information about the pixel click
Typically, a click is a user click on ad inventory link. However, not in all cases, the user who clicked will visit the landing page. Sometimes the technical features of the advertiser’s integration do not allow the system to take into account clicks in the usual way.
A pixel will be useful in the following cases:
- An advertiser filters traffic on his side but can report on clicks using a pixel.
- When a user is redirected from promo material to a Target URL, significant traffic loss occurs. You can suggest the advertiser place a pixel for tracking transitions on his side.
- If the advertiser uses JS banner promotional materials from other networks. If he uses other JS scripts of other networks, click tracking on his side his impossible. Such scripts are capable of supporting pixel click calls for tracking confirmed clicks.
- When a user, bypassing TDS, is redirected from the publisher’s site directly to the advertiser’s site. Here the pixel can be used to track Without TDS visits.
Tick the box Count only clicks confirmed by tracking pixel to use this option.
There are a few different ways of pixel integration. The advertiser determines which transmission of click data he prefers. However, regardless of the integration method, the advertiser must make a request to the specified URL. Instead of {CLICK_ID}, he needs to pass the click_id value, which was substituted in the Target URL when the user was redirected to it.
Each time a user goes to a landing page from advertising material, and a pixel loads successfully, the platform will consider this as a click. If there is a visit without loading the tracking pixel, it will not be counted.
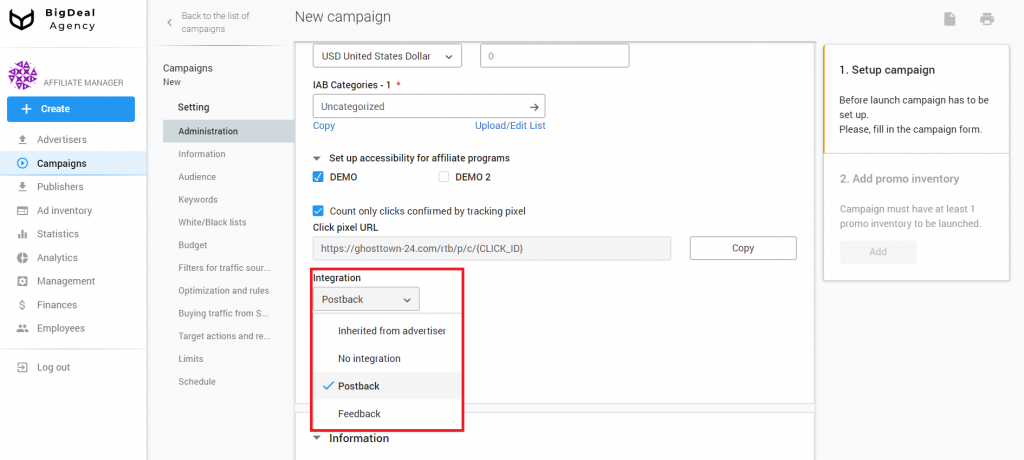
You will need the Integration field when you want to receive information about conversions. Integration is necessary for the creation of CPA, CPC, or CPM campaigns. You will also need it if you optimize traffic sources by ROI. There are the following types of integration in the drop-down list:
- Inherited from advertiser. The platform uses the type of integration that is specified in the advertiser’s settings.
- No integration. This option is suitable for CPC / CPM campaigns, where there is no need to consider the number of conversions.
- Postback. Select this option when conversion information is passed via a postback. You can read about it in the article Integrate MANAGED advertiser via postback URL.
- Feedback. Use it when the campaign runs on RTB protocol or feed. You can get more information about the setting of DSP campaigns in the article Integrate DSP MANAGED advertiser (coming soon).
Postback is the most common type of integration in the creation of a CPA campaign, so we’ll select it.
Insurance Rate displays the percentage of the advertiser’s payment that is deducted as insurance. Specify it as soon as the offer receives traffic. Compare statistics in your system and in the advertiser’s system. If there is a difference, set the insurance rate.
Type insurance as a percent proportion. For example, if insurance equals 10%, indicate a value 0.1.
Please note: the insurance rate in the campaign takes precedence over insurance rate that was previously specified in the same field of the advertiser account.
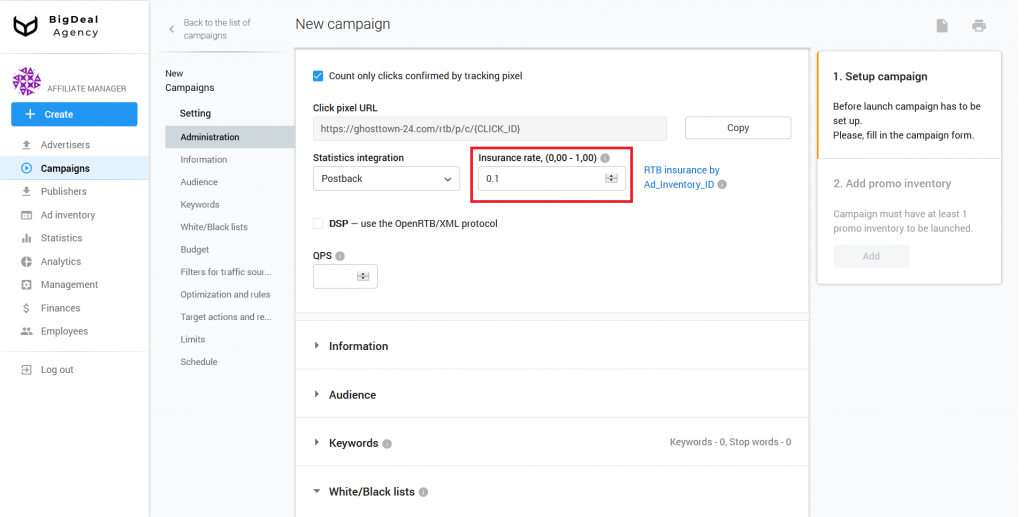
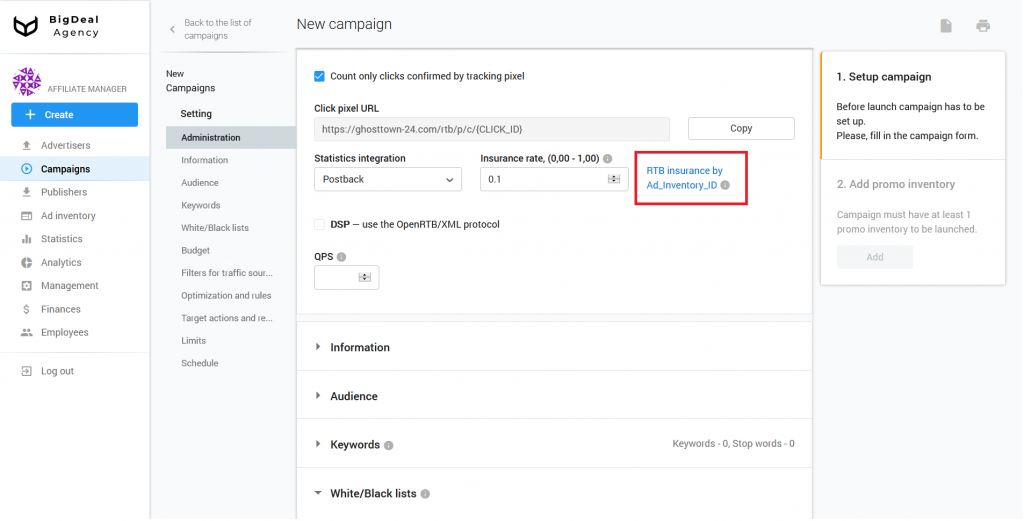
You can also set the insurance rate for ad inventories via the appropriate link.
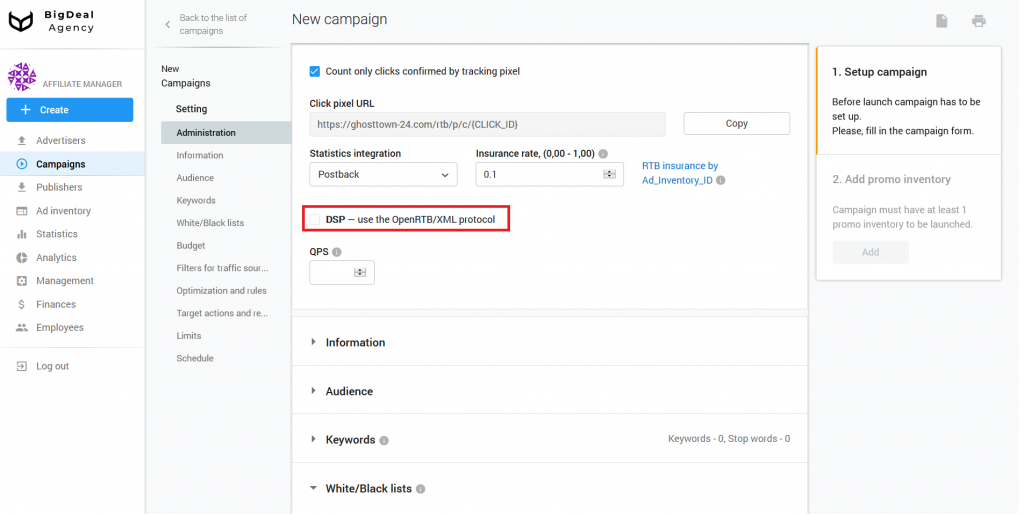
Use the DSP option when setting up RTB campaigns. Read more about this in the article Integrate DSP MANAGED advertiser (coming soon).
We’ll skip this setting because the CPA campaign doesn’t need it.
QPS is the number of queries per second. We do not recommend specify QPS more than 60 for new campaigns. You can change the previous value after the campaign test.

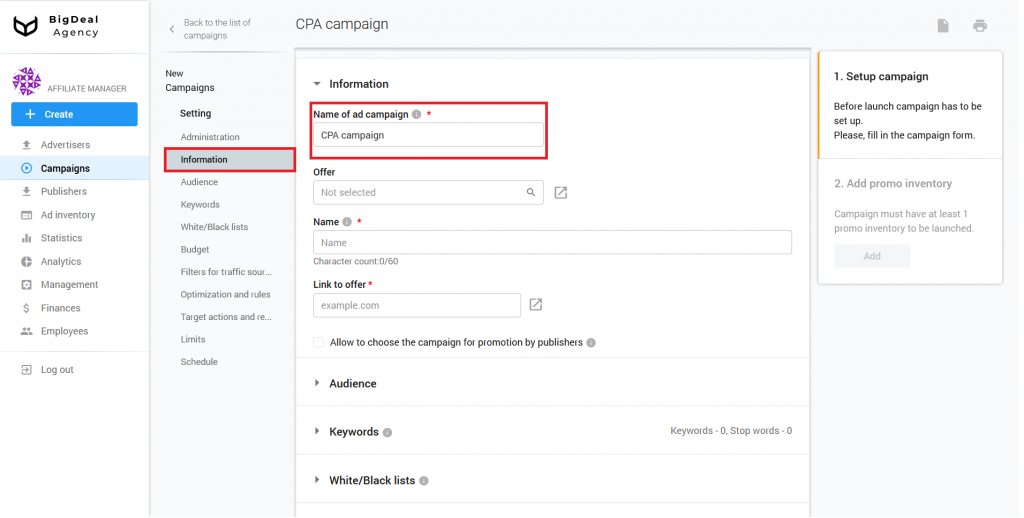
Block Information #
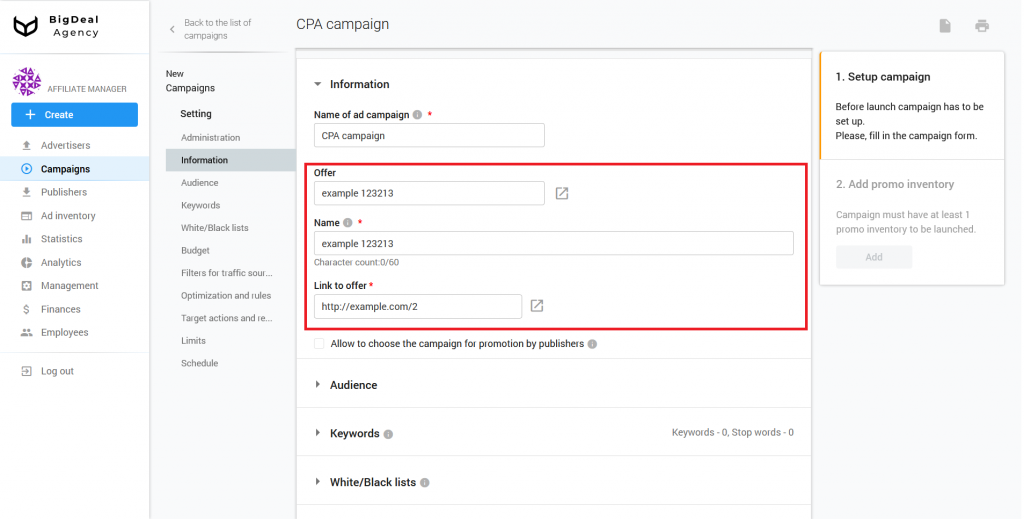
The next section is Information. Specify the name of the campaign in the relevant field. You can copy it from the affiliate program located on the advertiser’s website.
As soon as you select an offer from the Offer drop-down list, the system will automatically fill in the Name and Link to Offer fields. If there is no offer or this is the advertiser’s first campaign, the lines will remain empty.
You can create an offer right during the campaign launch. Add details to the following fields of the Information block:
- Name. Usually, it matches the one specified by the advertiser.
- Link to offer. Paste a link to the offer.
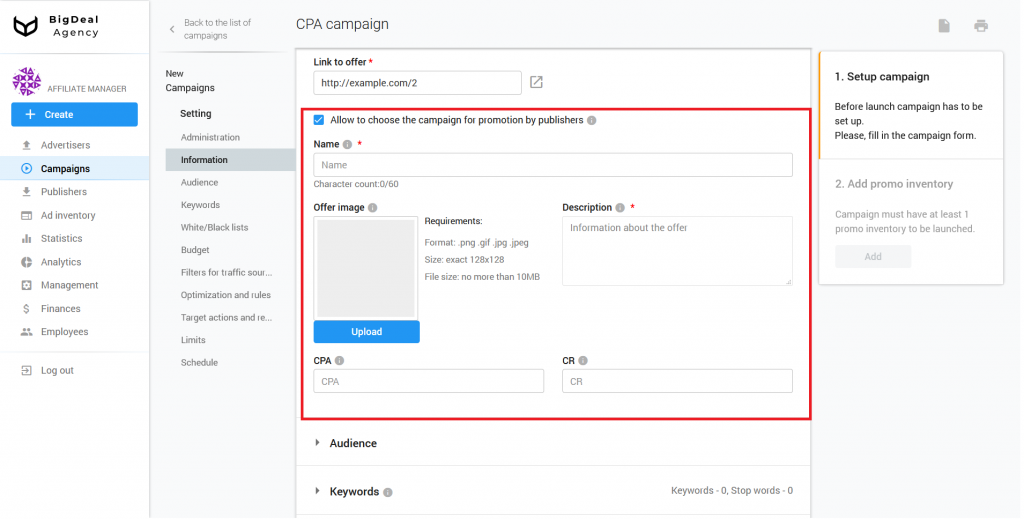
The Allow to choose campaign for promotion by publishers feature makes the campaign available for publisher. He will be able to choose a necessary campaign for further advertising promotion on his dashboard.
If you want to give the publisher access to the campaign, tick the box next to this option, add an offer image and a detailed description of the campaign. You do not need to specify targeting requirements in the description. All targeting restrictions will be automatically visible to the publisher.
If you want, you can add information about CPA and CR. Publishers will see this information in the description of the offer.
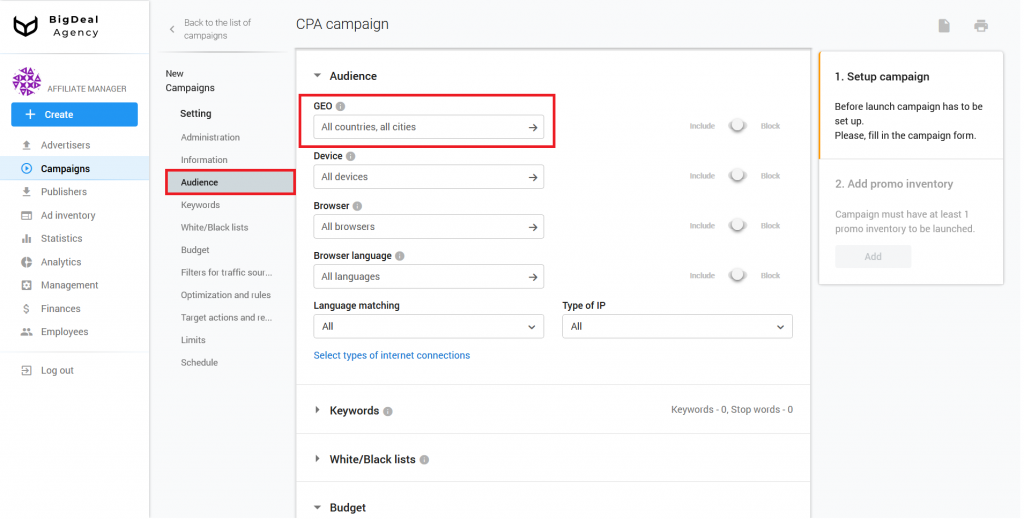
Block Audience #
Let’s move on to the audience setting to make targeting more accurate. Select the countries and cities where the offer will be shown in the GEO column.
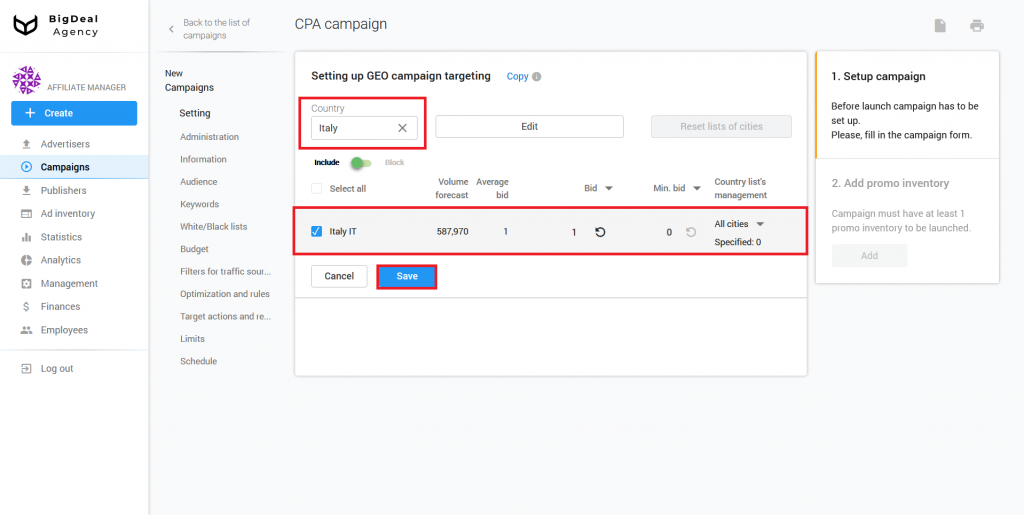
Click on the field, and you will see a list of countries where you can get traffic. For example, let’s choose Italy. Tick the box next to the name of the country and save the changes.
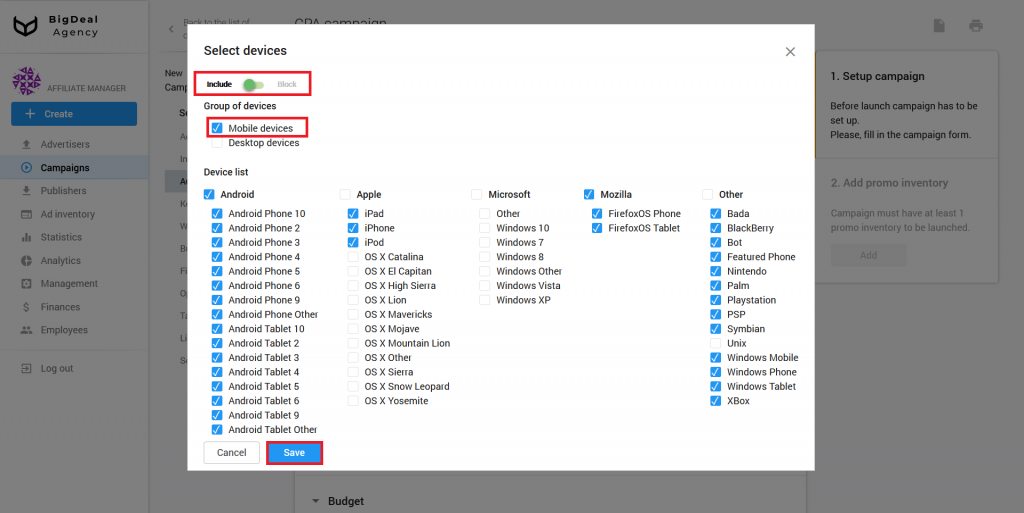
The next field is Device. Here you select devices (Mobile/Desktop). They will or will not show ads. Let’s suppose that we have a mobile offer. Select Mobile devices and the Include option. Save settings.
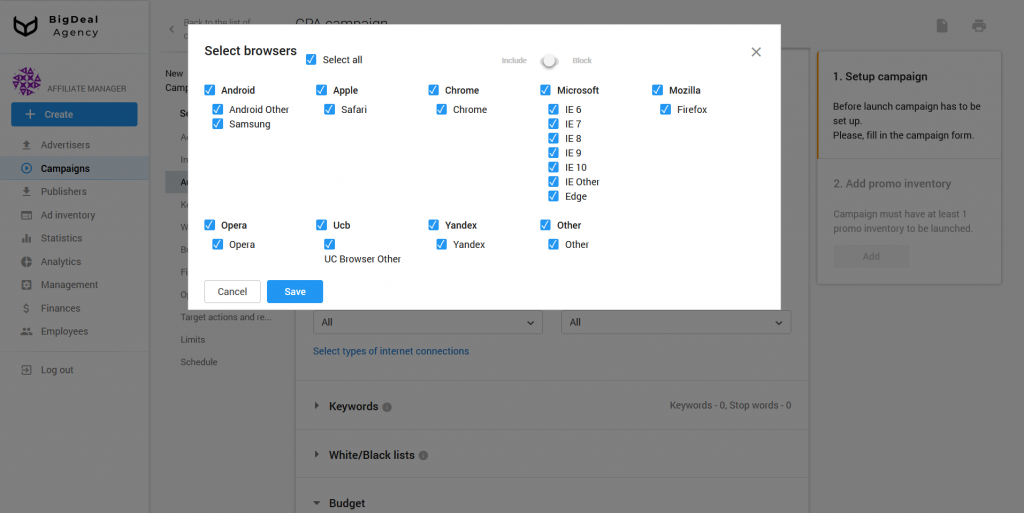
Browser is an optional setting. With its help, you can select browsers that will or will not show ads. An advertiser may have some restrictions that he should mention in the offer settings. If the advertiser doesn’t provide this information, the field will be blank.
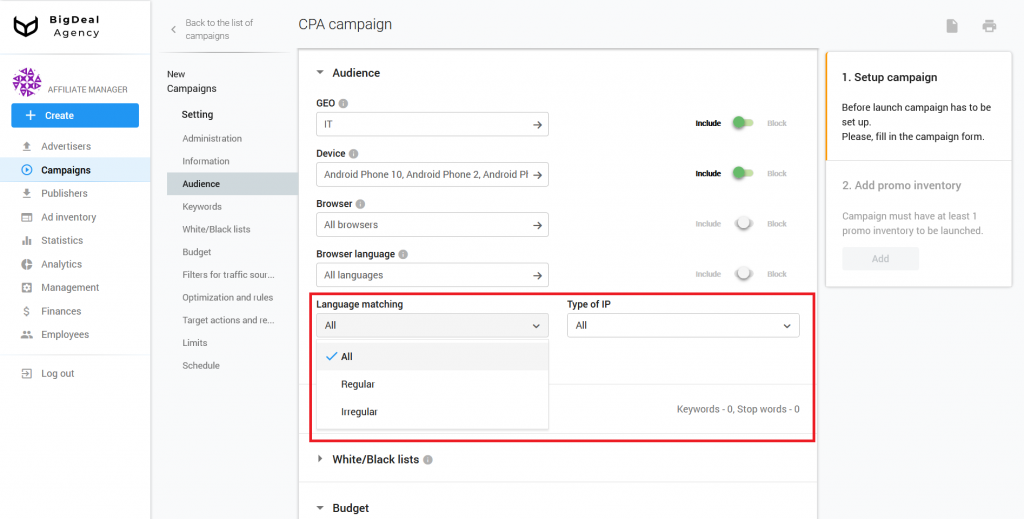
You can set certain restrictions in the lines Browser language, Language matching, Type of IP at the request of the advertiser.
In the section Language matching you can specify the preferred browser language. Let’s say a person is in the UK and uses a browser in English. The language is regular. If under the same conditions, the browser language is Russian, then this is an irregular language. If you want to target only the British, the setting will allow you to avoid, for example, tourists, travelers, or foreigners.
Block Keywords #
In the next block, you can choose which keywords will drive traffic.
Type all keywords that are directly related to your advertiser and campaign in the field with the same name (comma-separated). You will receive traffic only from sites with them.
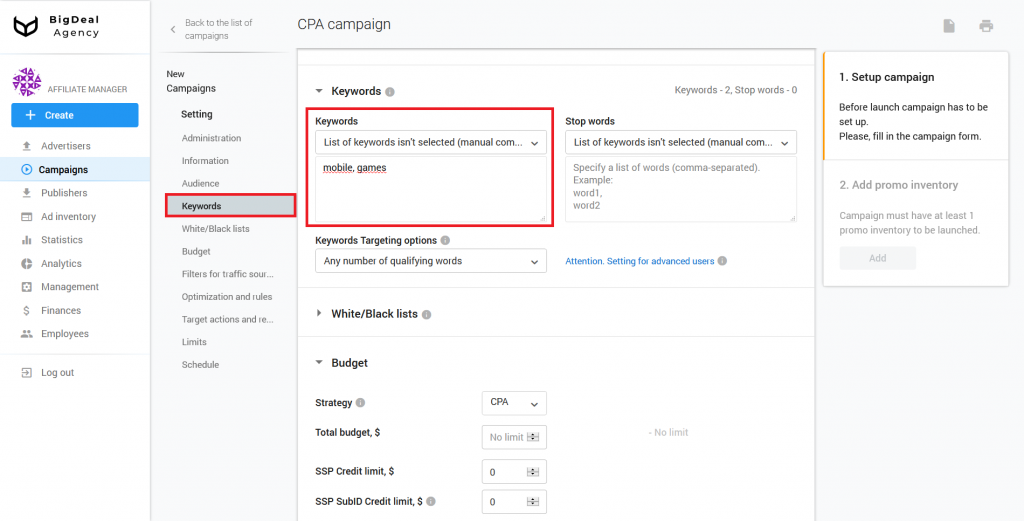
Stop words are the opposite of keywords. Indicate a list of stop words, and pages with these words will not show your ads. For example, this may include any adult words or words with a dual meaning: porno, free.
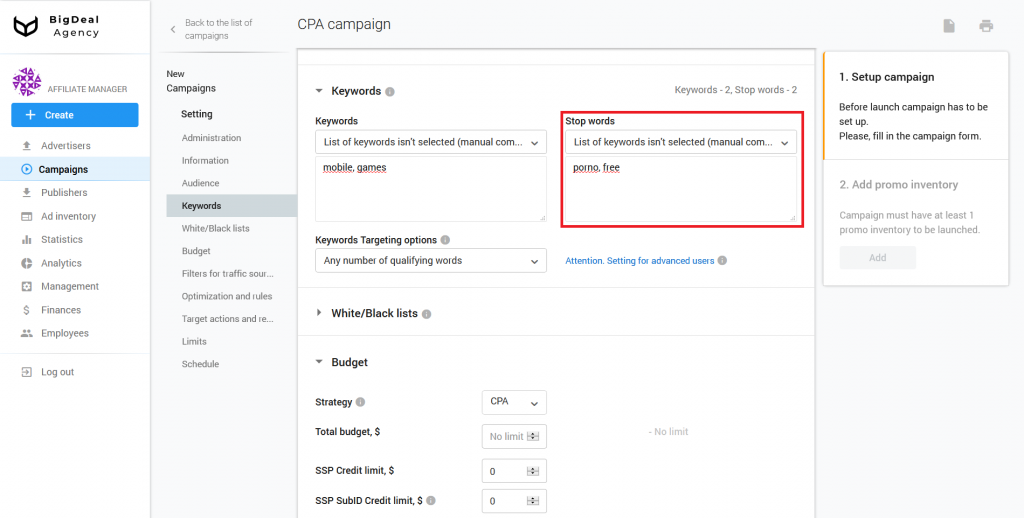
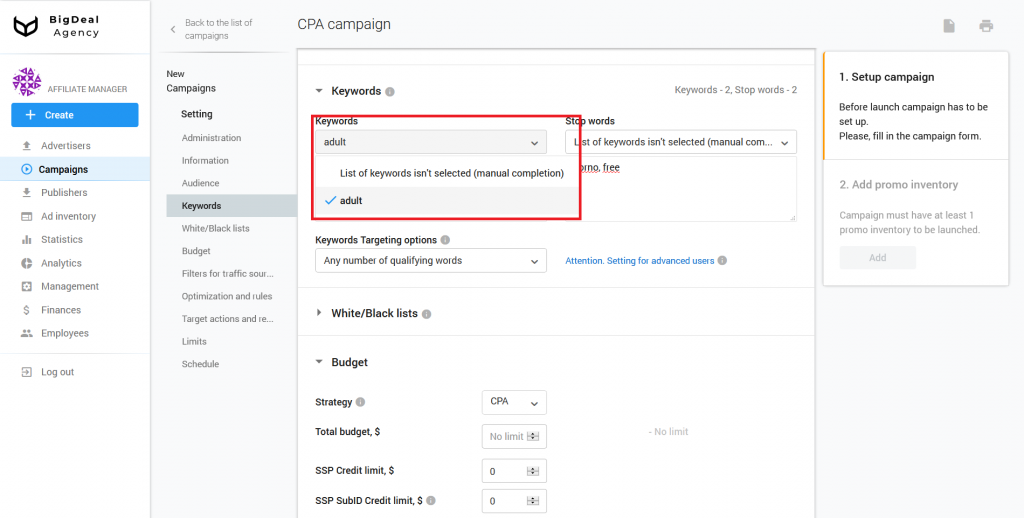
You can use prepared sets of keywords and stop words for the adult category. Select them from the drop-down lists.
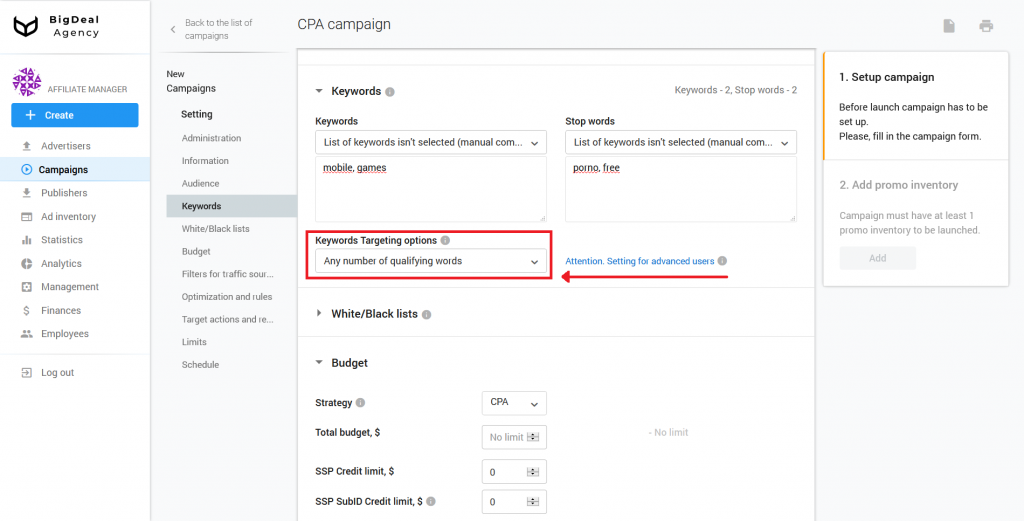
Skip the Keywords Targeting options field because it is useful for more advanced settings. We will analyze the process of working with keywords in a separate article (coming soon).
Block White/Blacklists #
Work with this block as soon as you receive test traffic.
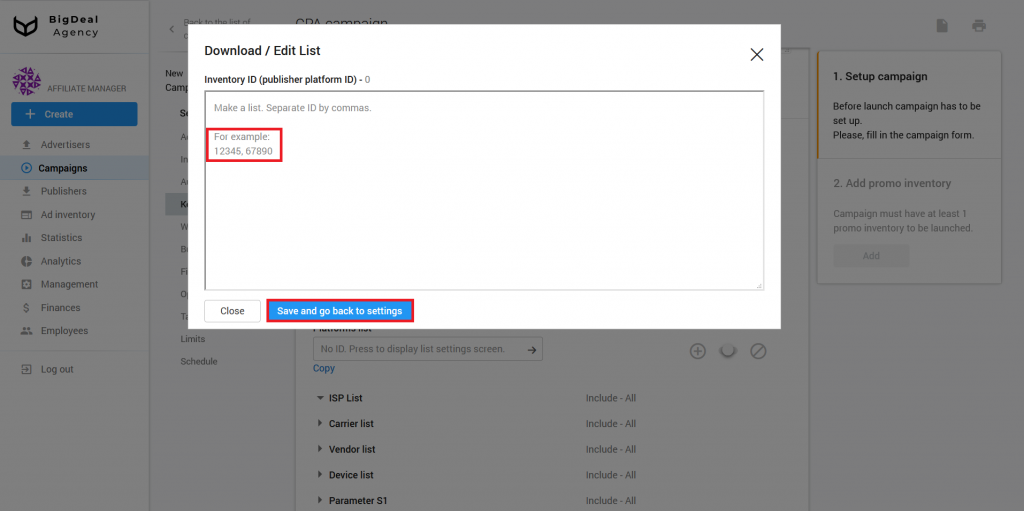
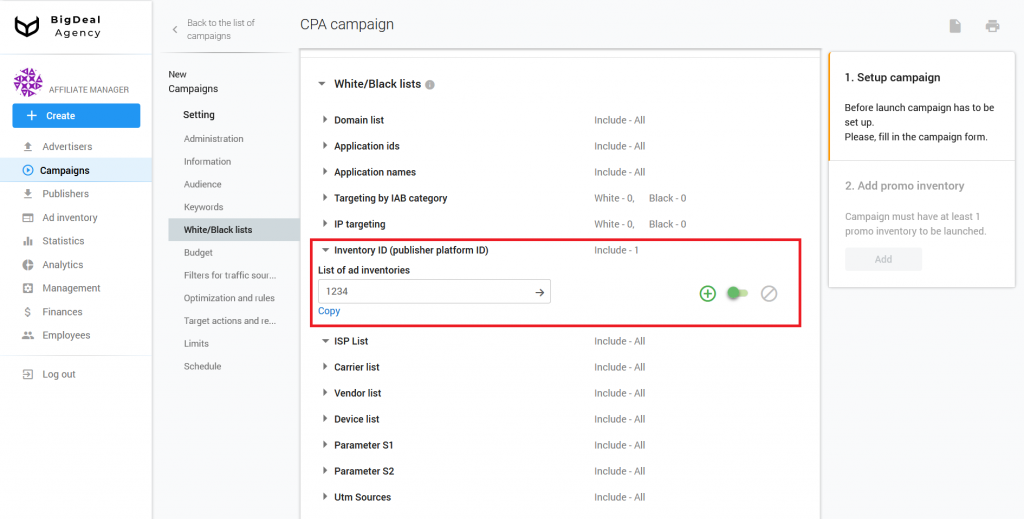
If your campaign needs some specific traffic from desired domains, add them to the Inventory ID field. Make a list of their IDs (comma-separated) and click Save and go back to settings.
If you click on an + icon, traffic will go from the marked ad inventories. If you click on a crossed-out circle, Salematics will block traffic from these ad inventories.
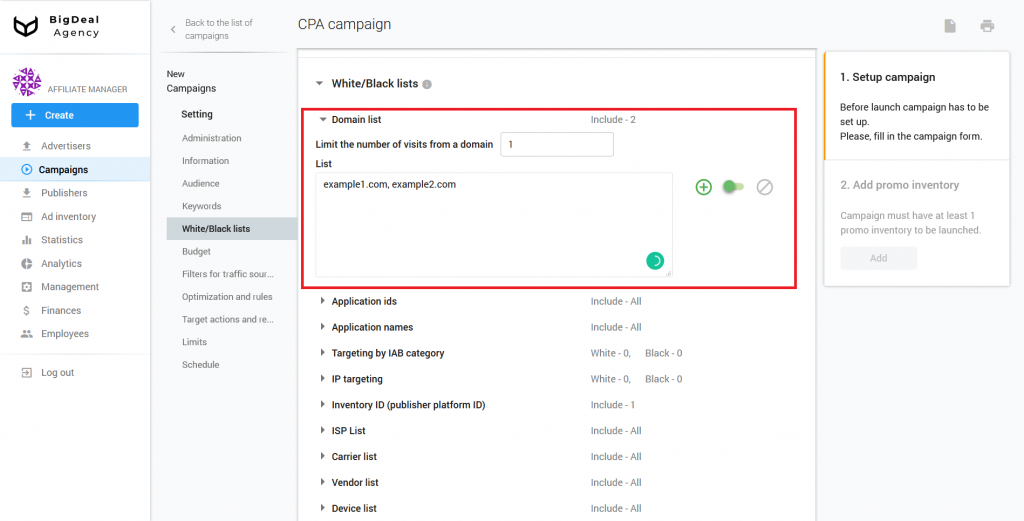
The same goes for domains. Moreover, you can limit the number of visits from a domain. Add the desired number in the field with the same name.
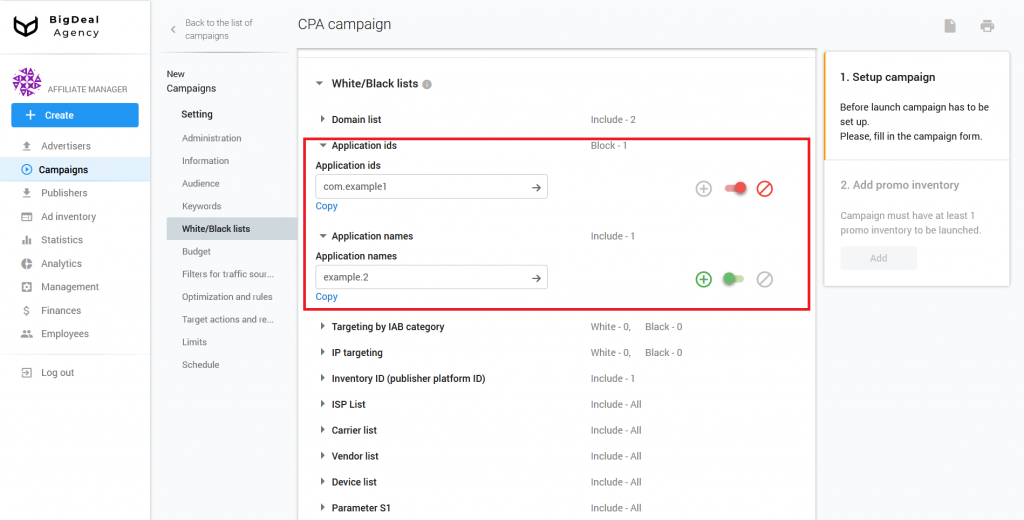
Application ids and Application names allows to target on specific mobile applications. These options work the same way as Inventory ID.
Each publisher’s ad inventory receives one or more categories that describe its content. Using the Targeting by IAB category field, you can target your campaigns to an ad inventory with specific content: movies, cars, education, etc.

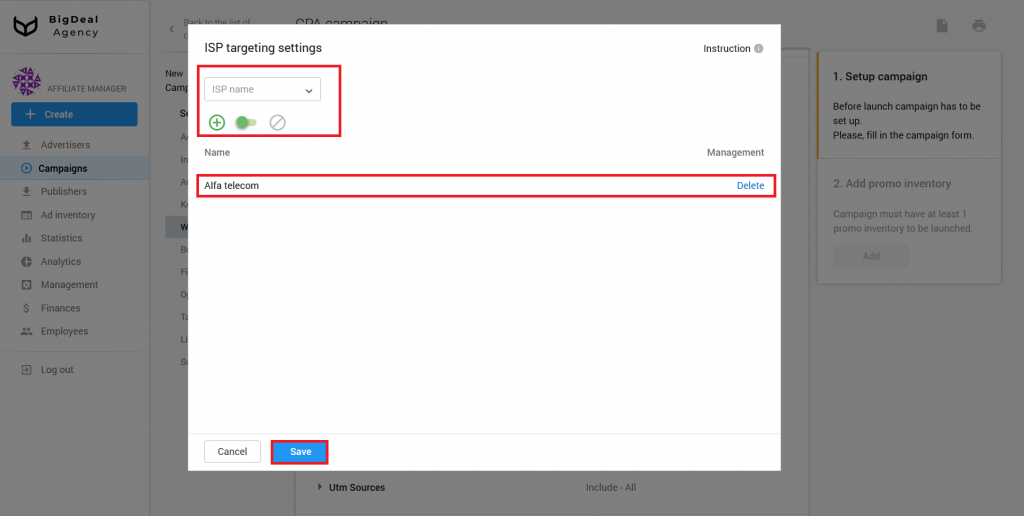
ISP List allows you to choose an Internet provider for targeting.
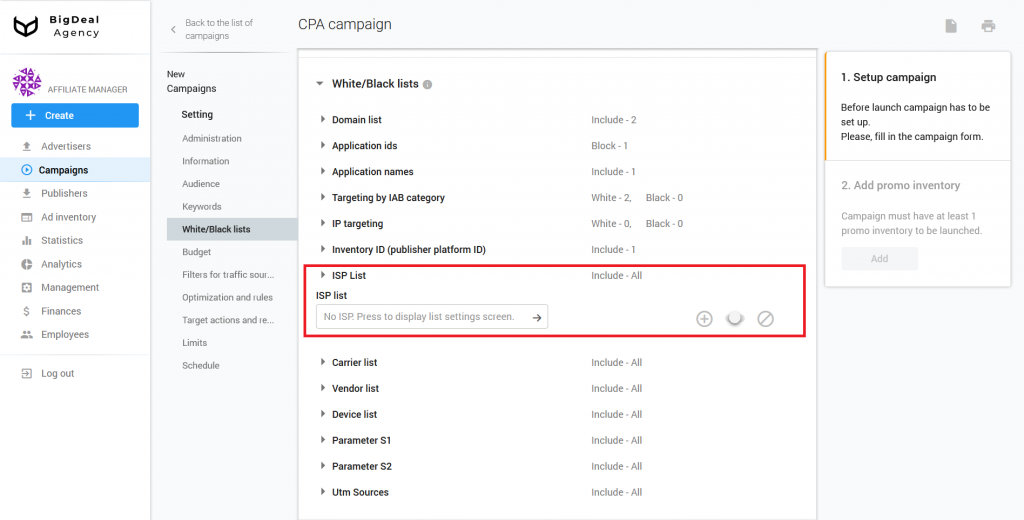
To add a provider, enter the ISP name in a separate window and save the settings.
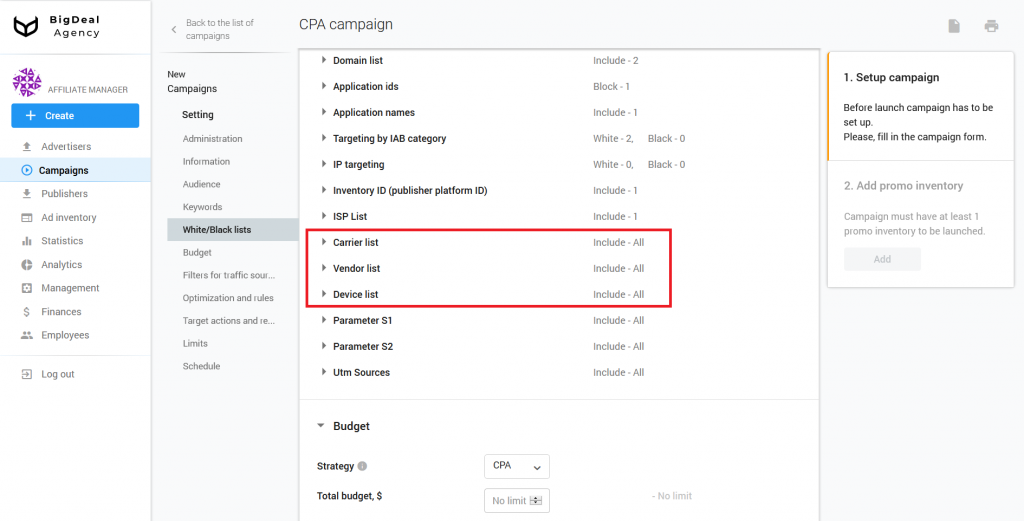
The White/Blacklists block has another targeting functionality:
- Carrier list defines the provider of communication services.
- Vendor list means the manufacturer of the device.
- Device list allows you to select the device model name.
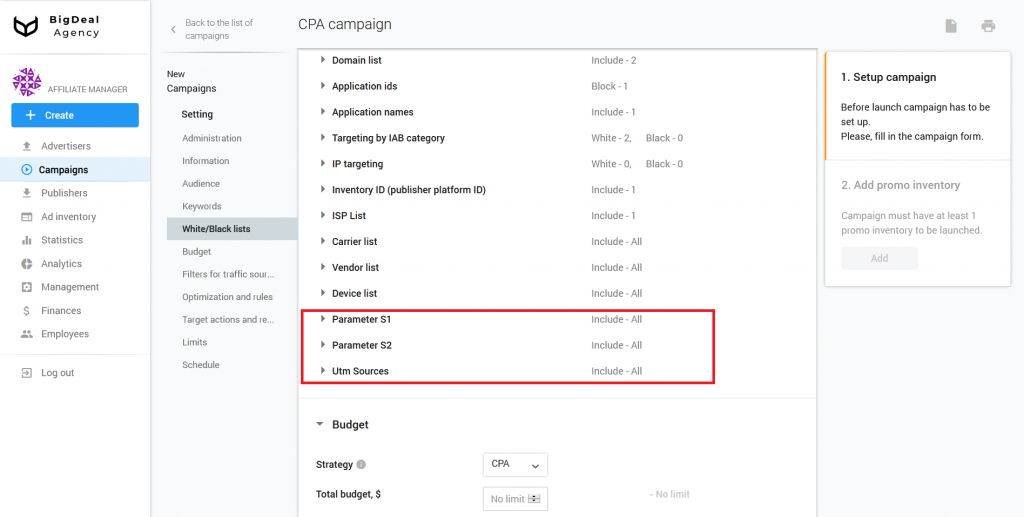
You can use Parameter S1, Parameter S2, and UTM Sources settings.
Let’s take a closer look at the special parameters S1 and S2 that are passed with a click. The S1 parameter passes a first level Sub ID. The S2 parameter passes a second level Sub ID. Suppose that the publisher uses this ad inventory on many sites, and he sends the site domain name in the parameters. You have one ad inventory, and you can filter traffic from different sites and domains by passing the specific domain name in the parameters. The database receives this information and sends it to the advertiser for further work. Filtering by the parameters S1 and S2 can be set in the future.
Another parameter is UTM Source. It is a hash sum of values: domain + S1 + S2. You can use it for the advanced setting of White/Blacklists.
Each traffic provider can be divided into sub-sources: S1, S2, UTM Source, or Domain List. You can find sub-segments in the traffic flow of a publisher or ad inventory that does not satisfy the quality. Disable them without blocking the entire traffic flow of this publisher or ad inventory.
Block Budget #
Select a strategy in the next block: CPM, CPA, CPC, or RTB. We will select CPA.
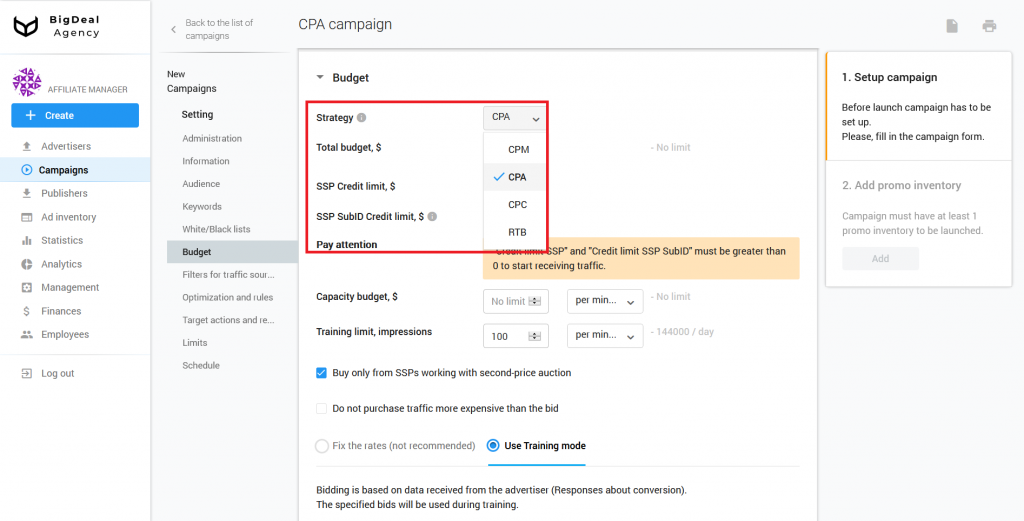
Set the amount that the advertiser is ready to spend on traffic in the column Total budget (by agreement with the advertiser).
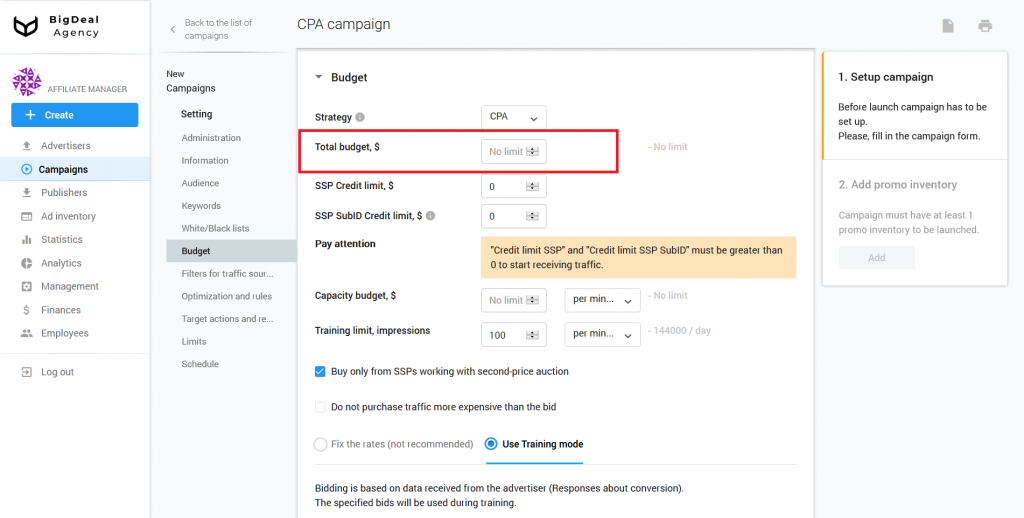
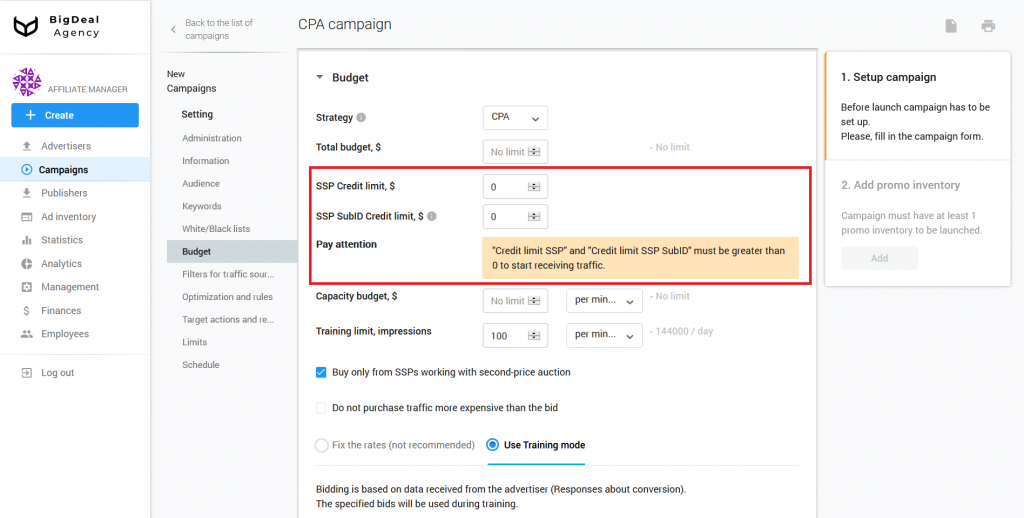
SSP Credit limit limits the buying of traffic from the ad inventory. If the ad inventory exhausted this credit, traffic will not come until the advertiser notifies you of the conversions and income from them.
You can also set the size of the credit limit to test the ad inventory. Add it to the SSP SubID Credit limit field. For example, a limit of $3 means that the buying will stop when a traffic source with an UTM Source goes to -$3.
Read more about this in the article Launch CPA campaigns for buying from SSP or in a document on the platform.
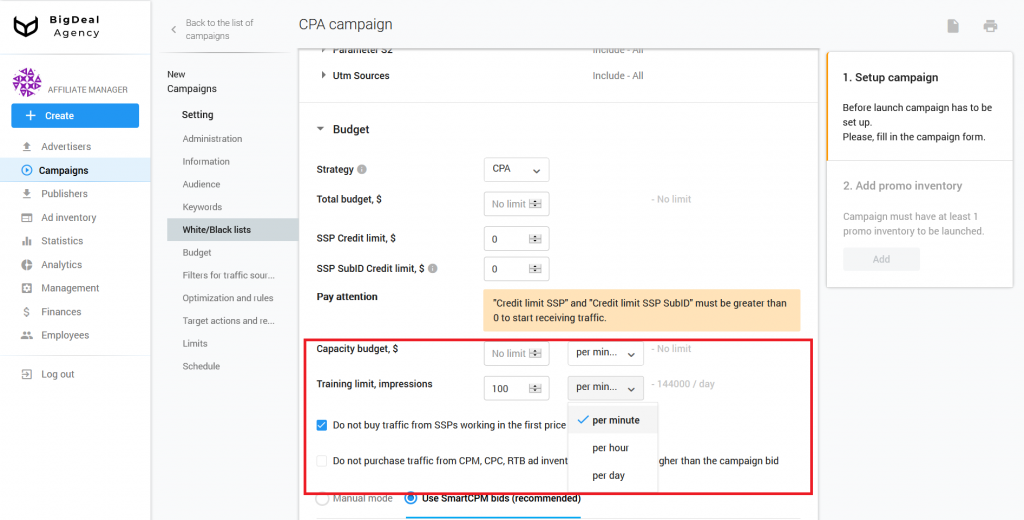
You can specify a click budget by minutes, hours, and days in the Capacity budget field.
The Training limit allows you to limit the number of impressions for training by minutes, hours, and days. The term training is understood to be the data availability based on which you can predict rates. There are 100 impressions per minute by default. This is the optimal number. If you want to make the learning process faster, increase the number of impressions. Read more about the learning process and working with bids in the article General principles of the advertising platform.
You can also use the following settings:
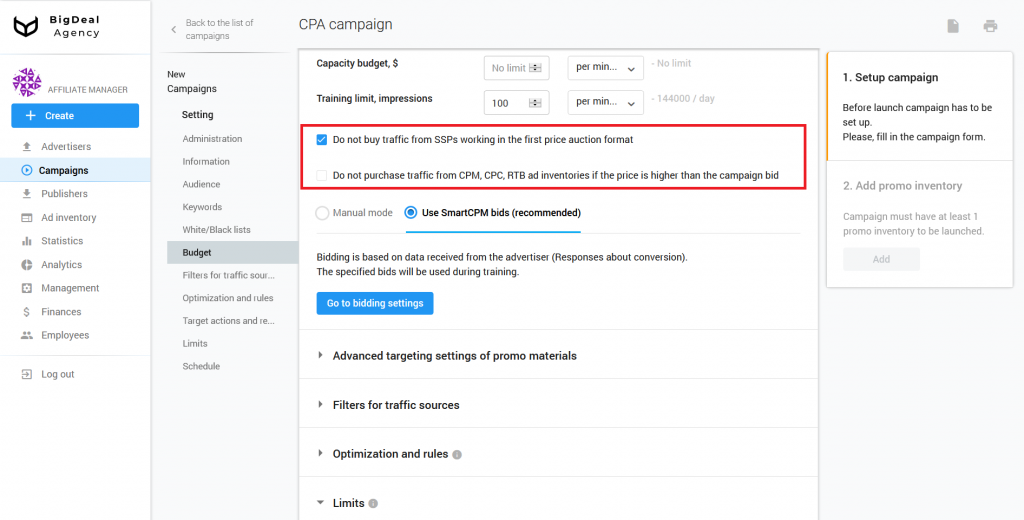
- Do not buy traffic from SSPs working in the first price auction format. If you use this option, the highest bid campaign will be the winner. The advertiser must pay the price of the next competing campaign + a predefined extra charge.
- Do not purchase traffic from CPM, CPC, RTB ad inventories if the price is higher than the campaign bid. The campaign will not buy traffic if the cost set on the ad inventory is higher than the estimated impression value.
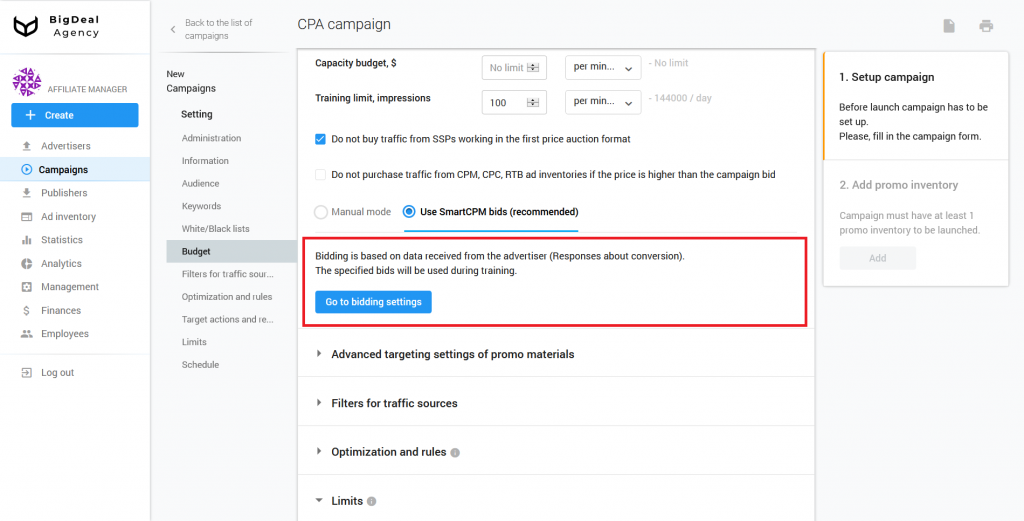
We specified the CPA strategy, so we need to choose one of the options:
- Manual mode. Select this option if the advertiser does not give you information about conversions for several reasons. For example, there is no agreement or technical possibility.
- Use SmartCPM bids. In this case, the platform sets the initial CPM rates, and use them for all unknown traffic sources. Bidding is based on data received from the advertiser.
By an unknown traffic source, we mean a small segment of traffic. It is called a cluster. All traffic that comes to you is divided into clusters. They consist of the source, country, language, device, and user’s capacity to pay.
20% of the traffic from the cluster will participate in the training of the campaign. When a campaign receives 10 conversions from a cluster or more than 500 impressions, bidding is considered trained for the cluster and campaign. So, it is a known source. The platform will make further bidding based on conversions for the current campaign, which were committed within a particular cluster.
Platform will use CPM bids until the bidding algorithm receives enough data about the effectiveness of the campaign when working with a particular cluster. This will allow the campaign to participate in the auction and collect the necessary amount of statistics.
We have a CPA offer, so we select Use SmartCPM bids. If you do not select bids for countries, the platform will use the average values of bids.
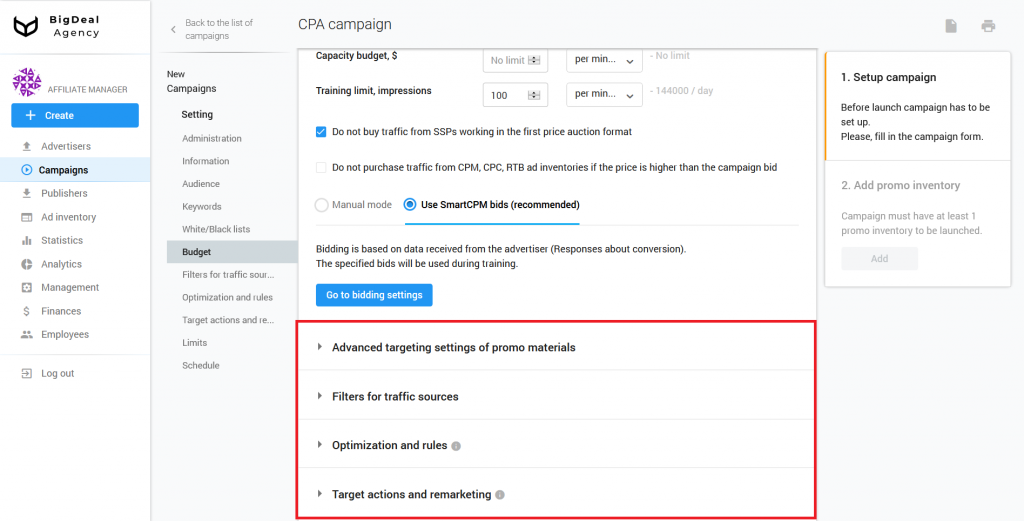
Blocks for Advanced Settings #
You don’t need the blocks Advanced targeting settings, Filters for traffic sources, Optimization and rules, and Target actions and remarketing for the usual campaign settings.
You can find complete information about the settings in the following materials:
- Advanced targeting settings (coming soon).
- Filters for traffic sources — Setup JSTDS Filters in Campaigns.
- Optimization and rules — How to set up Automated Rules in Campaign.
- Target actions and remarketing (coming soon).
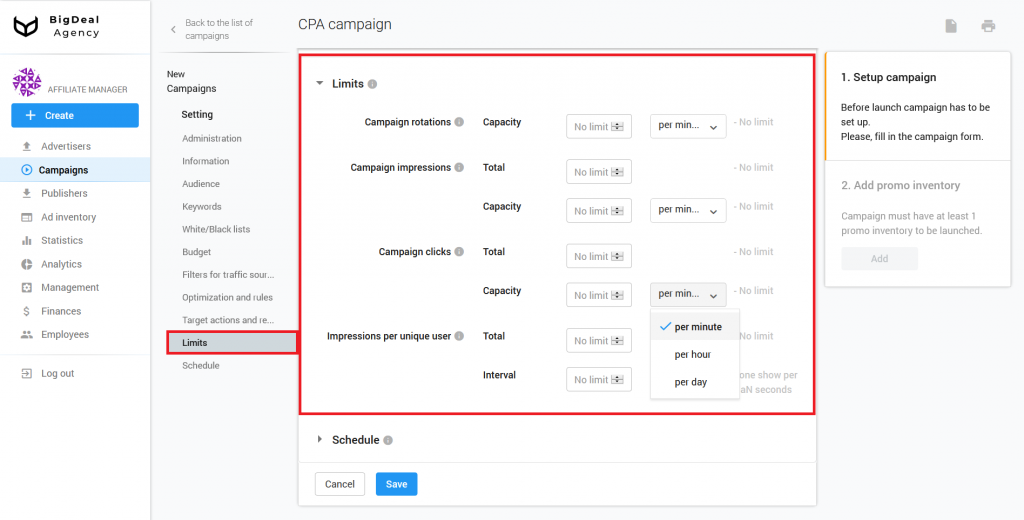
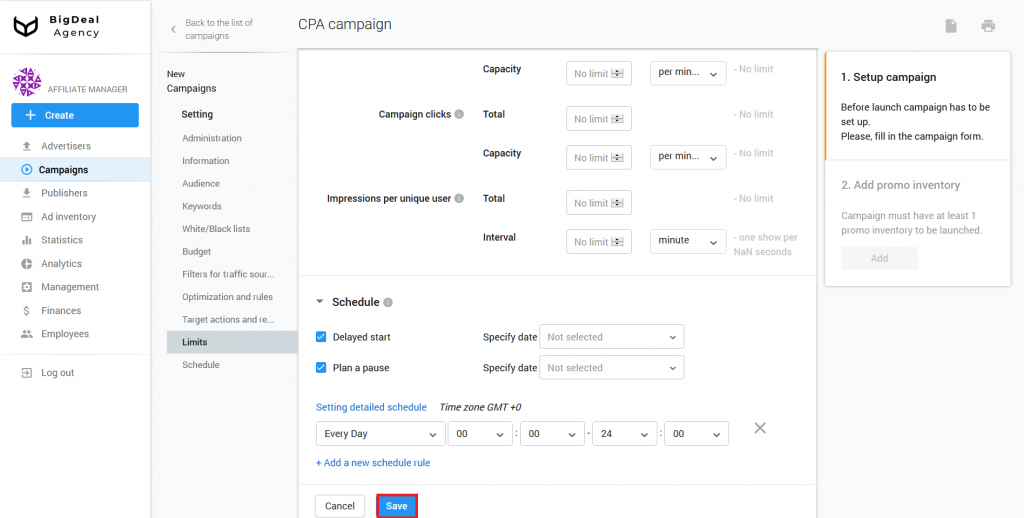
Block Limits #
Let’s move on to the Limits. Here you can set up the impression limit. There are the following types of limits:
- Campaign rotations. Specify it when the affiliate program has ad inventories with high QPS. The limit on the number of rotations will not allow overloading individual advertisers and their campaigns. The limit is set by minutes, hours, and days.
- Campaign impressions. In this field, you can enter the impression limits. They can be either general (Total) or limited (Capacity) to minutes, hours, and days. For example, our total limit will be 5000 impressions. It means that ads will be shown no more than 5,000 times.
Please note: we recommend setting impression limits for all new offers. This will allow you to avoid possible financial losses in case of malfunctions on the advertiser’s side and errors when setting up the campaign. When you make sure that your campaign works correctly, you can change your impression limits.
- Campaign clicks. The campaign will stop once the set click limit is reached. They can be either general or limited to minutes, hours, and days.
- Impressions per unique user is a limit on ad impressions for a unique user. They can be either general or impression interval with no limit or limited to minutes, hours and days, weeks, months.
Block Schedule #
In the final section, you can set up a delayed start and detailed schedule or plan a pause.
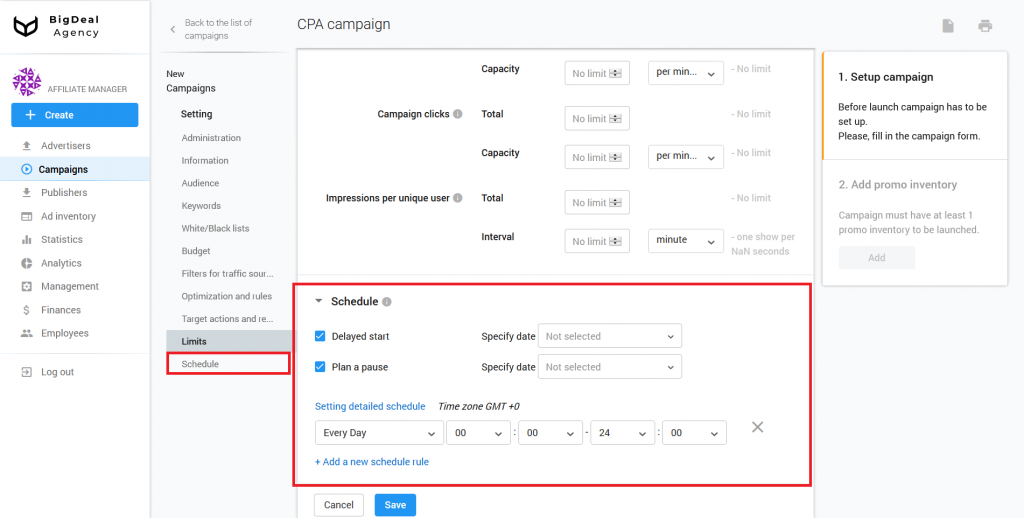
Make sure that you have entered all the necessary information and click Save.
Please note: the CPA campaign will be fully launched only after setting up the promo. The process depends on the type of advertisement. You can read about the algorithms for creating promotional materials in the following articles:
- Directlink creation and Integration Guide (coming soon).
- VAST creation and Integration Guide (coming soon).
- VIDEO creation and Integration Guide (coming soon).
- PUSH SUBSCRIBER SCRIPT creation and Integration Guide (coming soon).
- BANNER creation and Integration Guide (coming soon).
- TEASER creation and Integration Guide (coming soon).
Let’s summarize the material:
- Make sure that the advertiser and offer are already created on the platform before launching a CPA campaign.
- Fill out a special form to create a campaign. Settings block contains the required fields marked with a red asterisk.
- An advertiser may have campaign restrictions, which he mentioned in the offer settings.
- Each traffic provider can be divided into sub-sources: S1, S2, UTM Source, or Domain List. Very often, you can find sub-segments in the traffic flow of a publisher or ad inventory that does not satisfy the quality. In this case, disable them without blocking the entire traffic flow of this publisher or ad inventory.
- Set impression limits for all new offers.
- Check the Target URL for duplicate parameters when you specify it.
- Change the status of the company’s project to Launched to run the CPA campaign. You can do this only after setting up the promotional material.
