Highlights #
Popads JS are pop-ups where advertisers can place their ads. There are several variations of pop-up windows. A pop-up ad appears in front of the active window, and the pop-under ad opens a new browser window under the active window. Pop-under is a more subtle ad distribution technique. It does not attract the user’s attention until the active window is closed. This makes it difficult to determine the source of the pop-up window.
Many advertisers use Popads JS to promote wow products, collect contact information in return for a chance to win something, or to install cookies. The latter method will be useful if you work with online stores that use the Last cookie win attribution model.


Creation of Ad Inventory #
Before creating an ad inventory, make sure that the platform has a publisher account. A publisher can independently register an account via the main page of the affiliate program website, or you register it via the Salematics platform.
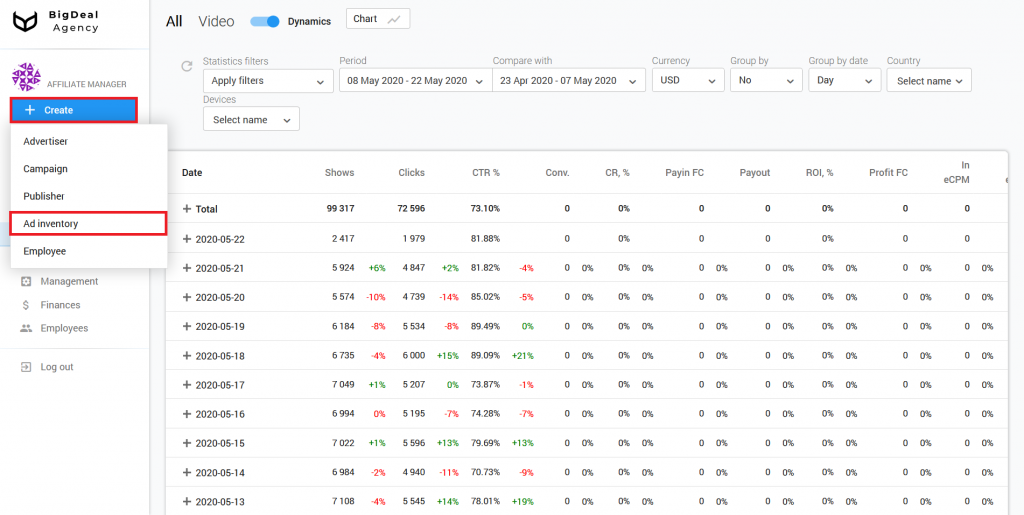
Click on the Create button to create a new ad inventory.
Block Administration #
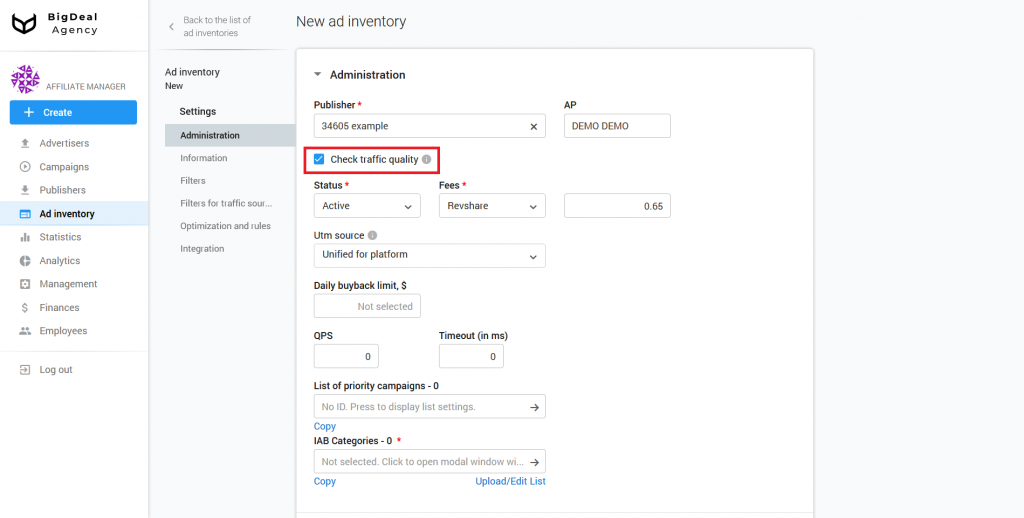
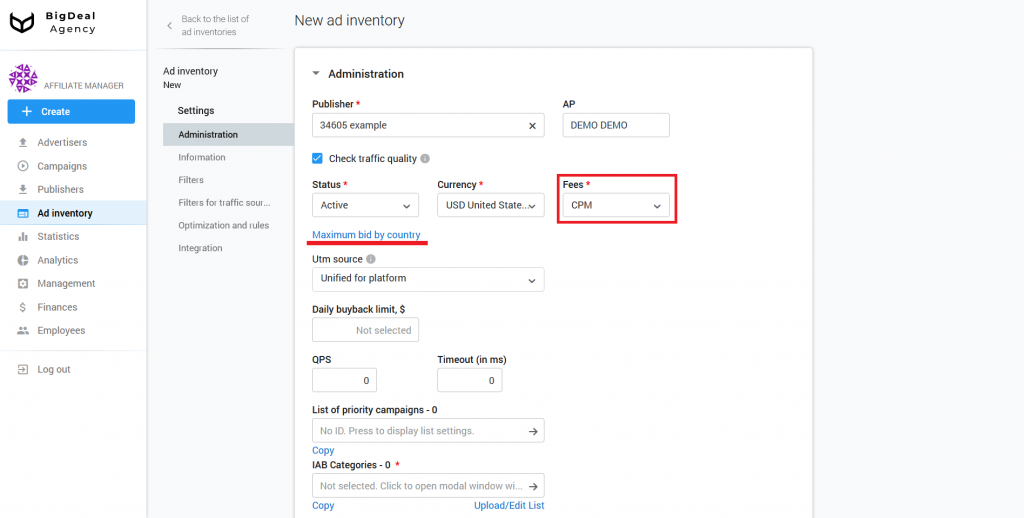
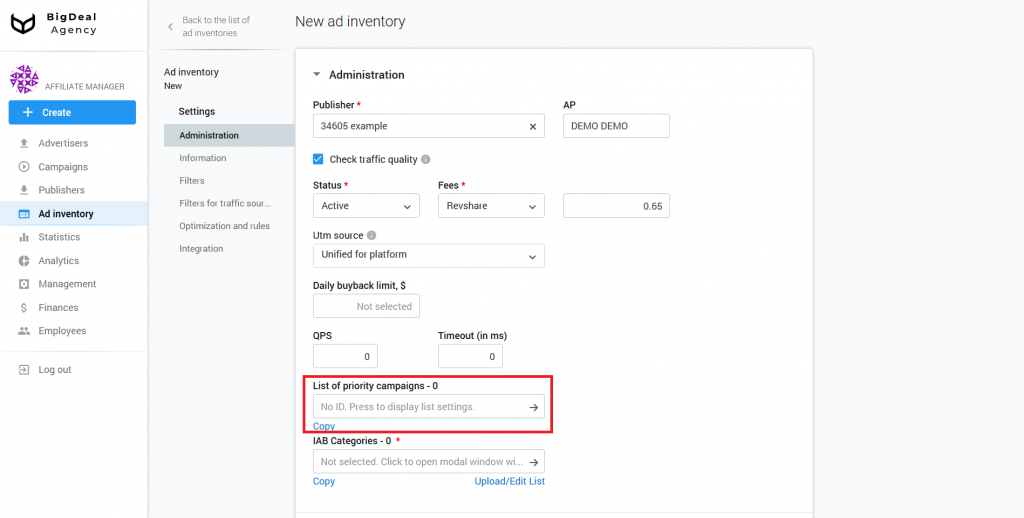
You will see the settings page. Select the publisher in the block Administration. Indicate his ID or name in the appropriate field. The platform will fill in the line Affiliate program automatically because the publisher will already be tied to one of the programs.

The platform checks traffic quality by default. You can use it to enable and disable the test landing page. If you are sure that the publisher sends high-quality traffic only, untick the box.
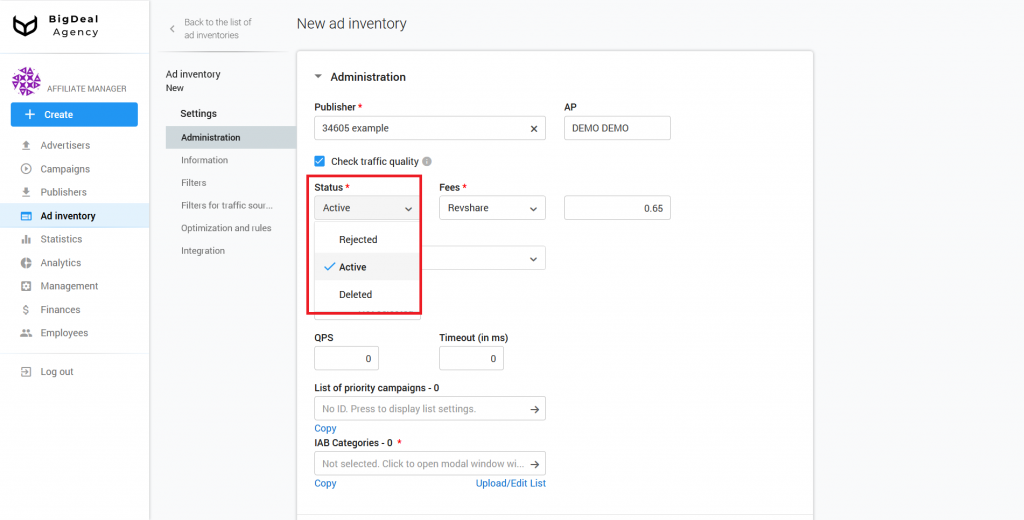
Each new ad inventory has Active status by default. You can change it in the drop-down list Status. For example, if an ad inventory violates the rules, then after its creation, it can be rejected. The ad inventory will be blocked, and the publisher will not be able to send traffic to it. You can also select the status Deleted. In this case, the ad inventory will be completely deleted from the system.
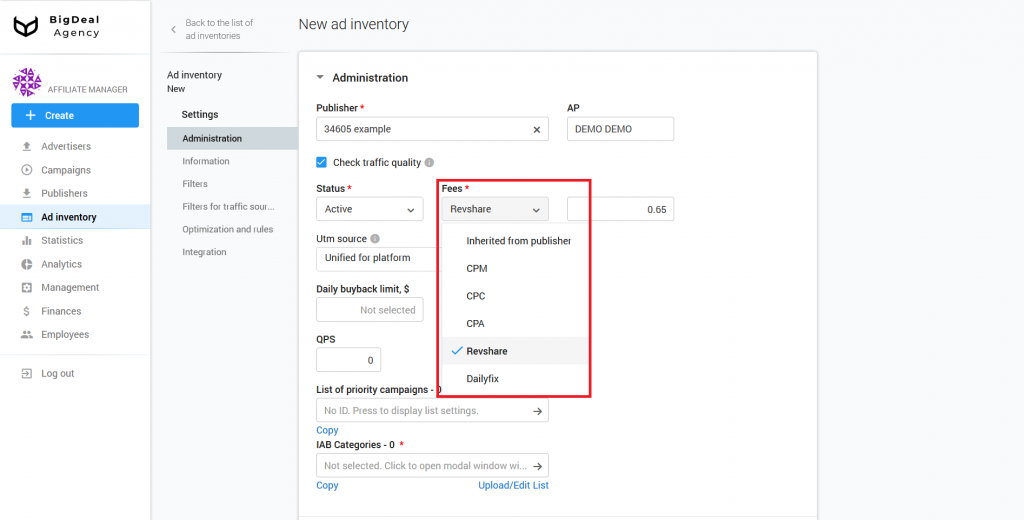
Select your fee: Inherited from publisher, CPM, CPC, CPA, Revshare, or Dailyfix. If the publisher already has a certain fee, use Inherited from publisher. After that, the publisher’s settings will be used for the current ad inventory. We will select RevShare as an example. It is equal to 65% of income by default.
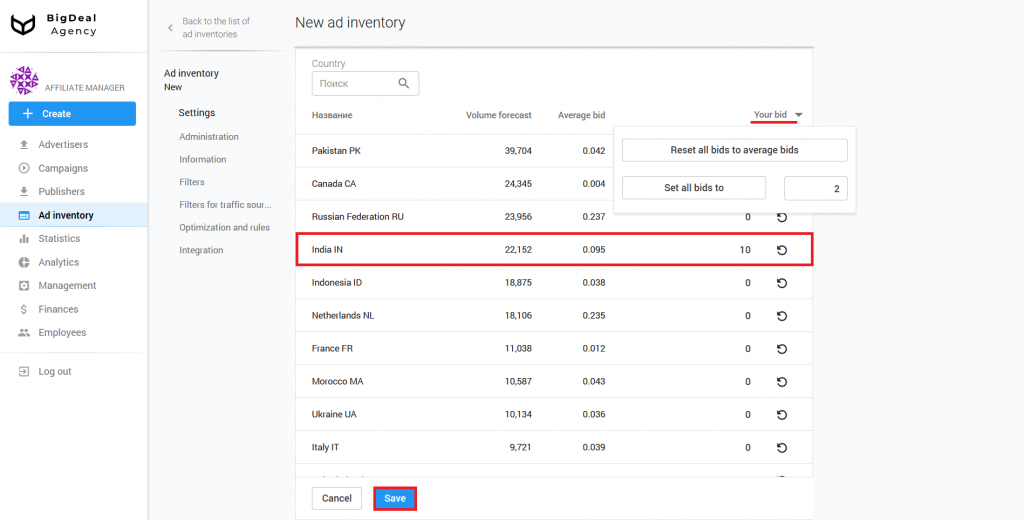
If you selected a fixed payment model (CPM or CPC), we recommend setting the maximum bid for countries via the link with the same name.
If you click on the link, you can make a bid for each country separately or specify a single bid for all countries. If you need to reset your bids to an average value or set a certain price for all countries, click on the Your bid field. As soon as you insert information, click Save.
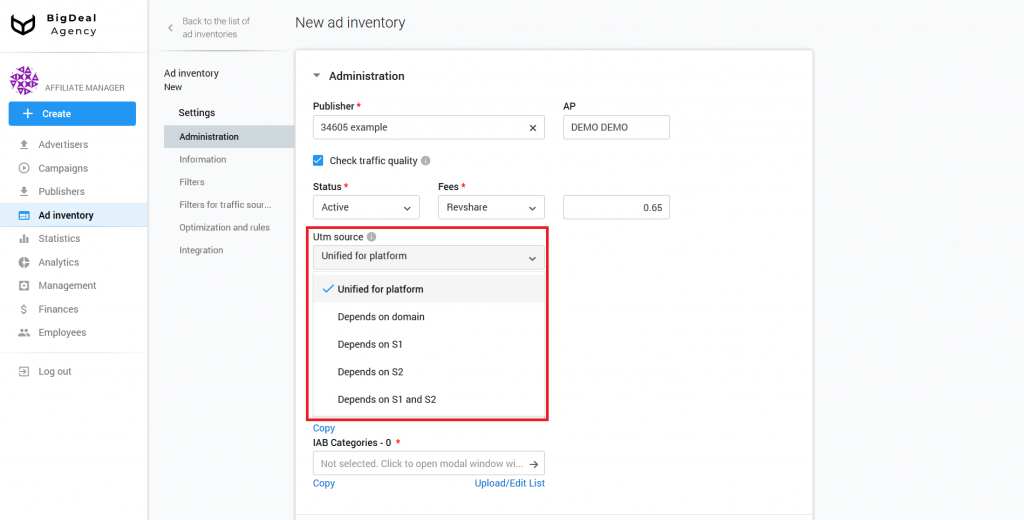
Select the template based on which UTM Source will be generated from the Utm source drop-down list:
- Unified for platform. Select this option if the site is located on one domain.
- Depends on domain. Select this option if the same ad inventory is placed on a few domains. Make sure that domain names are being passed. You can check it in the Filters — Domains block after the ad inventory will start to receive traffic.
- Depends on S1.
- Depends on S2.
- Depends on S1 and S2.
You can set the type to Unified for platform. However, we recommend that you agree with the publisher to pass the parameters S1 and S2. Below we will tell you more about these parameters.
As soon as you make sure that the publisher passed the parameters, check the new, appropriate template in Utm source.
We will not talk about Daily buyback limit, QPS, and Timeout (in ms) in this article. This functionality refers to a complex type of connection. These settings are required for RTB and XML feed. You can read about SSP/Feed ad inventories in this article (coming soon).
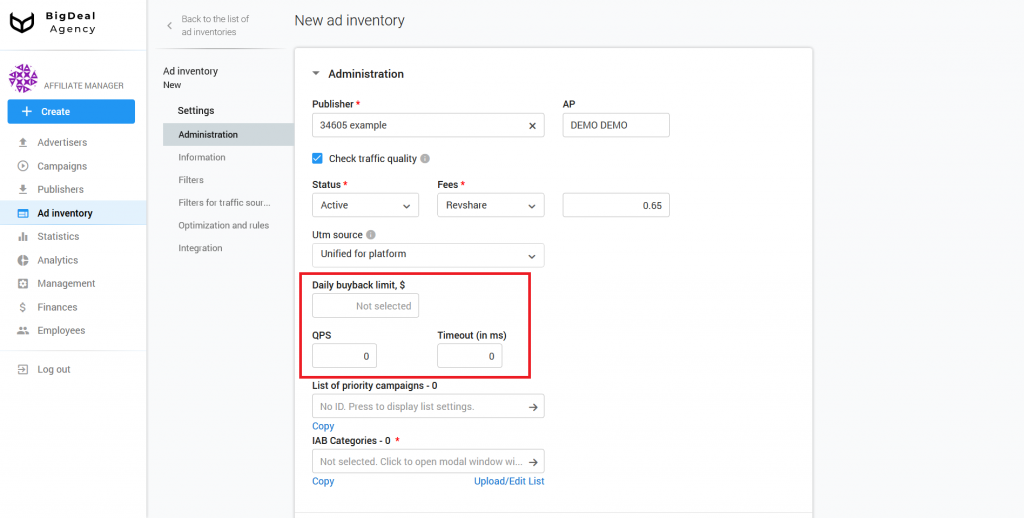
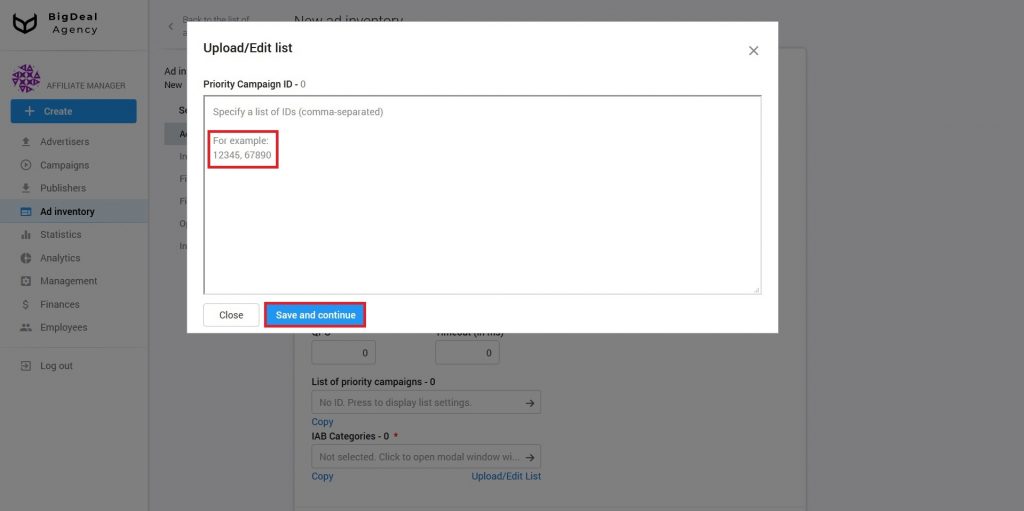
The List of priority campaigns allows you to influence what kind of advertising will be displayed on the ad inventory. Suppose you want users to see mobile offers on an APK website first, and then everything else. In this case, you can specify the ID of advertising campaigns that will be in priority.
Click on the No ID field to add campaign IDs. Specify a list of IDs (comma-separated) and click Save and continue.
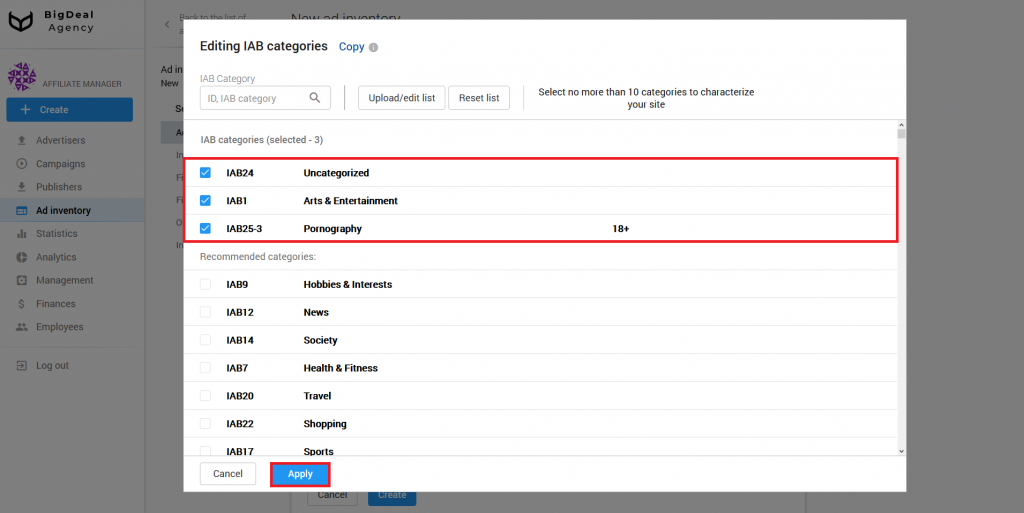
IAB categories is a required setting. Indicate one or a few categories to which the campaign belongs. We recommend selecting no more than 10 categories. IAB categories are required for more precise targeting.
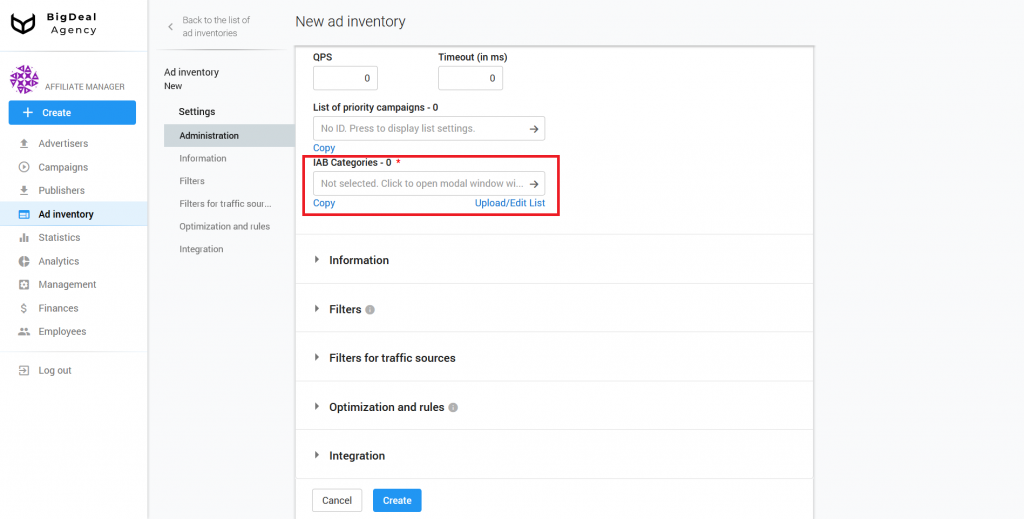
If you can not select a category, set the IAB24 – Uncategorized or IAB1 – Arts & Entertainment, because they have a very broad definition. If the campaign contains sexually explicit material, select IAB25-3 – Pornography. In this case, only adult sites will display the campaign.
Block Information #
The next section is Information. First, specify the appropriate name of the ad inventory in the corresponding field.
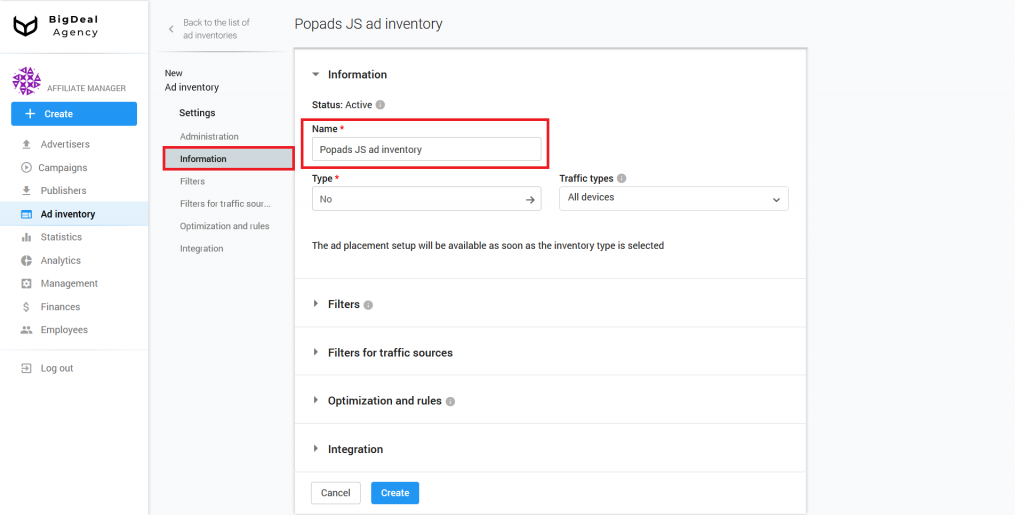
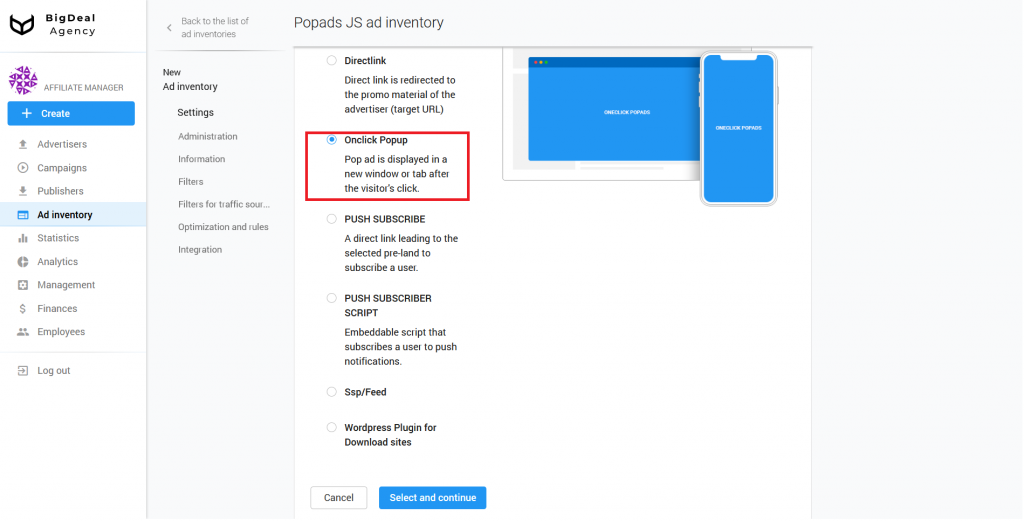
Select inventory for the ad inventory from the drop-down list Type. In our case, we select Onclick Popup. Click on the button Select and continue.
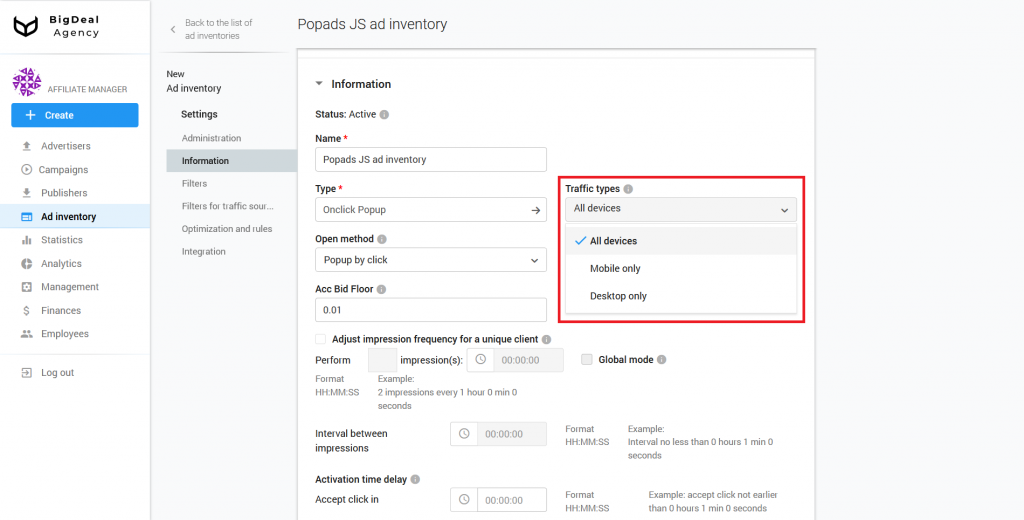
Now let’s move to Traffic types. Here you can select the type of traffic that you want to receive. You can see the following options in the drop-down list:
- All devices;
- Mobile only;
- Desktop only.
If you select All devices, both mobile and desktop users will see ads. If you select Mobile only, only mobile users will see ads. Note that the window with advertising will open by click in any case. Therefore, it is important to specify trafficback. We will talk about it later. The same goes for desktop traffic.
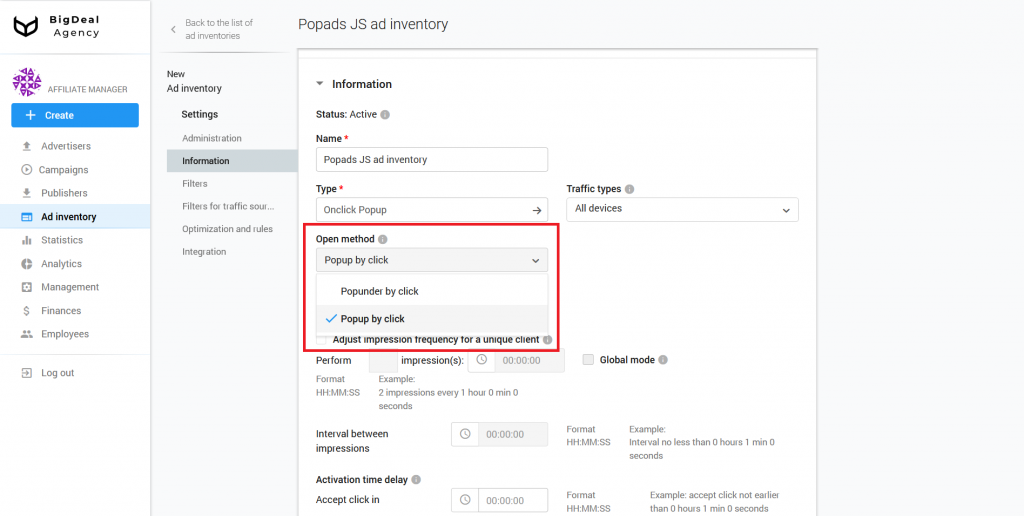
There are two open methods to choose:
- Popunder by click. An ad opens in a tab in an invisible zone
- Popup by click. An ad instantly opens in a new tab.
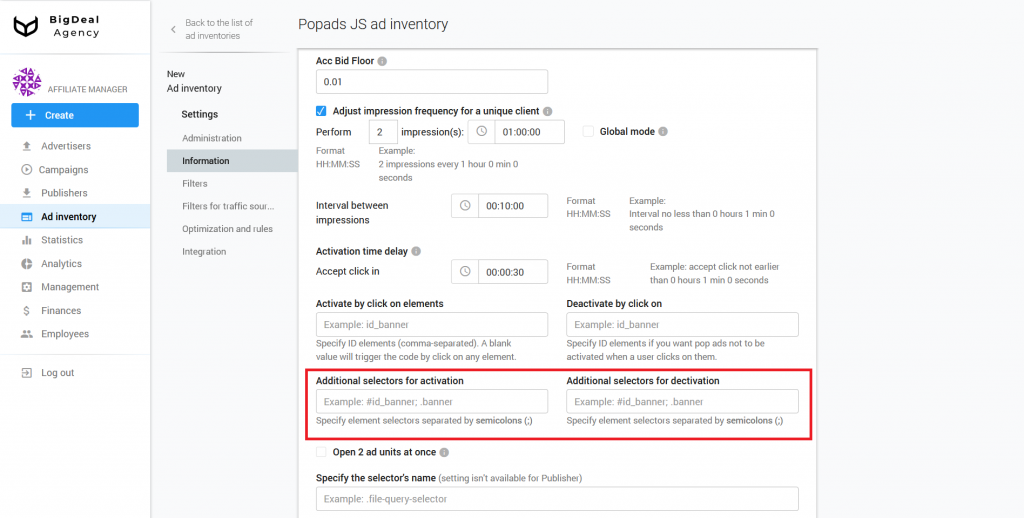
The Acc Bid Floor field shows the minimum bid. It allows you to specify the lowest bid at which the script will trigger.
For example, the publisher wants to receive no less than $0.1 for 1000 impressions. In this case, write down the 0,1 value. After that, he won’t see any advertisement that brings less than $0.1.
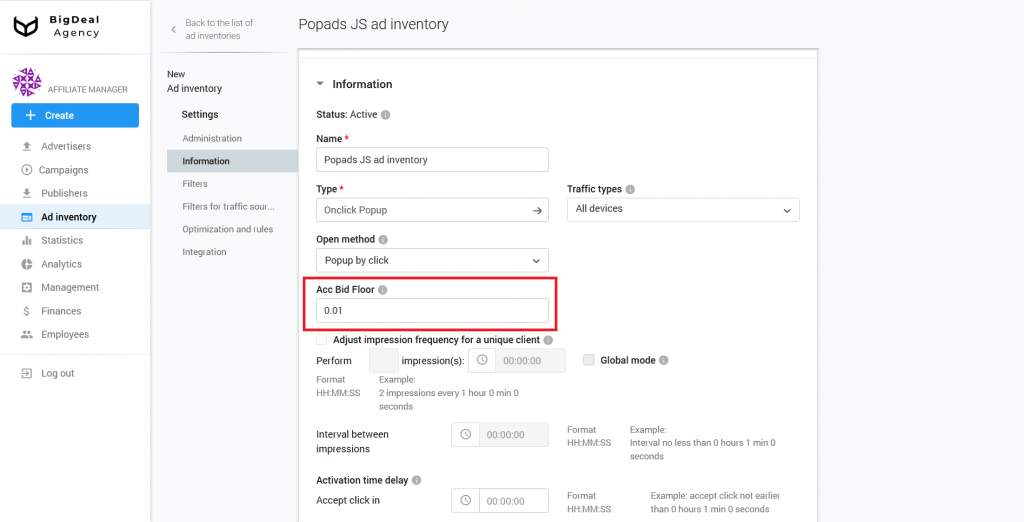
The settings below allow you to adjust show frequency. If you do not change anything, the first click will trigger the script.
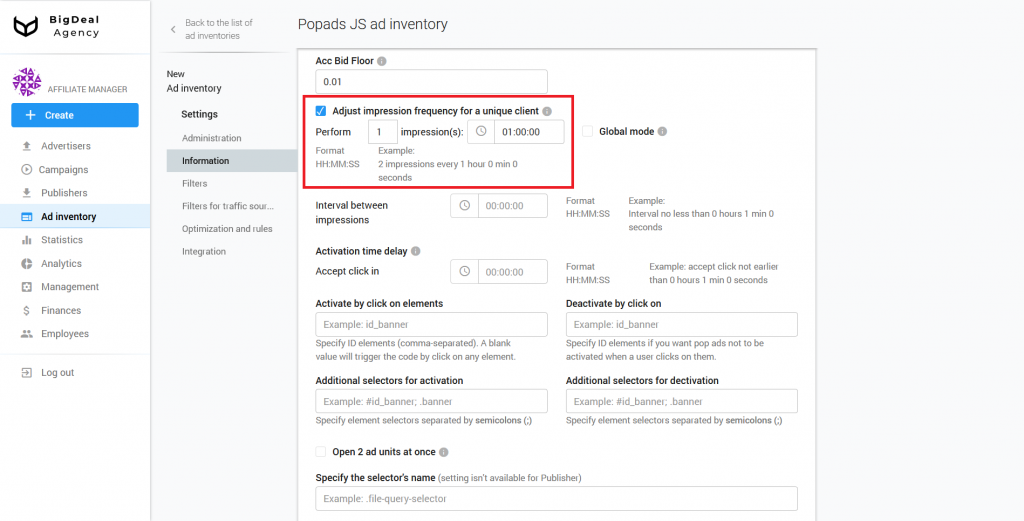
You can change the behavior of the script in the block. For example, you can adjust the following impression frequency for a unique client: perform 1 impression for 1 hour. To do this, tick the Adjust the frequency of impressions for a unique client box and specify the desired number of impressions and time. The script will trigger for each unique client every hour.
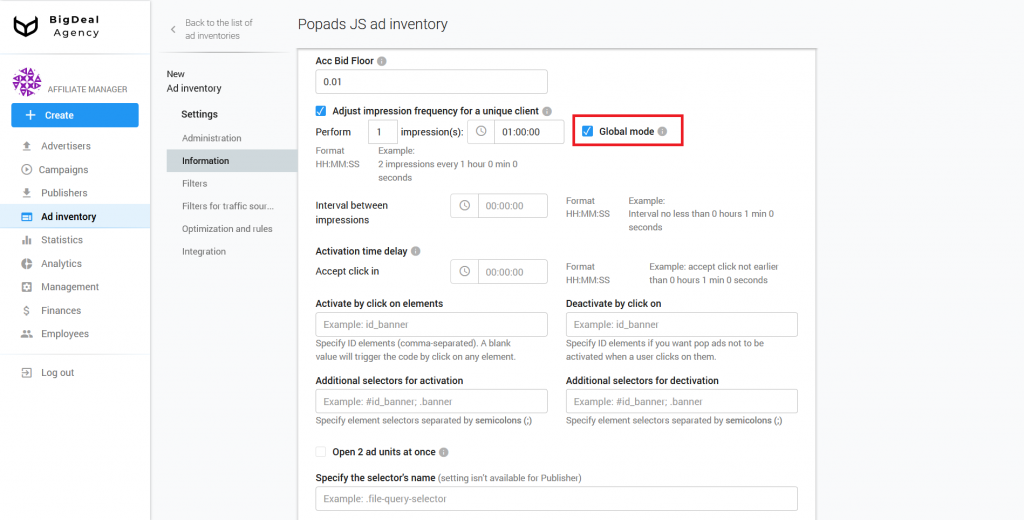
If you use the option Global mode of operation, the specified rules will take effect on the domain. If the setting is disabled, the limit of impressions will work within a single page. This means that the frequency of impressions will be different on different pages.
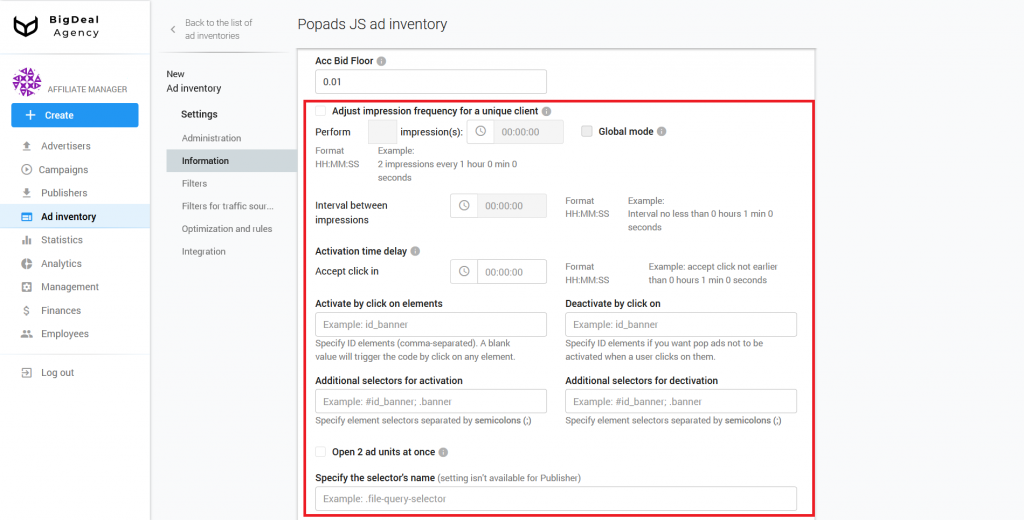
You can specify an interval between impressions. It is a period after which the script will trigger. If you do not indicate the number of impressions for a certain time, but specify the interval, for example, 30 minutes, the user who visits the site will see an advertisement every half hour.
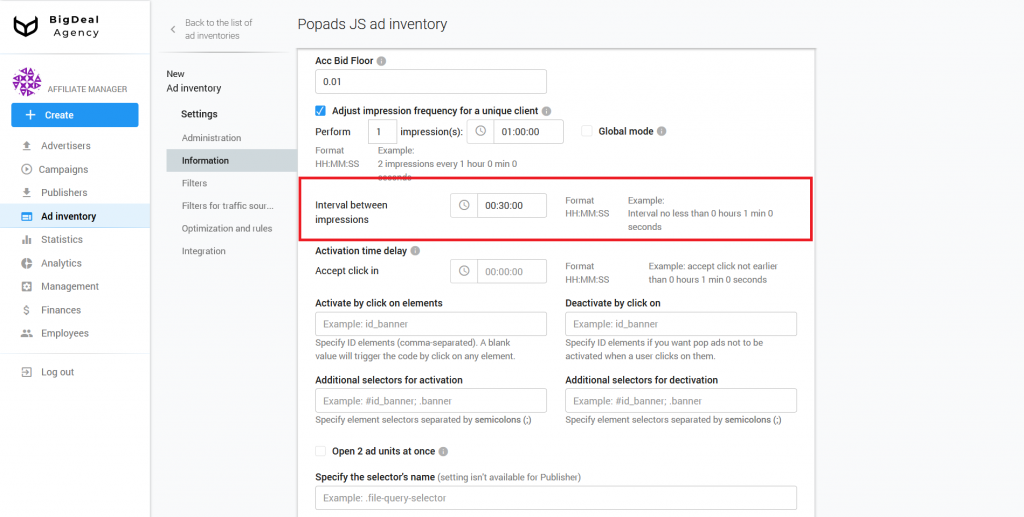
If you want the same client to see ads on the site several times, specify the intervals. At the same time, the pop-up should not appear after each click.
If you set two impressions in one hour with a 10 minutes interval, the user will see two promotional materials in an hour with a delay of 10 minutes.

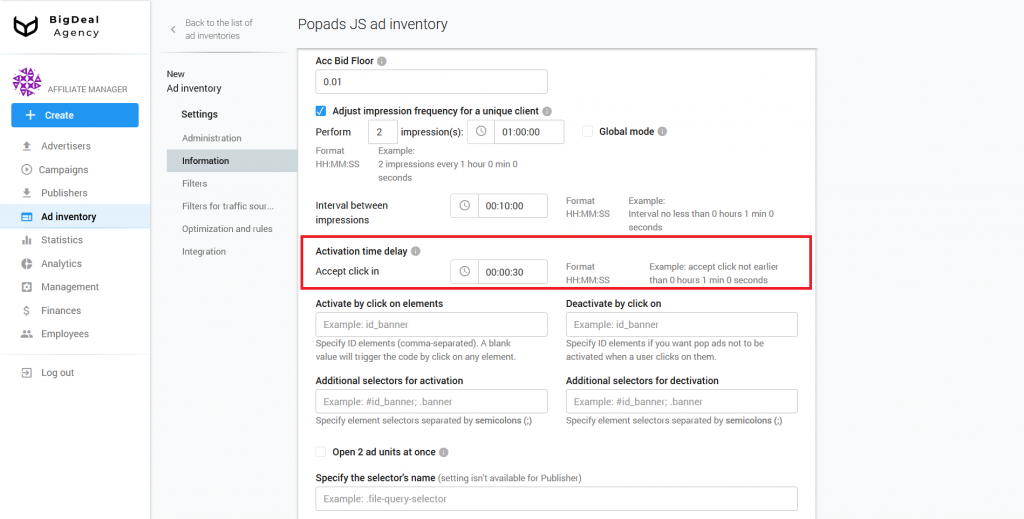
Activation Delay allows you to specify the waiting time before the first ad display. When you don’t want the user who comes to the site and makes one click to see an ad immediately, set a time delay. For example, we specified 30 seconds. Therefore, the user makes a first click on the site, and only after 30 seconds he will see a pop-up.
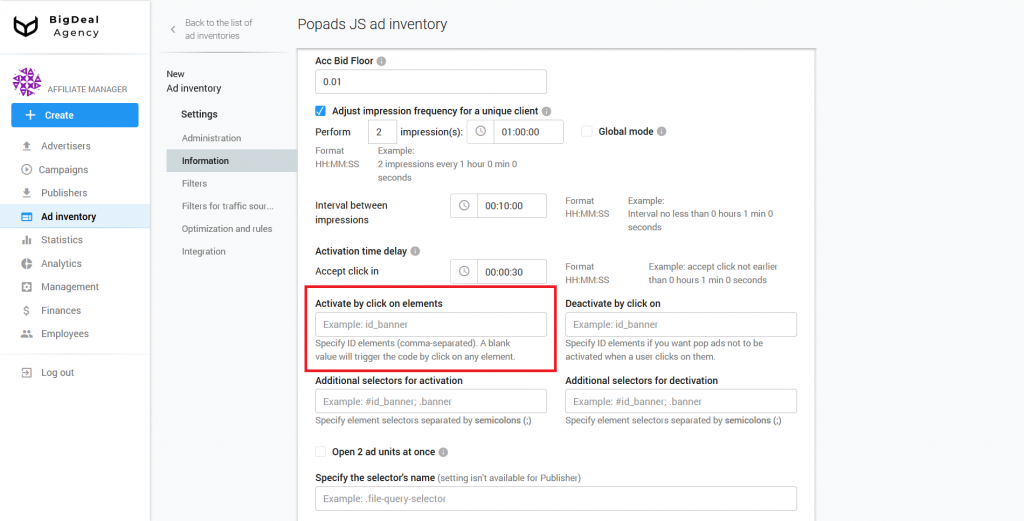
The Activate by click on elements field is useful when you need to register an ID for any element on the site, for example, a button. The script will start working as soon as the user clicks on the button. This setting is important if you want users to first perform the necessary target actions, and then view ads by clicking on the button with the given identifier.
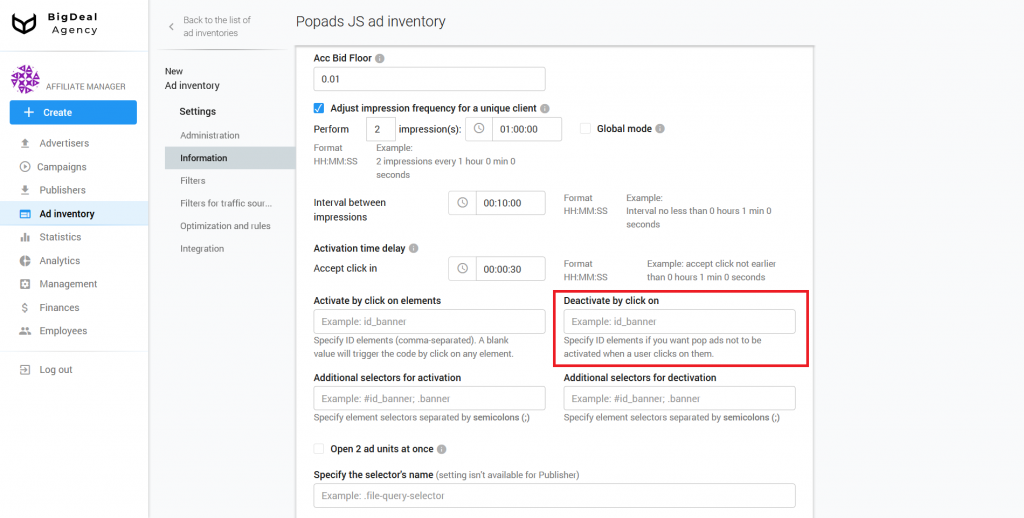
The Deactivate after clicking on elements option is similar to the previous one, but has the opposite effect. Let’s suppose that you can add the Disable ads button on the site. If a user clicks on it, then the ads will be disabled.
The Additional selectors for activation field you can use, if you want the pop-up to open only when you click on a specific object. In this field, you need to specify the selectors of the elements that will be tied to the this object.
The Additional selectors for deactivation option is similar to the previous one, but has the opposite effect.
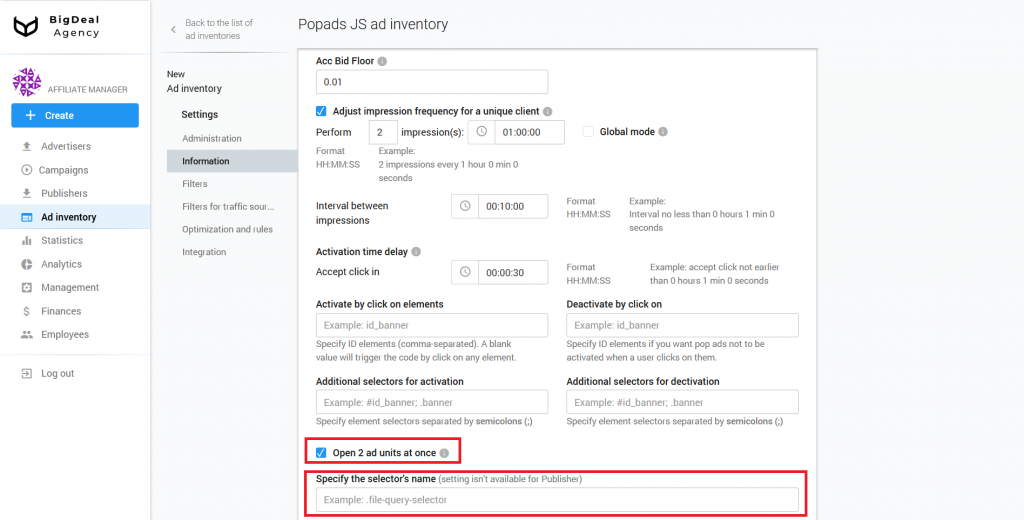
If you tick the option Open 2 ad units at once, one click will open two pop-ups at once.
We skip The Specify the selector’s name, as it is designed for more advanced platform setup.
Block Filters #
In the section Language matching, you can specify the preferred browser language. Let’s say a person is in the UK and uses a browser in English. The language is regular. If under the same conditions, the browser language is Russian, then this is an irregular language. If you want to target only the British, the setting will allow you to avoid, for example, tourists, travelers, or foreigners.
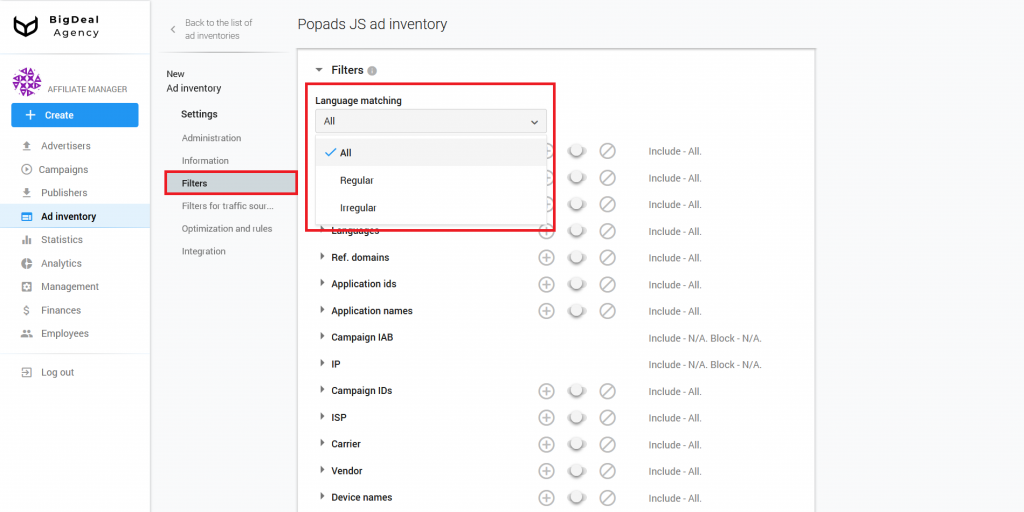
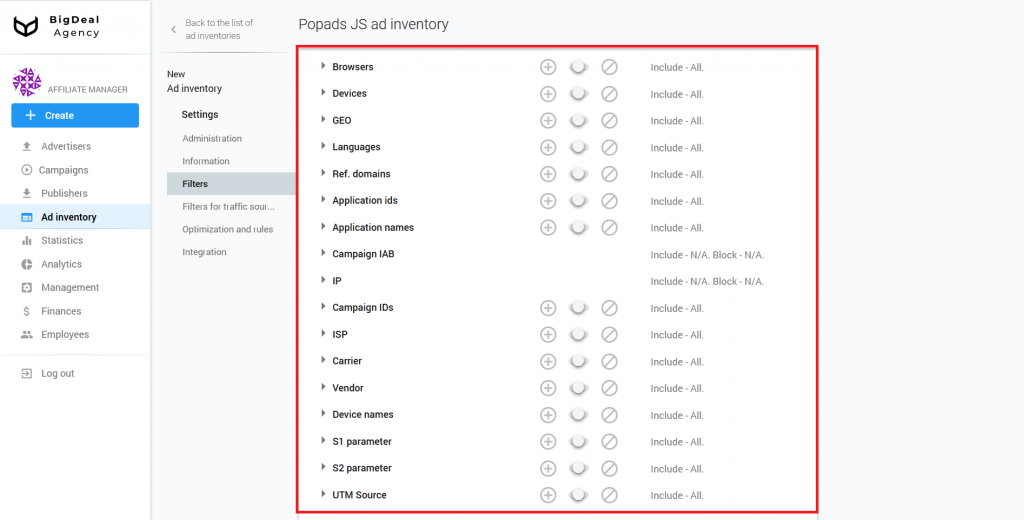
Also, the Filters block contains a number of settings: Browsers, Devices, GEO, Languages, Ref. domains, Application IDs, Application Names, Campaign IAB, IP, Campaign IDs, ISP, Carrier, Vendor, Device Names, S1 parameter, S2 parameter, and UTM Source. With their help, you can, for example, specify a list of appropriate browsers, domains, or devices from which traffic will or will not be received. When this ad inventory begins to work, in this section, you will be able to analyze its quality. You can learn more about this process in the article Quality control of publisher’s ad inventories using the Quality tab (coming soon).
Let’s take a closer look at the special parameters S1 and S2 that are passed with a click.
The S1 parameter is intended to pass a first level Sub ID. The S2 parameter is intended to pass a second level Sub ID. Suppose that the publisher uses this ad inventory on many sites, and he sends the site domain name in the parameters. You have one ad inventory, and you can filter traffic from different sites and domains by passing the specific domain name in the parameters. The database receives this information and sends it to the advertiser for further work. Filtering by the parameters S1 and S2 can be set in the future.
Another parameter is UTM Source. It is a hash sum of values: domain + S1 + S2. You can set the conditions for UTM Source in the Administration block. It can be used for the advanced setting of white/blacklists.
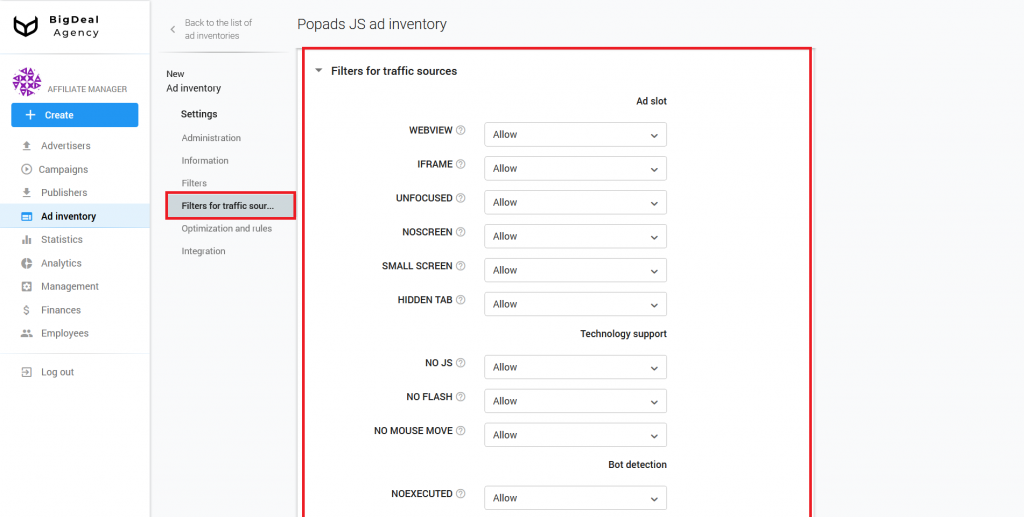
Block Filters for traffic sources #
Let’s move to the JSTDS filters. you can find them in the Filters for traffic sources block. With their help, you can block low-quality requests for an ad impression. More information about filters you can find in the article Setup JSTDS filters in campaigns. The process of their setup on ad inventories will be similar.
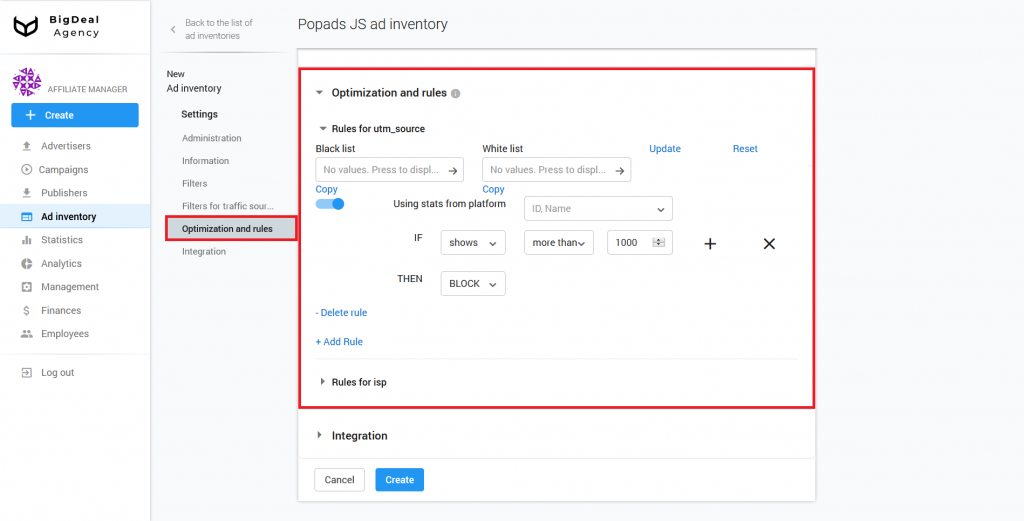
Block Optimization and rules #
When you work with a large number of publishers whose traffic is constantly changing, manual optimization will be not enough. You will not have time to block unprofitable sources of traffic, because they will appear and disappear faster than you can add them in Black or Whitelists.
To solve this problem, you will need the block Optimization and rules.
Setting the rules for ad inventories and campaigns is the same. You can read more about the rules in the article How to set up Automated Rules in Campaign.
Block Integration #
The Integration block has a Postback URL field. It is used for advanced settings, and most of the publishers do not need to set a postback. Therefore, we will skip it. You can learn more about postback setup in the article Setup Postback URL for Publisher.
The next option is Trafficback. It is important for setting the type of traffic and restrictions. If, for example, you set the restriction Mobile only, all users on desktops who have clicked will see a 404 page. Consequently, the traffic will be lost, because the system can’t accept it, but the script will be still working.
If you set trafficback, you can avoid such situations. You can set it by adding a link to another ad network, for example, directlink, or you can add the domain of the publisher, for example, the main page of a site. It’s best to always set trafficback after agreeing with the publisher.
You can specify the S1, S2, S3, and query parameters in the Trafficback. The query parameter contains a title of the page on which you placed an ad code. The value in the parameter allows you to target by keywords and personalize promotional materials in advertising campaigns.
Let’s look at an example of keyword substitution in trafficback. KEYWORD indicates the place to add the keyword. Replace KEYWORD with {QUERY} for correct keyword substitution.
Original link:
http://www.onefamousdownloadsite.com/search/KEYWORD.html?aff.id=1234The link with {QUERY} replacement:
http://www.onefamousdownloadsite.com/search/{QUERY}.html?aff.id=1234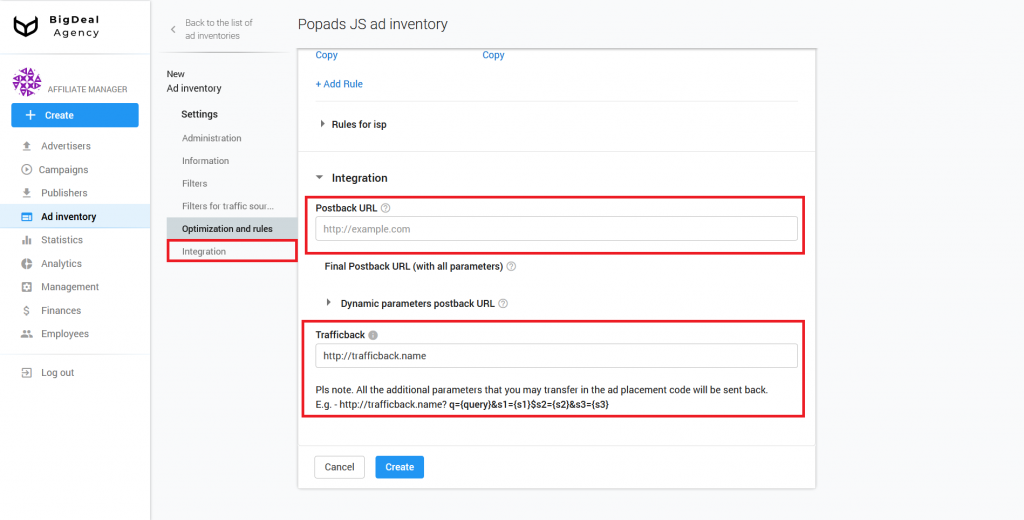
Connection of the script #
As soon as you inserted all the necessary information, click the Create button.
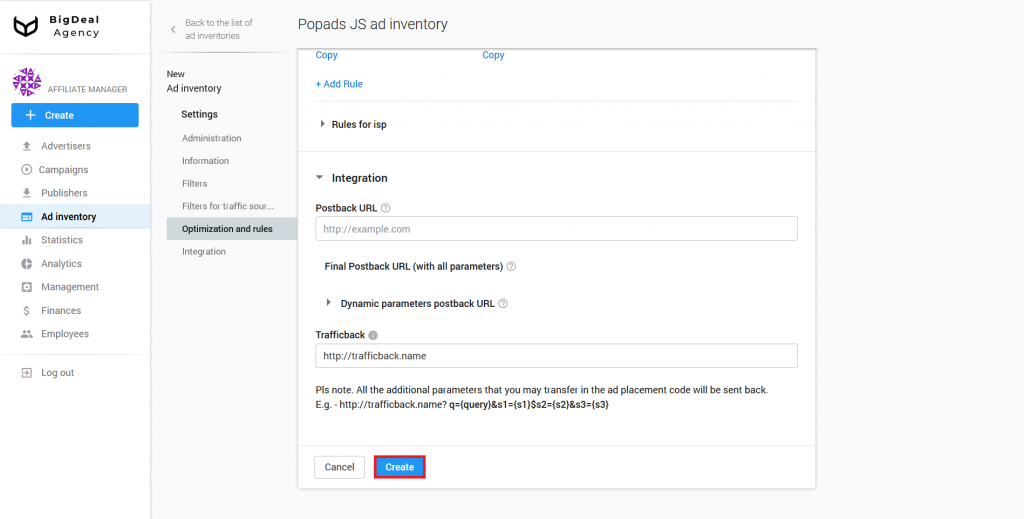
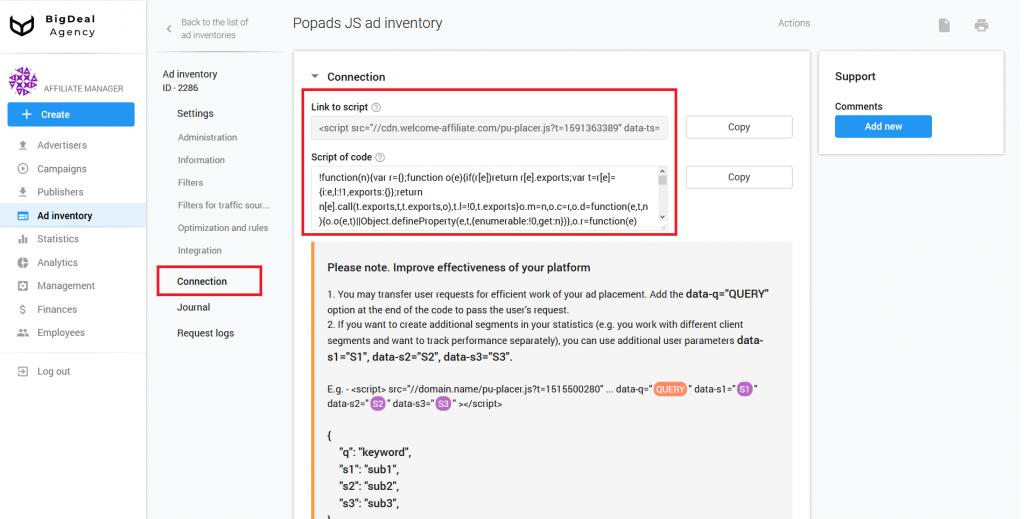
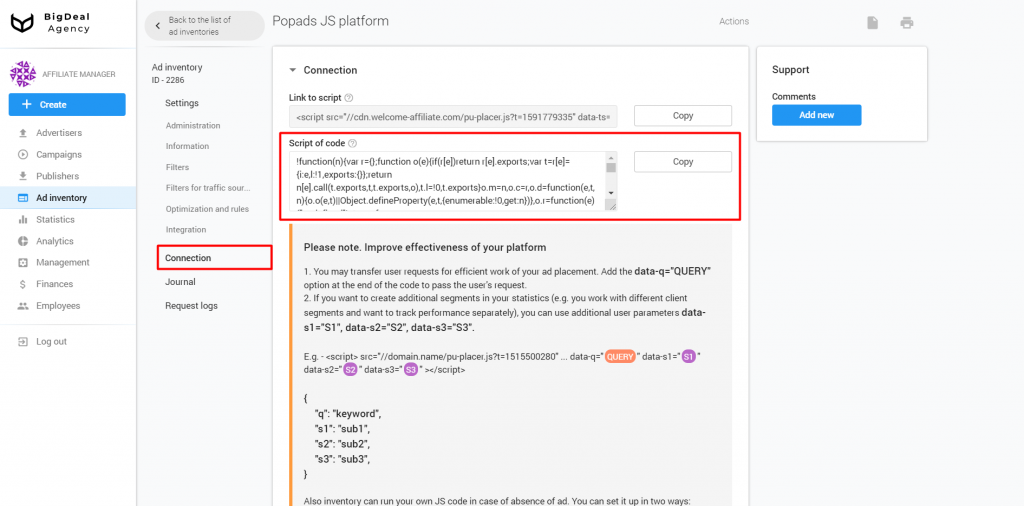
The system will generate a script. You can find it in the new tab Connection. In the case of a Popads, the system creates a Link to script and Script of code (most of the time it is used for advanced settings). We will copy and integrate the link to the script on the publisher’s website page.
Please note: you can expand the functionality of the pop-up script using the Fallback setting. If it is not possible to open an ad, Fallback will run another script. For example, it can be a pop-up script from a third-party ad network. For more details on the circumstances under which this option will be useful and how to configure it, read the last section of this material.
Adding User Parameters for Traffic Optimization #
The publisher can add variables to the advertising tag, which he places on his sources for a better selection of advertising:
<script src="//mediaoaktree.com/v2/loader.js?_t=52468" data-ts="1574069688" data-token="9bb42c5f29e5f1a225e4cd606ef25f1602f1637e" data-promo-cdn="mediaoaktree.com" data-q="QUERY" data-s1="S1" data-s2="S2" data-s3="S3"></script>There are several types of variables:
- data-q=QUERY. You need to pass a keyword or phrase in the link instead of QUERY. It will improve targeting. This setting is optional. You can use it if the publisher wants it. By default ad scripts take a keyword from the page title automatically.
- data-s1=S1. Instead of S1, you need to substitute the source of the traffic. Do not specify S1 if the script is placed on a specific site. If you add the same script to different sites, you need to type the site domain where the script is located in the S1 parameter.
- data-s2=S2. You need to add a sub-source of traffic instead of S2. Let’s consider two examples of sub-sources.
In the first case, there is a site with various categories that are located on subdomains. Therefore, in the parameter S1, we indicate the main domain, and in S2, we indicate the subdomain:
<script src="//mediaoaktree.com/v2/loader.js?_t=52468" data-ts="1574069688" data-token="9bb42c5f29e5f1a225e4cd606ef25f1602f1637e" data-promo-cdn="mediaoaktree.com" data-s1="website.com" data-s2="movie.website.com"></script><script src="//mediaoaktree.com/v2/loader.js?_t=52468" data-ts="1574069688" data-token="9bb42c5f29e5f1a225e4cd606ef25f1602f1637e" data-promo-cdn="mediaoaktree.com" data-s1="website.com" data-s2="music.website.com"></script>In the second case, there is an advertising network that sells traffic from various sites. You can substitute the name of the advertising network in “S1”, and substitute in “S2” the domain or ID of the site where the advertising script is located. It will look like this:
<script src="//mediaoaktree.com/v2/loader.js?_t=52468" data-ts="1574069688" data-token="9bb42c5f29e5f1a225e4cd606ef25f1602f1637e" data-promo-cdn="mediaoaktree.com" data-s1="adnetwork.com" data-s2="website_1.com"></script><script src="//mediaoaktree.com/v2/loader.js?_t=52468" data-ts="1574069688" data-token="9bb42c5f29e5f1a225e4cd606ef25f1602f1637e" data-promo-cdn="mediaoaktree.com" data-s1="adnetwork.com" data-s2="website_2.com"></script>- &s3={S3}. If the publisher is going to use postback, you can write click_id instead of {S3}. The publisher sets the values for S3 at will. If the publisher does not specify S3, the platform will generate a click_id.
Use the S1 and S2 parameters when different sites or projects with a large number of content categories contain the same advertising tag. There are no strict usage rules for the S3 and query parameters.
A publisher can place one ad tag on two different sites. If he types the names of sites or their domains in the S1 parameter (data-s1 = website1 and data-s1 = website2), you can find out from which site the traffic and most of the conversions came from. You will also have the opportunity to understand how to optimize each of the sites. Without this information, you will not be able to determine the site with the best result and pick up high-quality advertising.
Let’s move on to the integration of the script on the publisher’s site page. We have three cases as examples.
Adding script to HTML code #
As an example, we will use a text editor and HTML template based on the educational site W3Schools. Visit this link. Find an opening tag <body> in the new window with the code.
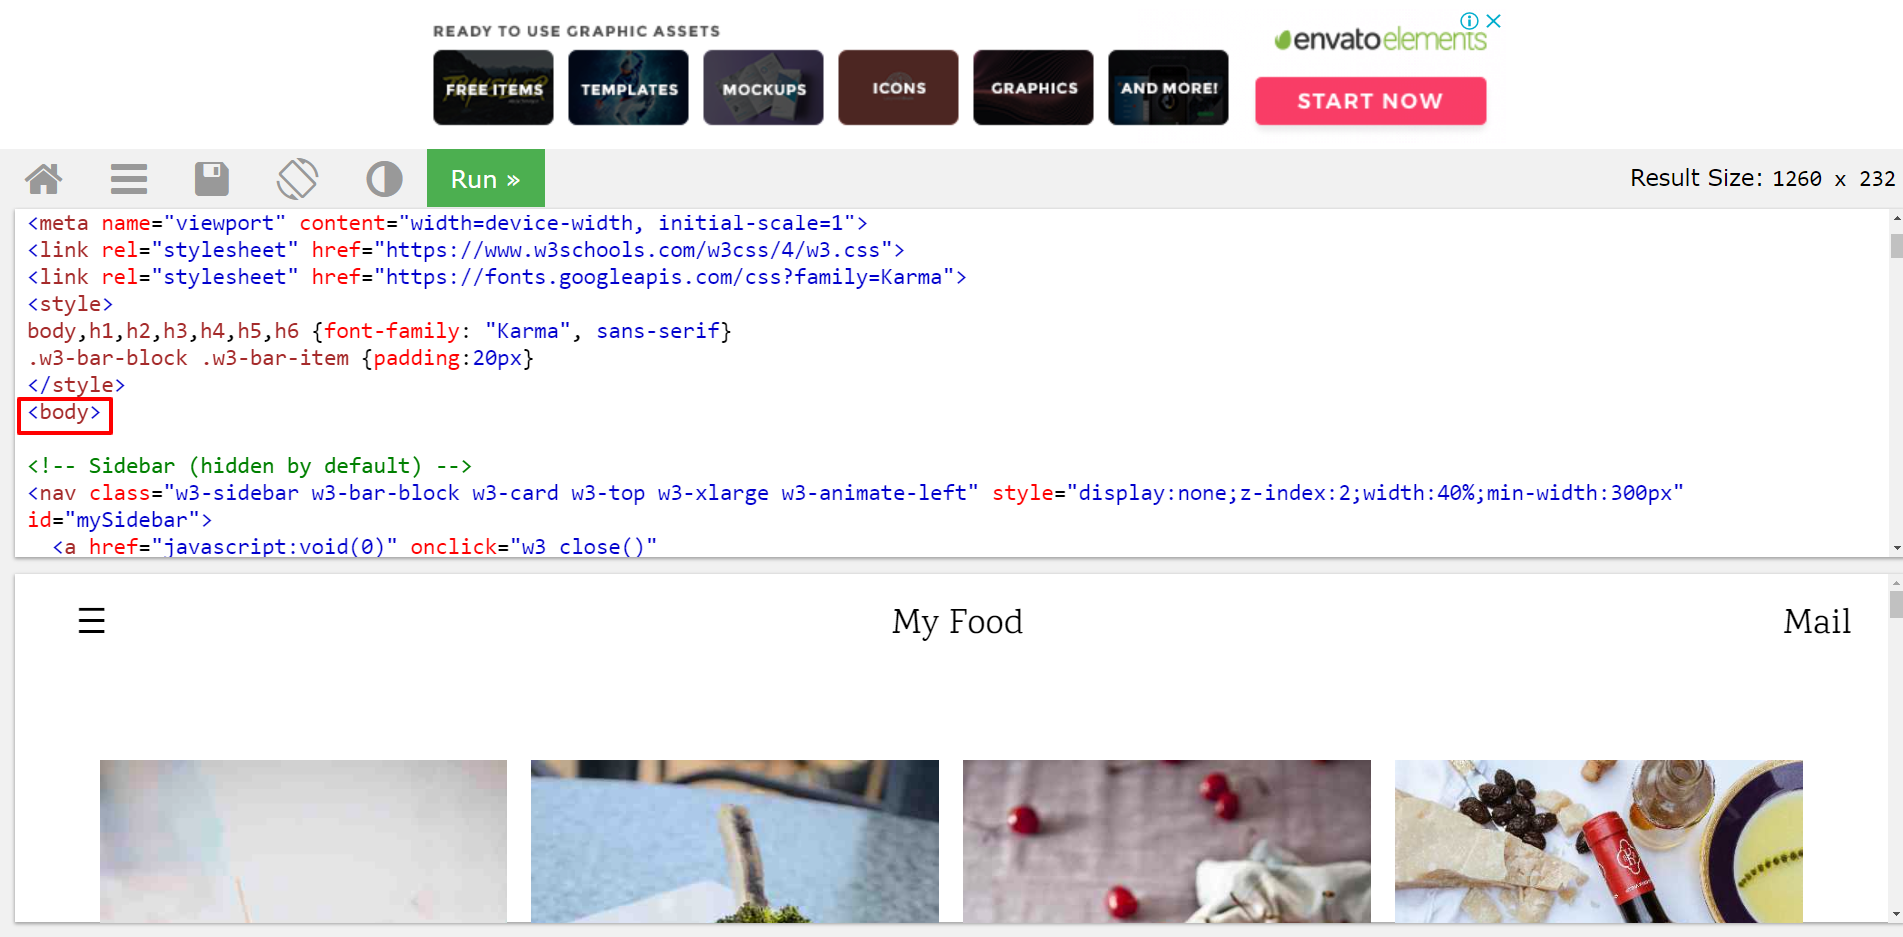
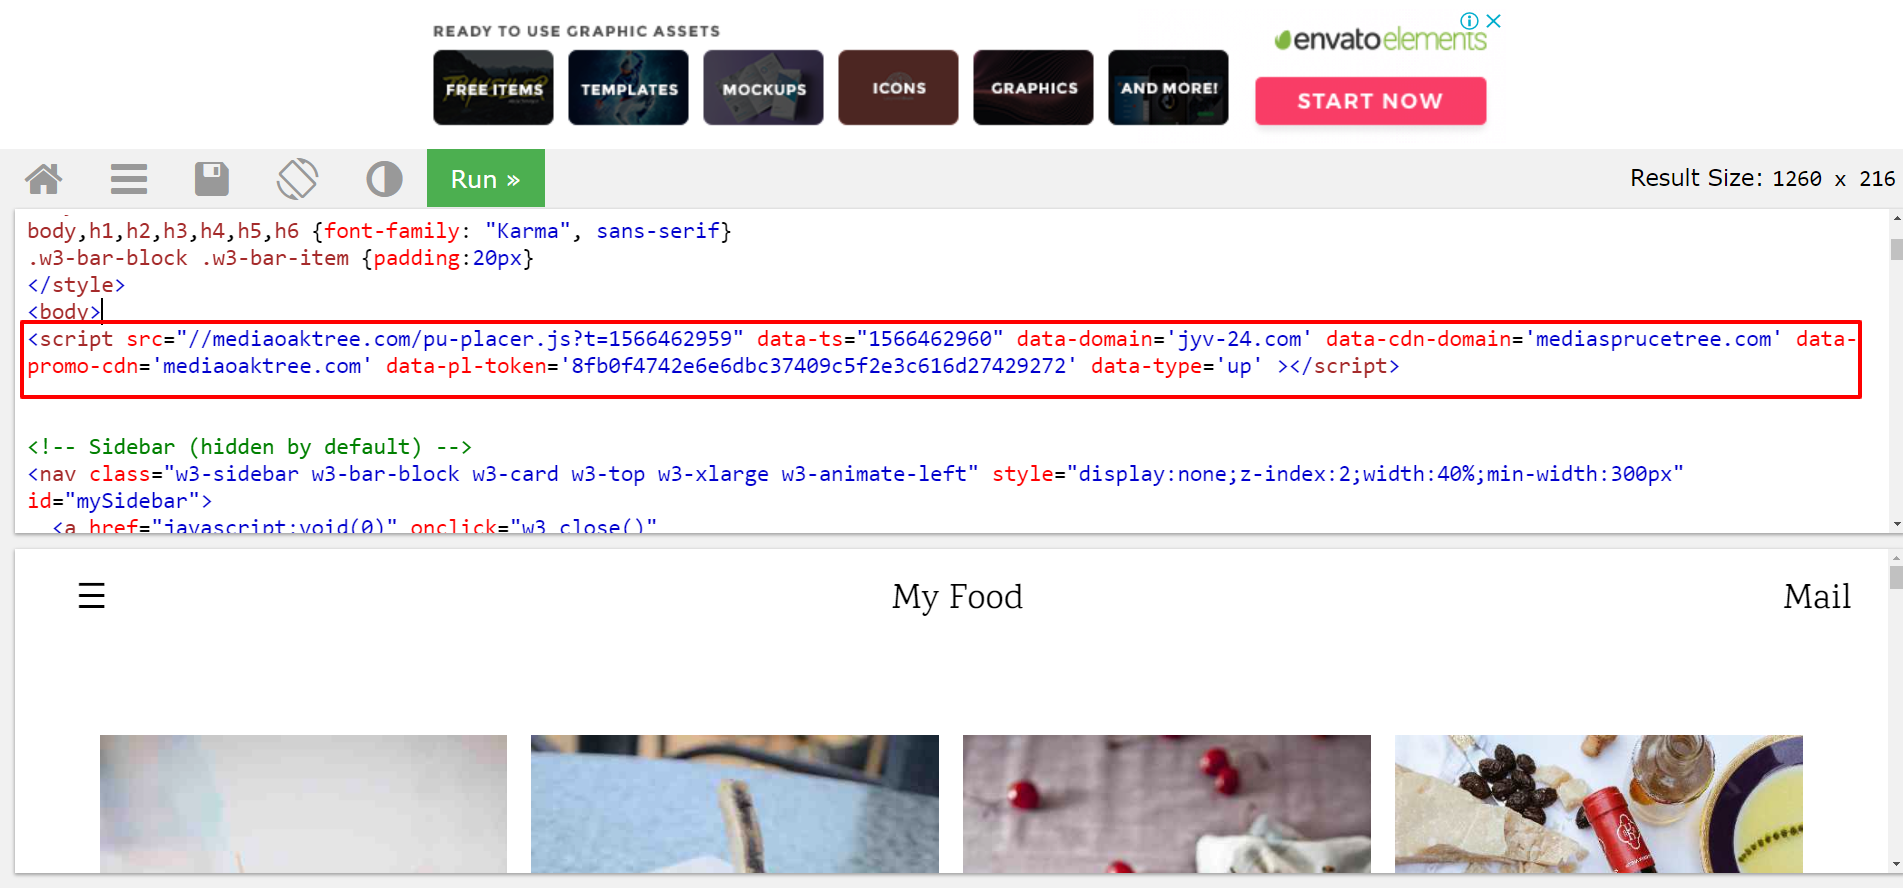
Insert the code generated by the platform on the next line after this tag.
Press the Run button and click on any place on the screen with the demo page.
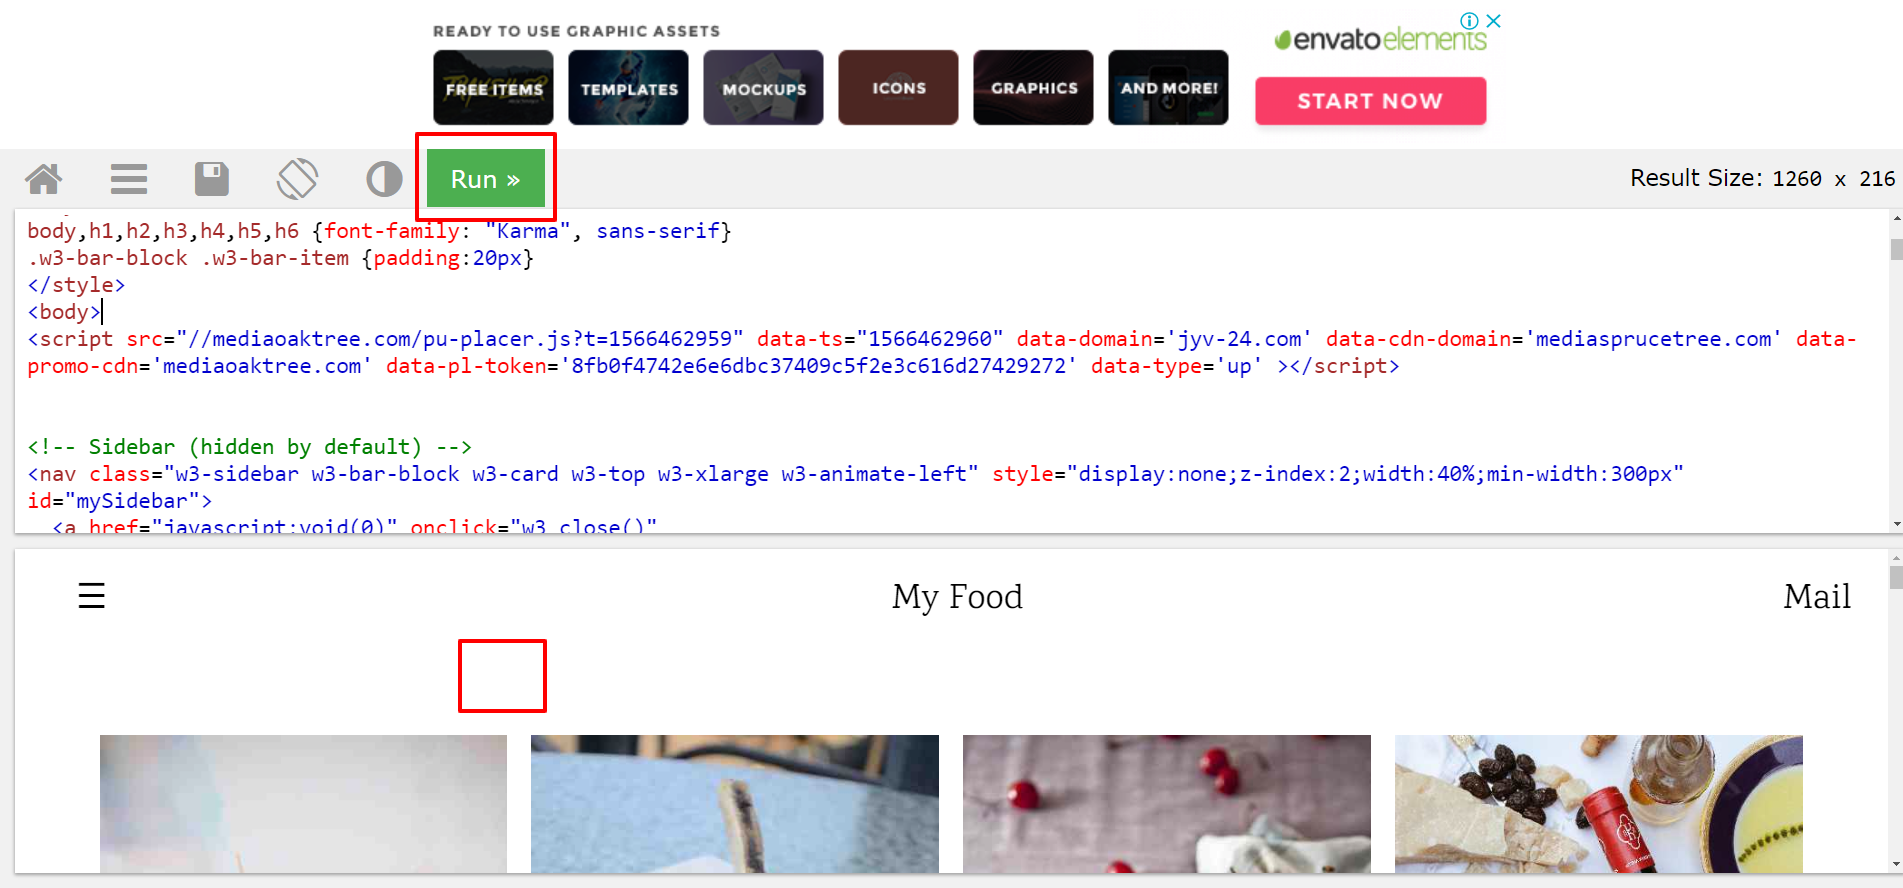
After that, the script will start to work. You will see a pop-up in the new tab.
Please note: you can place the link of the script in any place on the page. But we recommend you put it near the beginning of the code. Add it whether before an ending tag </head> or right after opening tag <body>.
If the platform has just been created, the script may not work on the page. Wait 10-15 minutes, then check it again.

Adding Script to CMS Blogger #
To add the Popads JS to CMS Blogger, you will need to make changes to the installed theme. The process is similar to adding a script to the HTML code.
Go to your Blogger account and visit the section Theme.
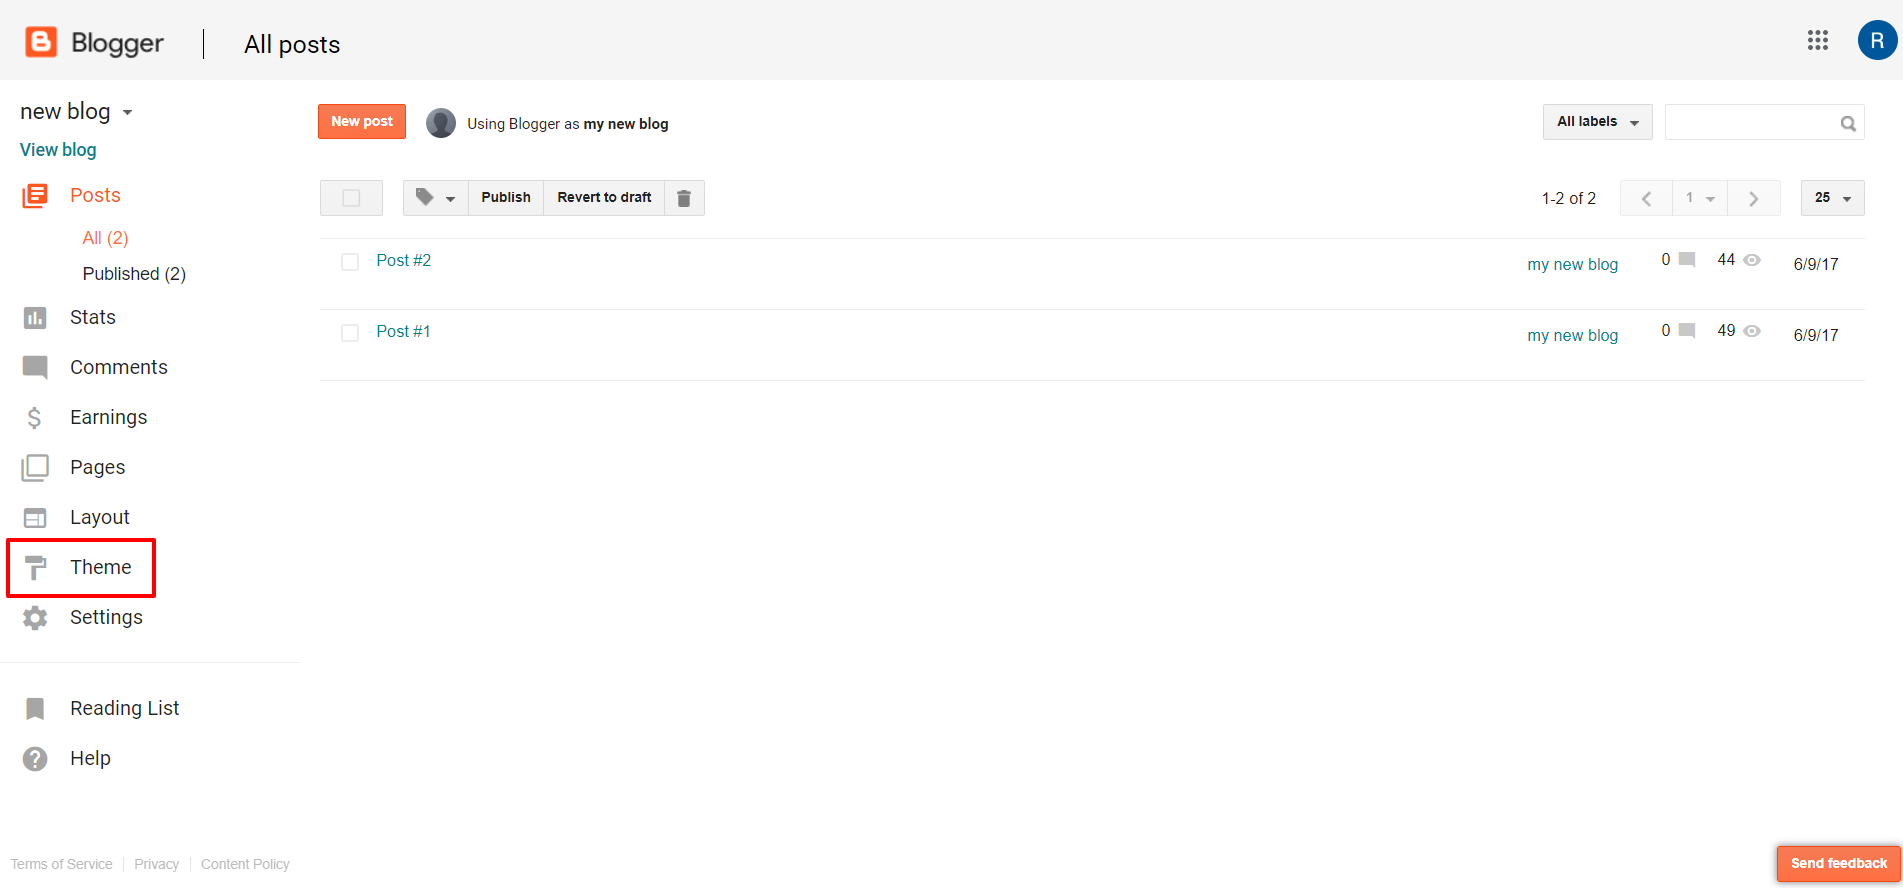
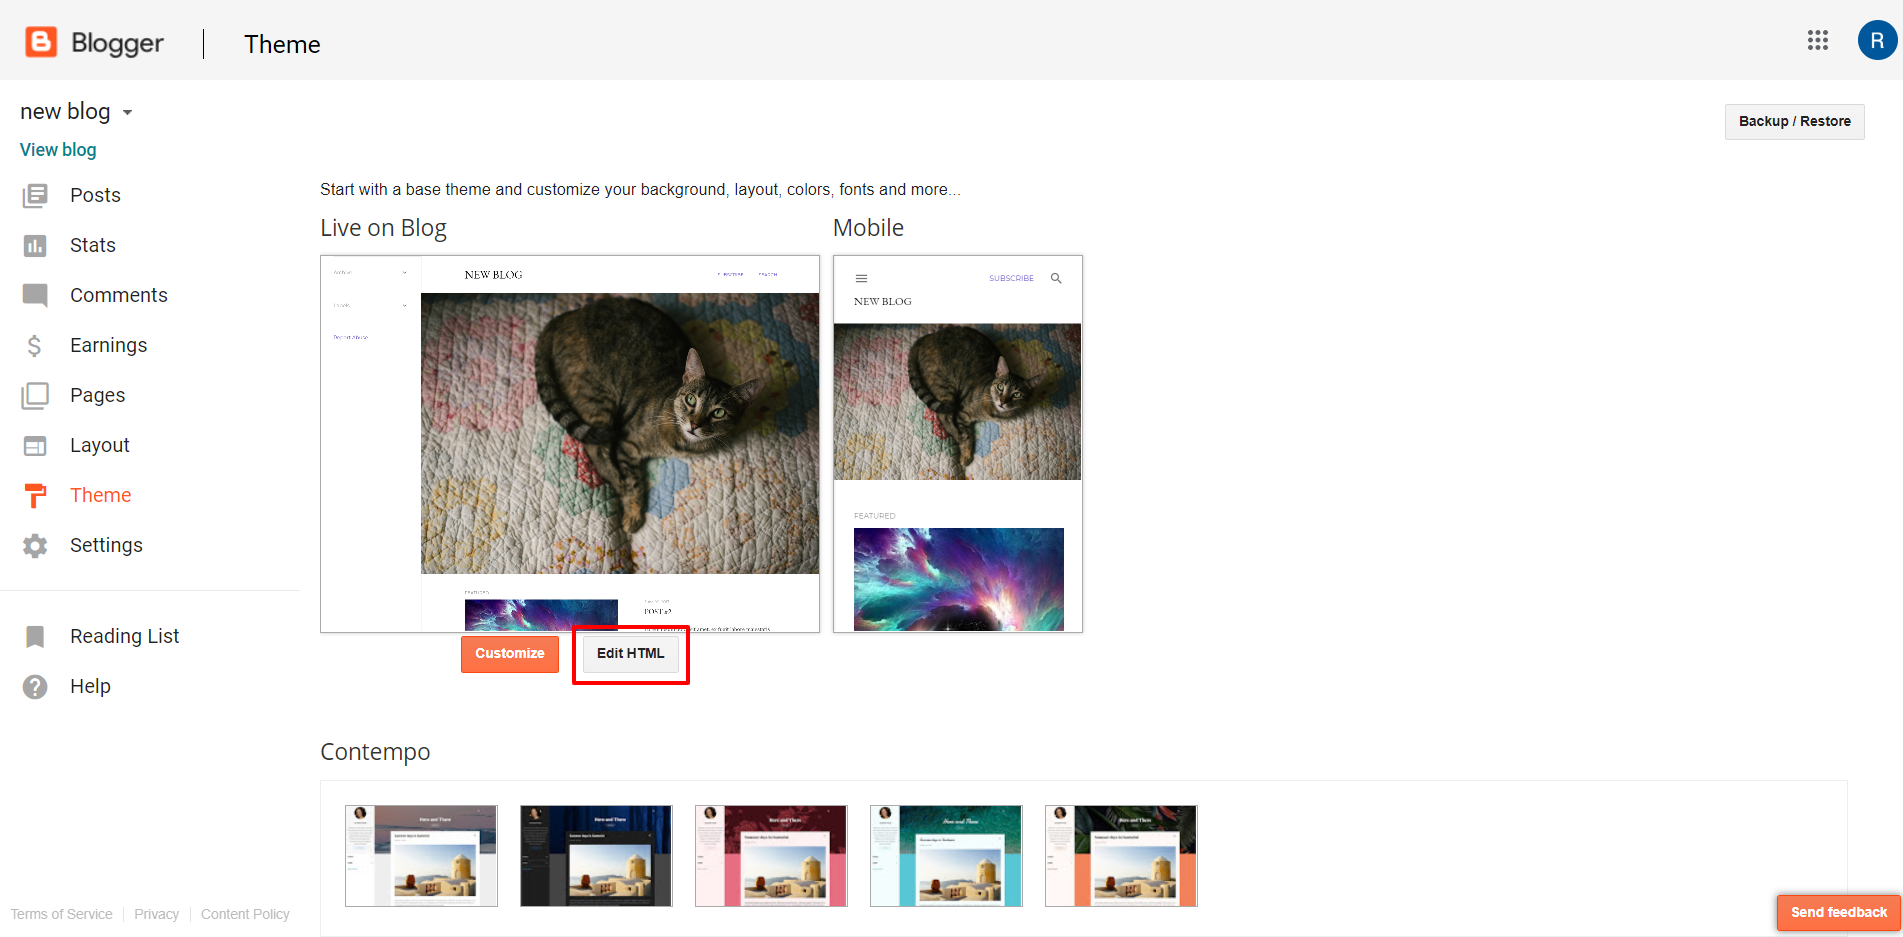
Click the button Edit HTML in the open window.
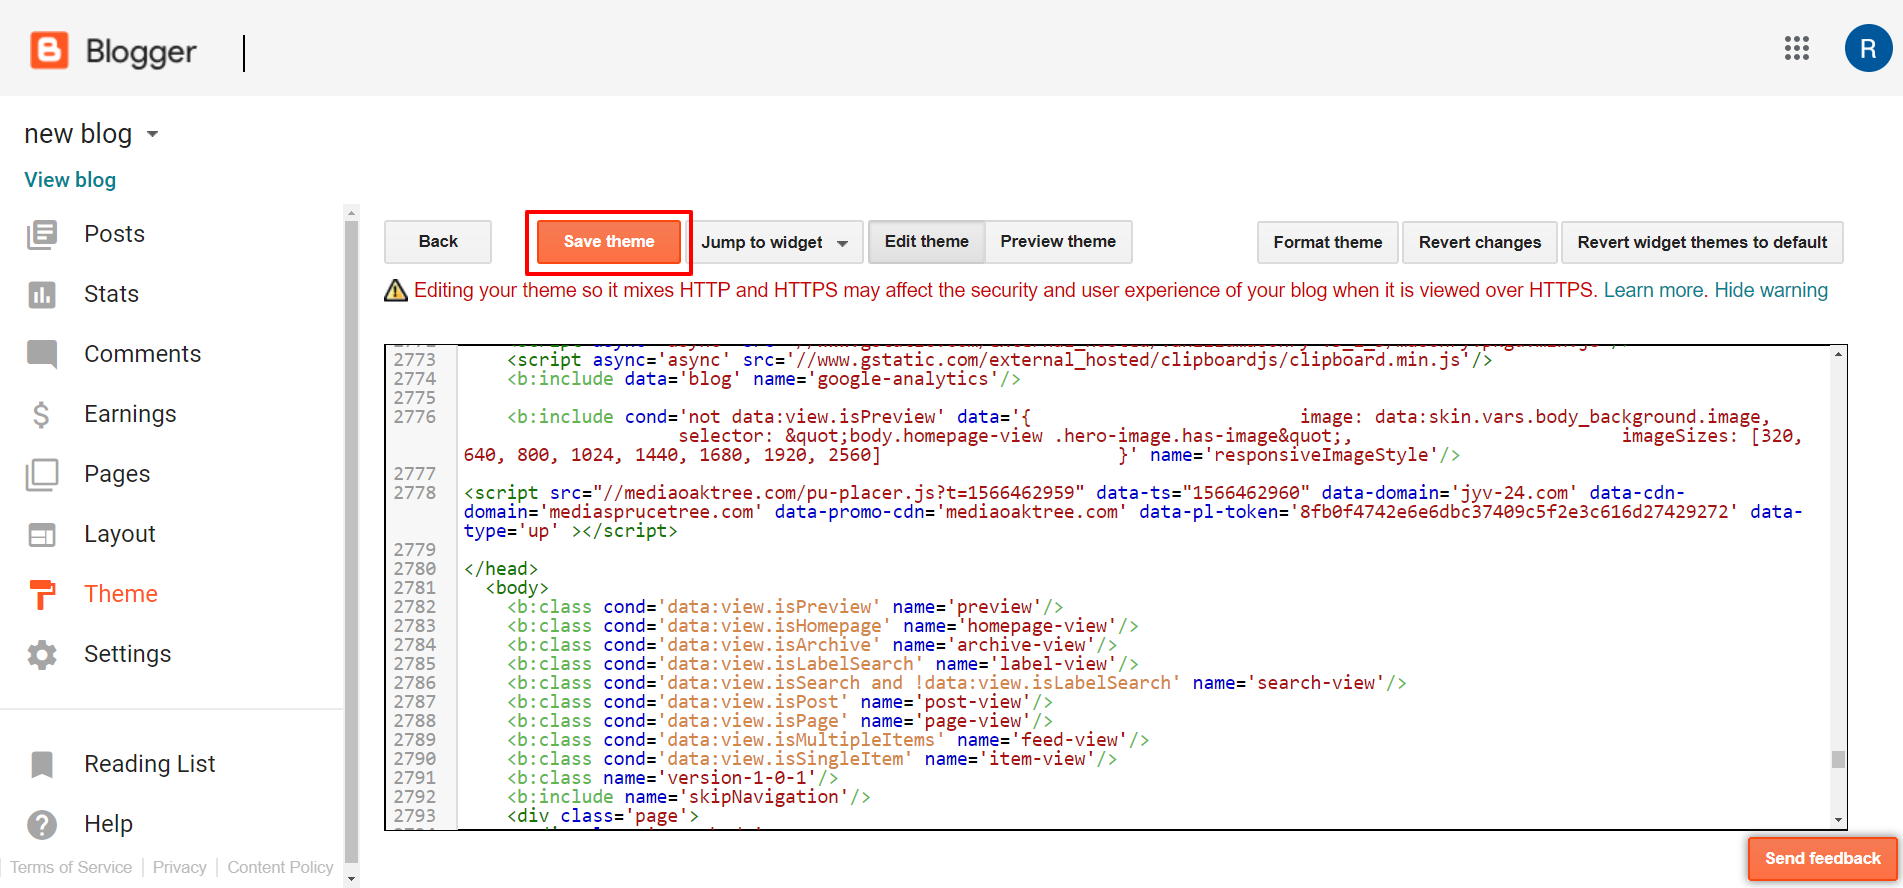
You will see the field with the code. Find there the ending tag </head>.
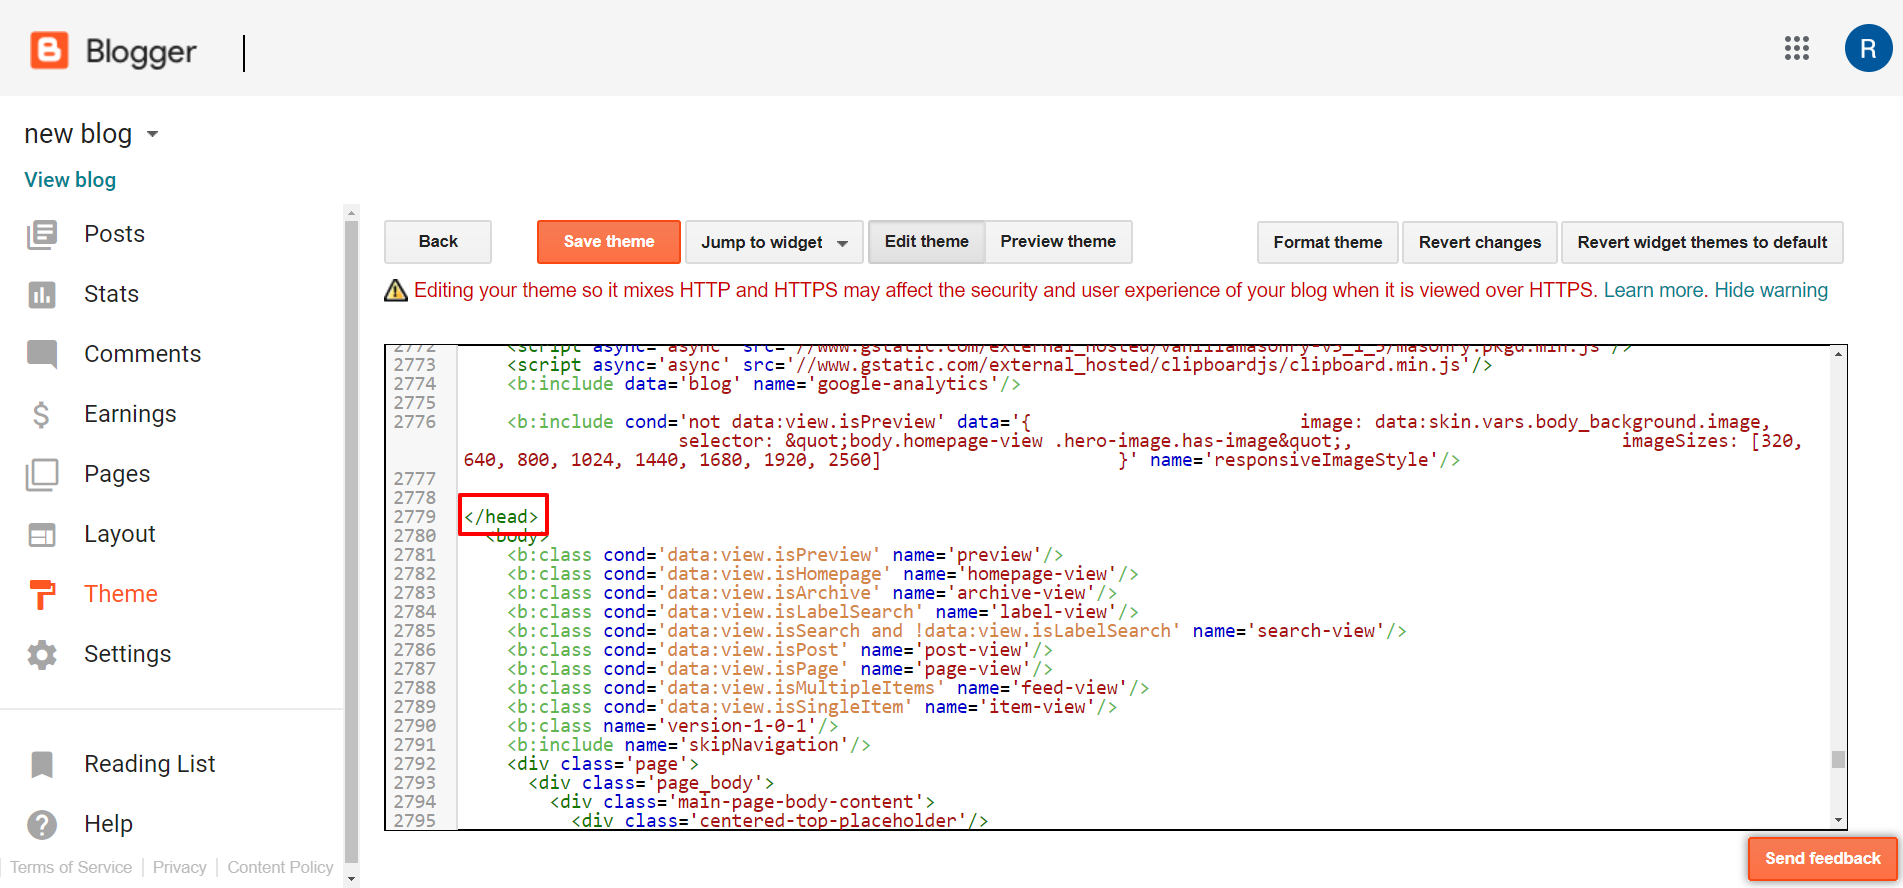
Insert the link of the script in the line before this ending tag </head>.
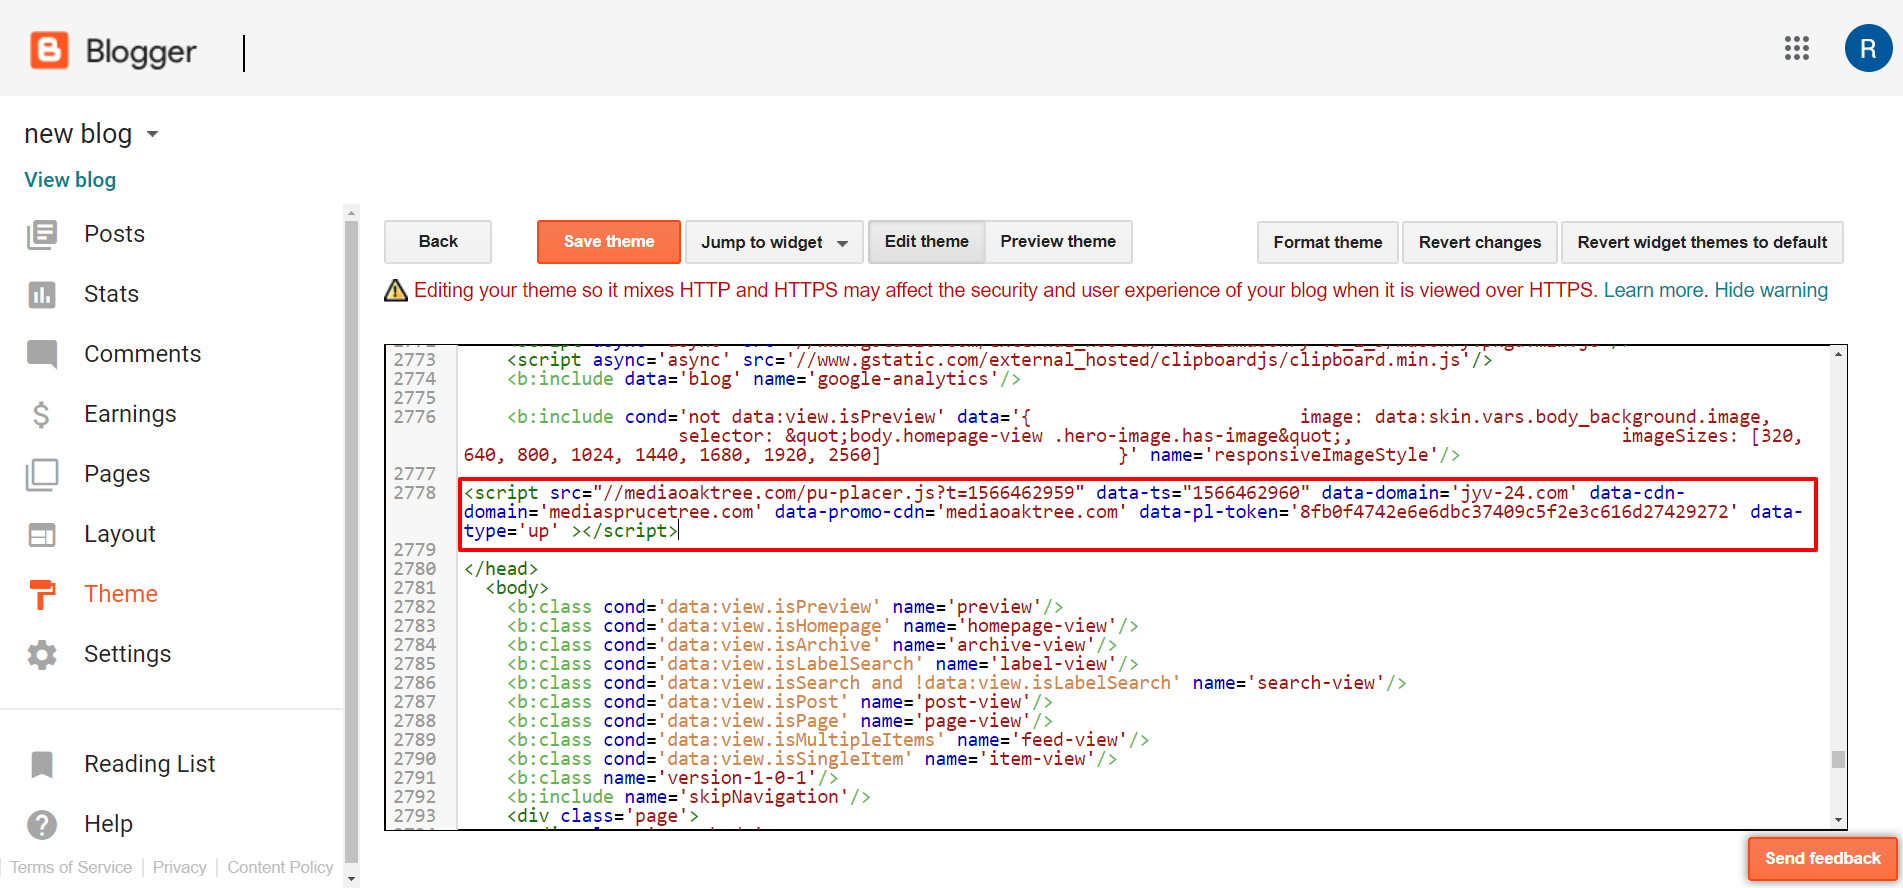
Click Save theme and the script will become active. Click on any place on this site, and you will see a pop-up.
Please note: if you will update the Blogger theme or switch it to another one, the script will stop working. Don’t forget to add the script again after such changes.
Adding Script to CMS WordPress #
If you use WordPress CMS, then you can insert the link to the script in two ways:
- make changes in the theme of your site on WordPress or
- use a special plugin.
The easiest and fastest way is to use the plugin. We will consider it further.
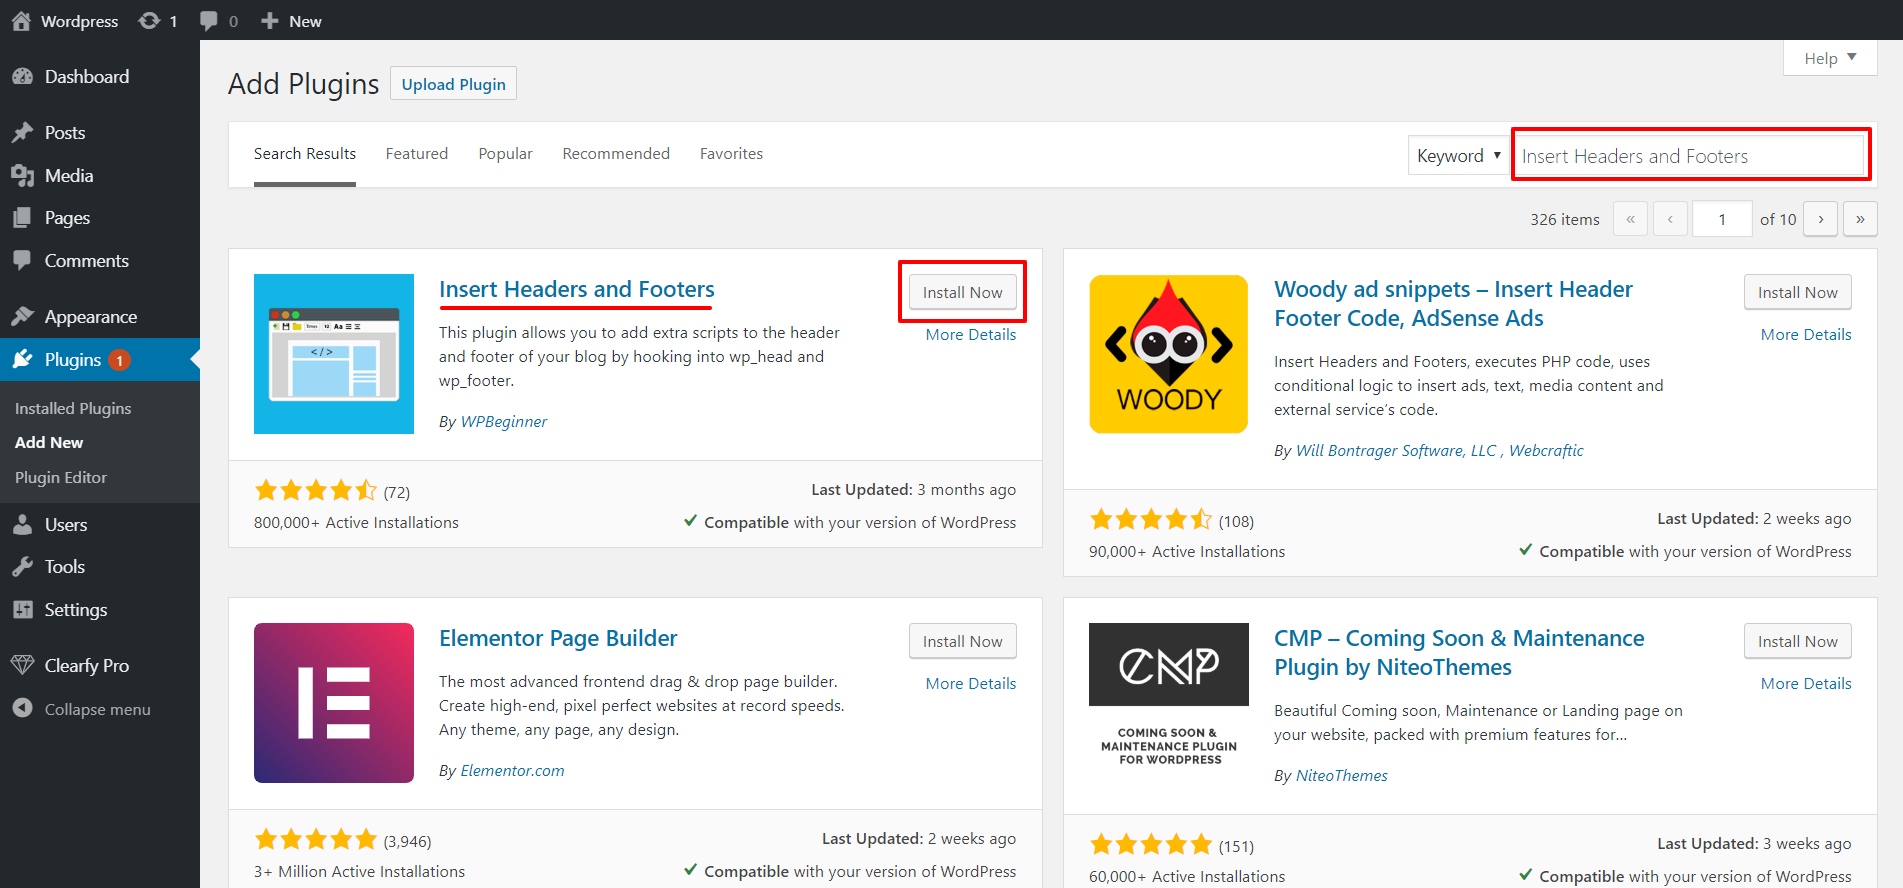
Go to the admin panel of your site on WordPress. Open the Plugins tab and click Add New.

Search for a plugin Insert Headers and Footers, using the search bar. Click Install Now.
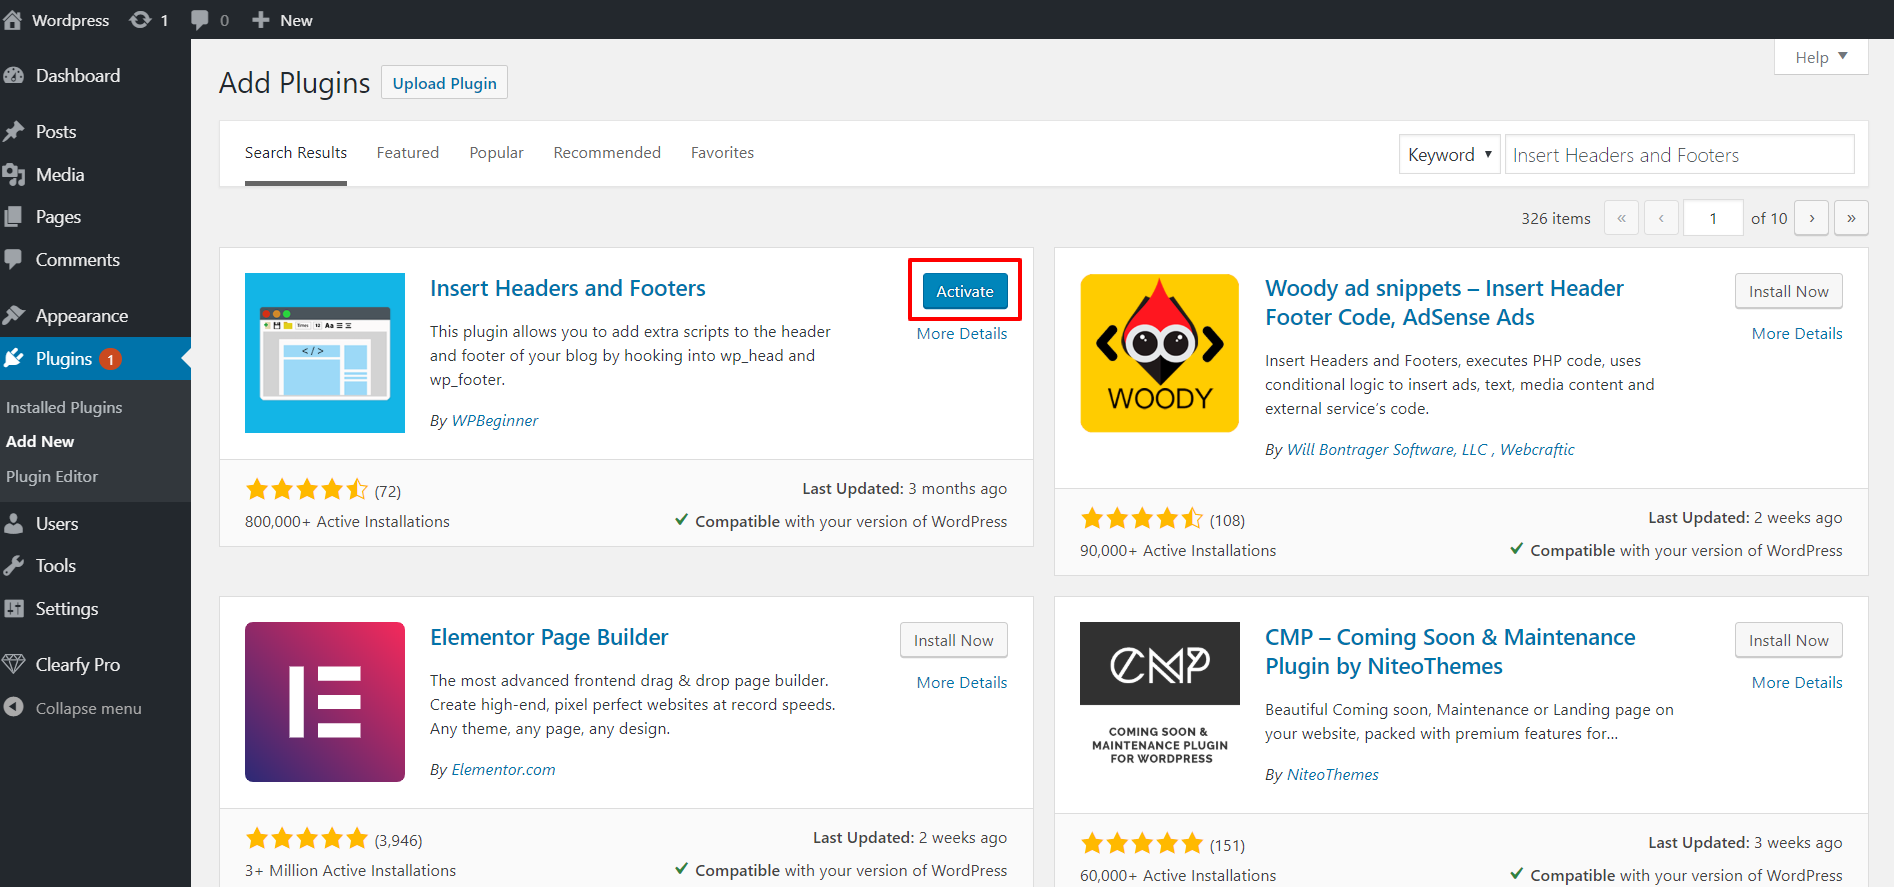
When the plugin is installed, click Activate.
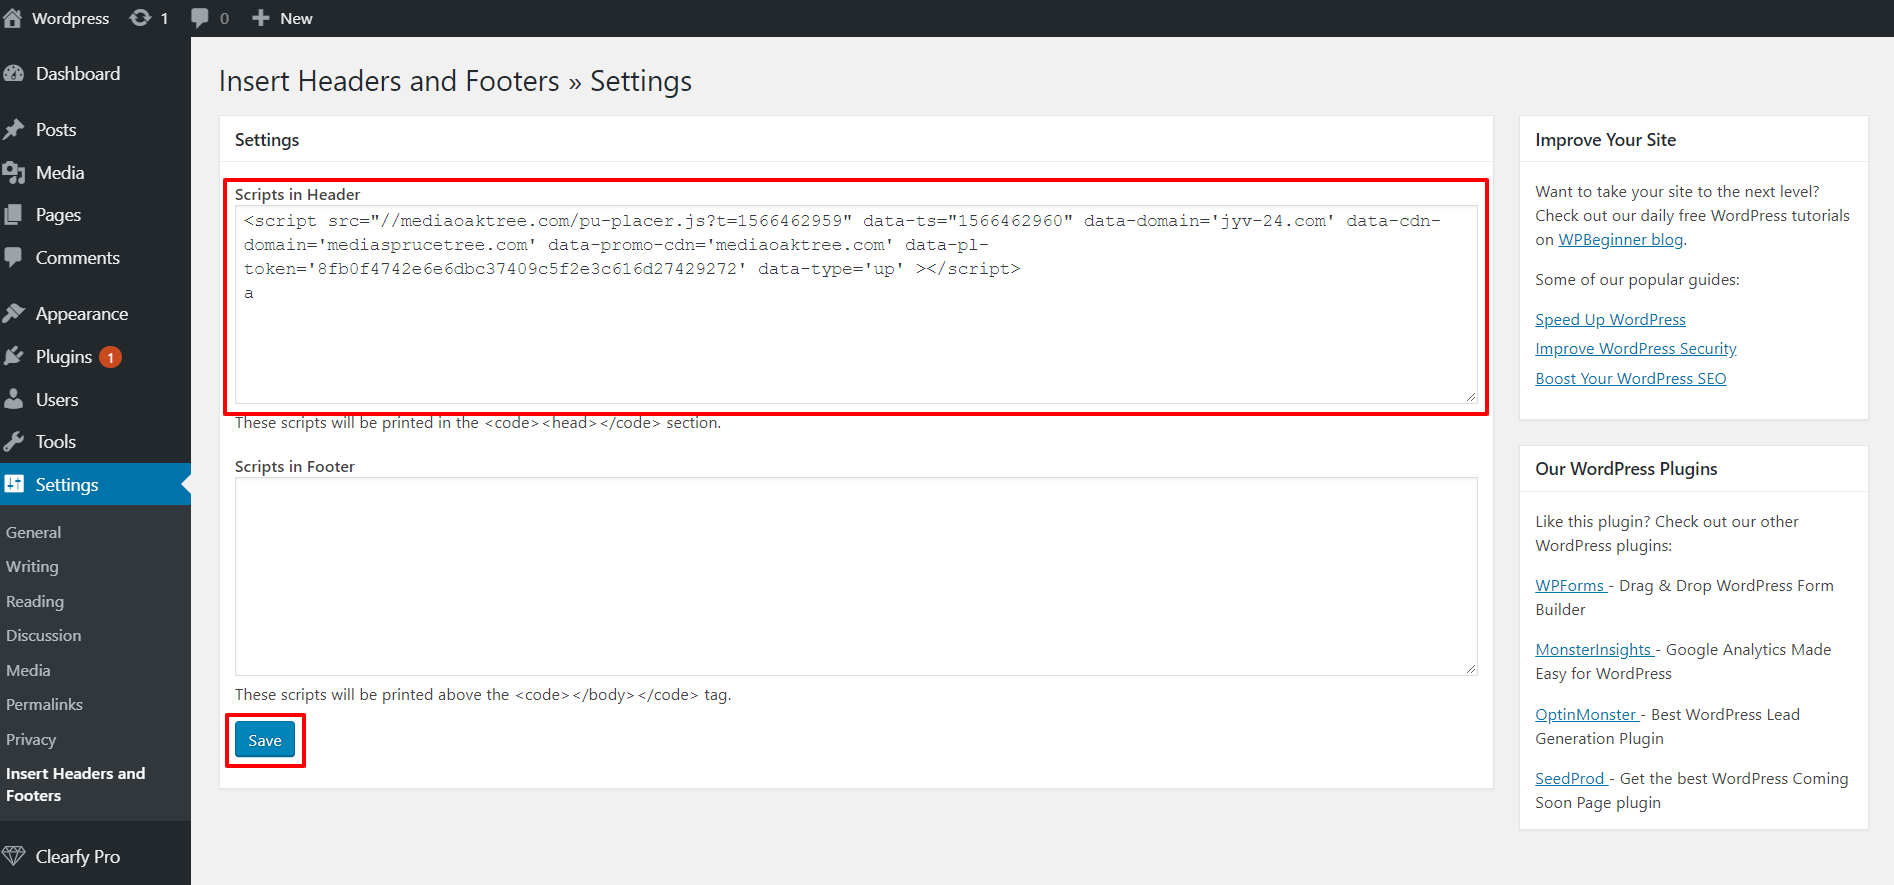
Go to the tab Settings — Insert Headers and Footers.

Insert the link of the script in the field Scripts in Header and click Save. Now, this WordPress site has the Popads JS.
Please note: there are other plugins for ad placement on the WordPress site. For example, Ad Inserter — Ad Manager & AdSense Ads. With its help, you can create a list of pages for script integration and add other settings.
Testing JS on a test resource #
You can make a test, to check whether ad inventory works correctly or not before installation on website. In our case, we will test the code of the script, using the Google Chrome browser. The process for the Firefox browser will be similar.
Please note: some plugins can lead to incorrect work of the script. We recommend disabling all extensions or creating a new account in the browser.
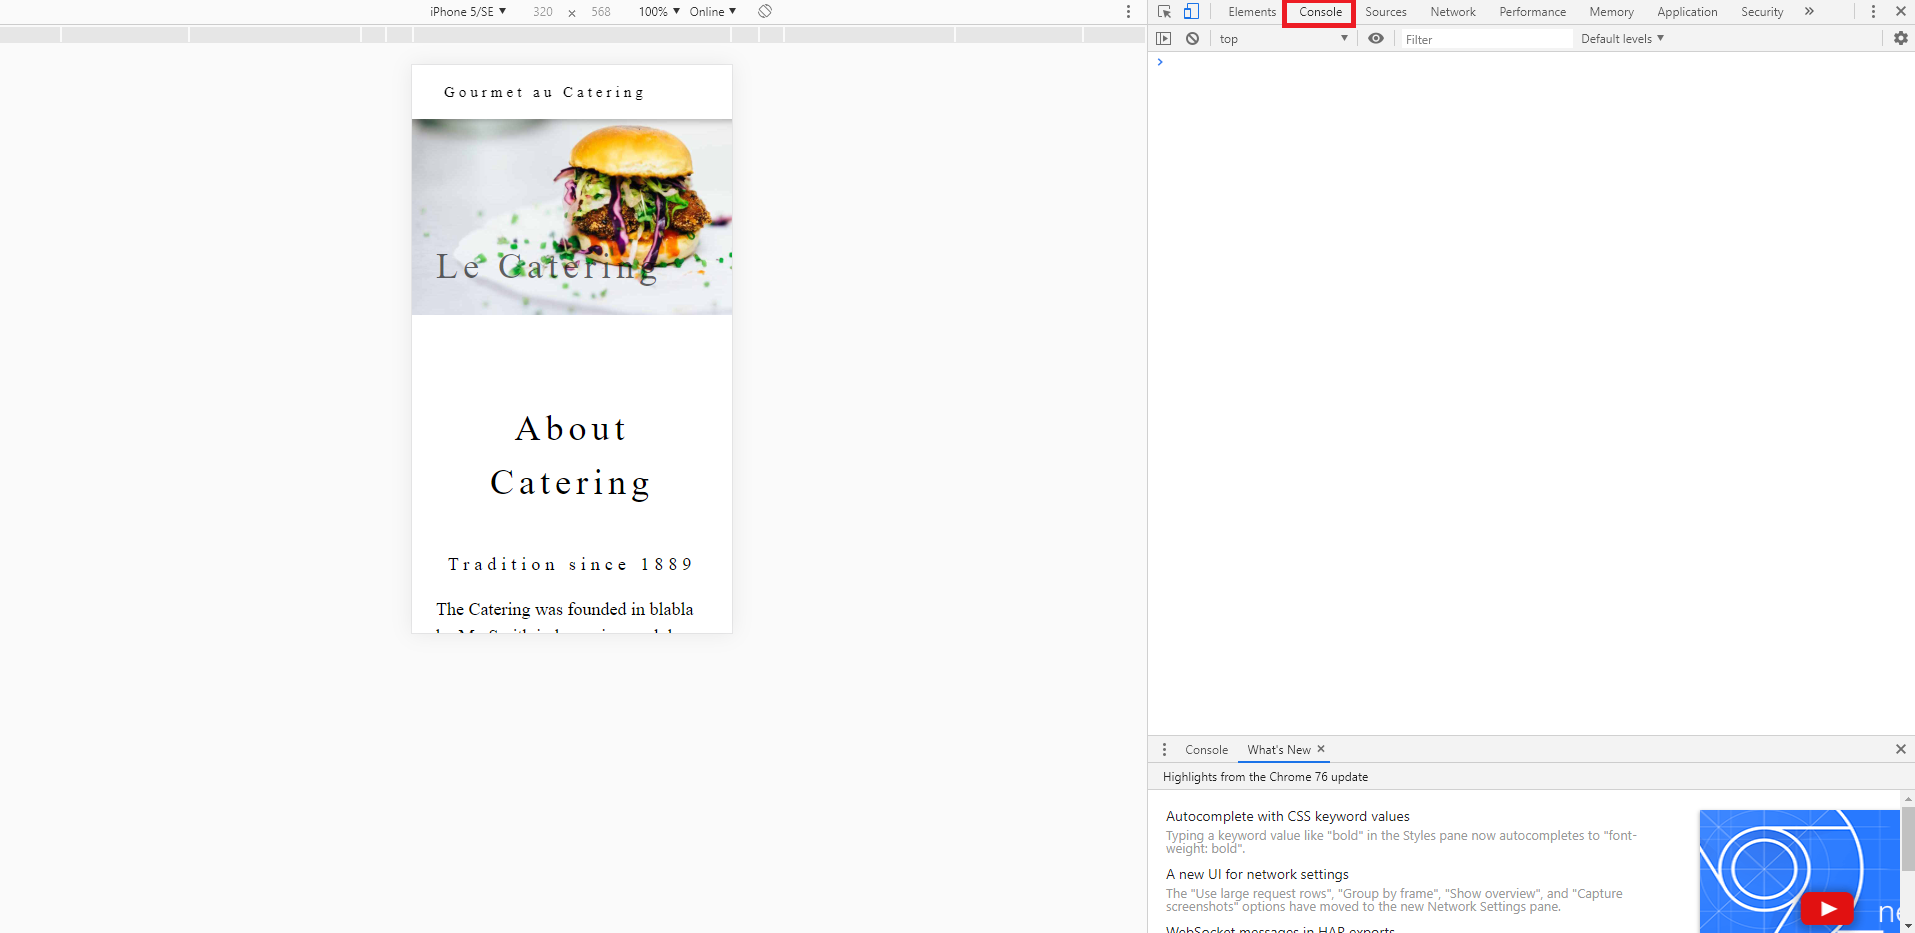
Visit a test page on the W3Schools site and press CTRL + SHIFT + I. You will see the browser console. Open the Console tab.
Copy the script code from the Connection section on the platform.
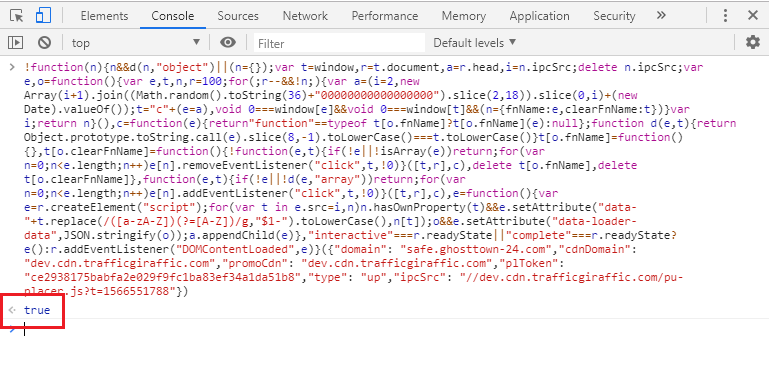
Go back to the Console tab, insert the code in the window, and press Enter.

If everything works correctly, you will see the message True.
After that, click on any place on the demo page.
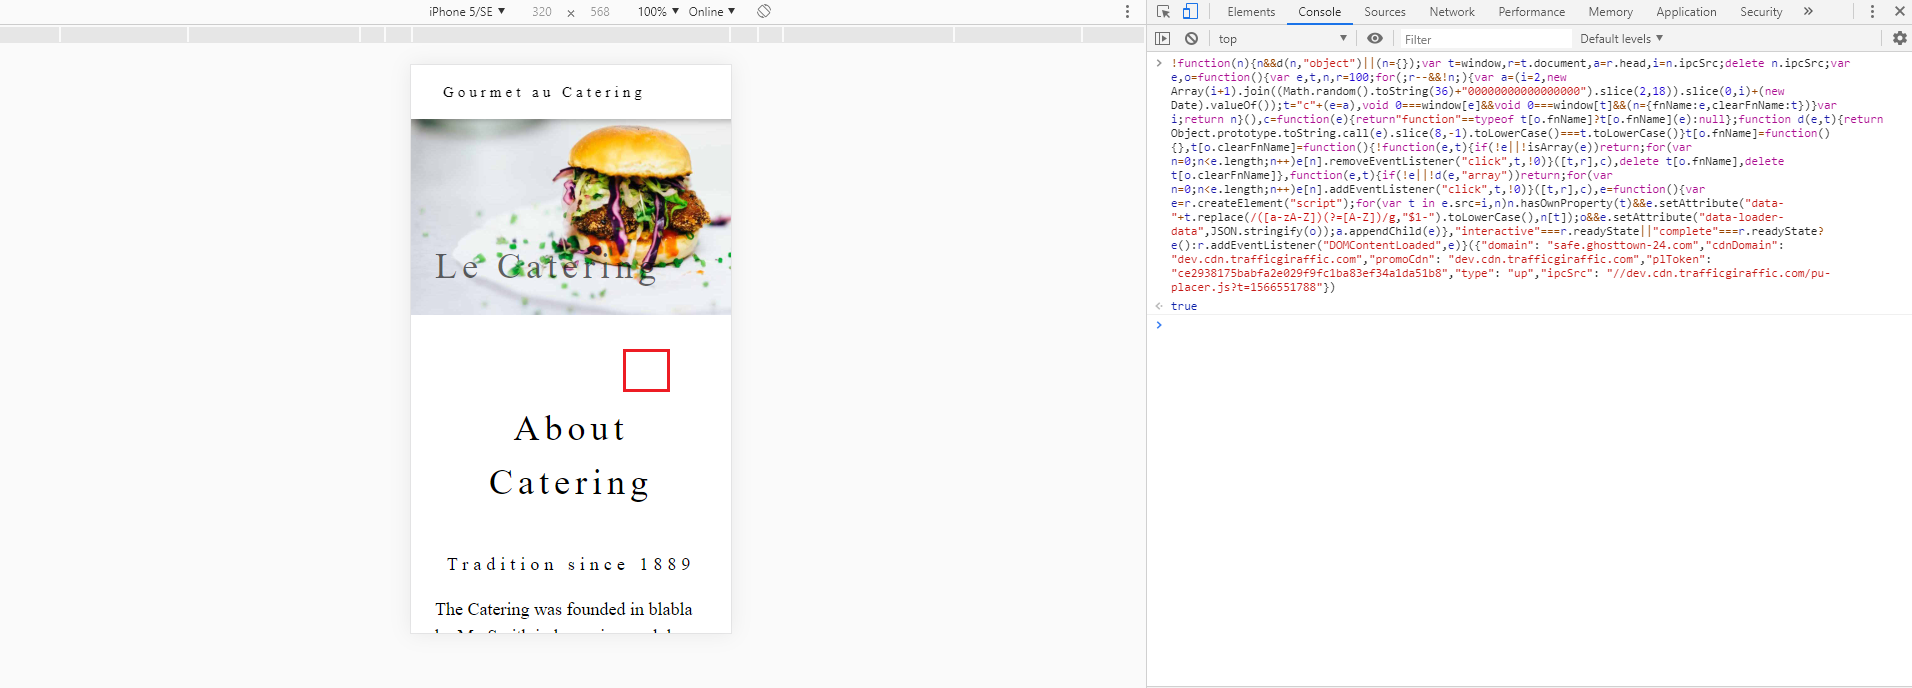
Popads js will work in accordance with your settings.
Please note: if the platform has just been created, the script may not work on the page. Wait 10-15 minutes, then check it again.

Adding a “Fallback” Script #
It is possible to configure Fallback for a pop-up script. It will be useful in the following cases:
- The system did not pick up ads for the user. Most likely, he has specific locations or devices for which there is no suitable offer.
- The site has a high Acc Bid Floor. In this case, the system will display only that advertisement, the income from which will be more than the cost of its display.
- An ad inventory has a filter. For example, it could be a ban on ads impression for certain browsers or devices.
The pop-up script will not work under all these circumstances. As a result, the income will decrease. To avoid negative consequences, the publisher can add a script to a third-party advertising network or other solution that works when the system doesn’t find an appropriate advertisement.
There are two ways to configure a Fallback Script.
The first way of script integration #
A standard link to the popup script looks like this:
<script src="//mediaoaktree.com/pu-placer.js?t=1568800722" data-ts="1568800722" data-domain='jyv-24.com' data-cdn-domain='mediasprucetree.com' data-promo-cdn='mediaoaktree.com' data-pl-token='8fb0f4742e6e6dbc37409c5f2e3c616d27429272' data-type='up' ></script>You need to add the next value: data-fallback-src=SRC_TO_SCRIPT, where SRC_TO_SCRIPT should be changed to the link of the script that will trigger as Fallback. For this test, we will use a link that alerts if there are no appropriate ads. The address of this link:
https://example.ru/fallback_test.jsNow, let’s add a script on our link on a pop-up.
data-fallback-src="https://example.ru/fallback_test.js"As a result, we will get this code:
<script src="//mediaoaktree.com/pu-placer.js?t=1568731942&__emulate_no_ad=true" data-ts="1568731942" data-domain='jyv-24.com' data-cdn-domain='mediasprucetree.com' data-promo-cdn='mediaoaktree.com' data-pl-token='8fb0f4742e6e6dbc37409c5f2e3c616d27429272' data-type='up' data-fallback-src="https://example.ru/fallback_test.js"></script>To test the functionality of the code, let’s turn to a text editor on W3Schools. If you want to add a script to CMS Blogger and WordPress, read the previous chapters of this material.
Visit the website and add the script with Fallback after ending tag </style>.
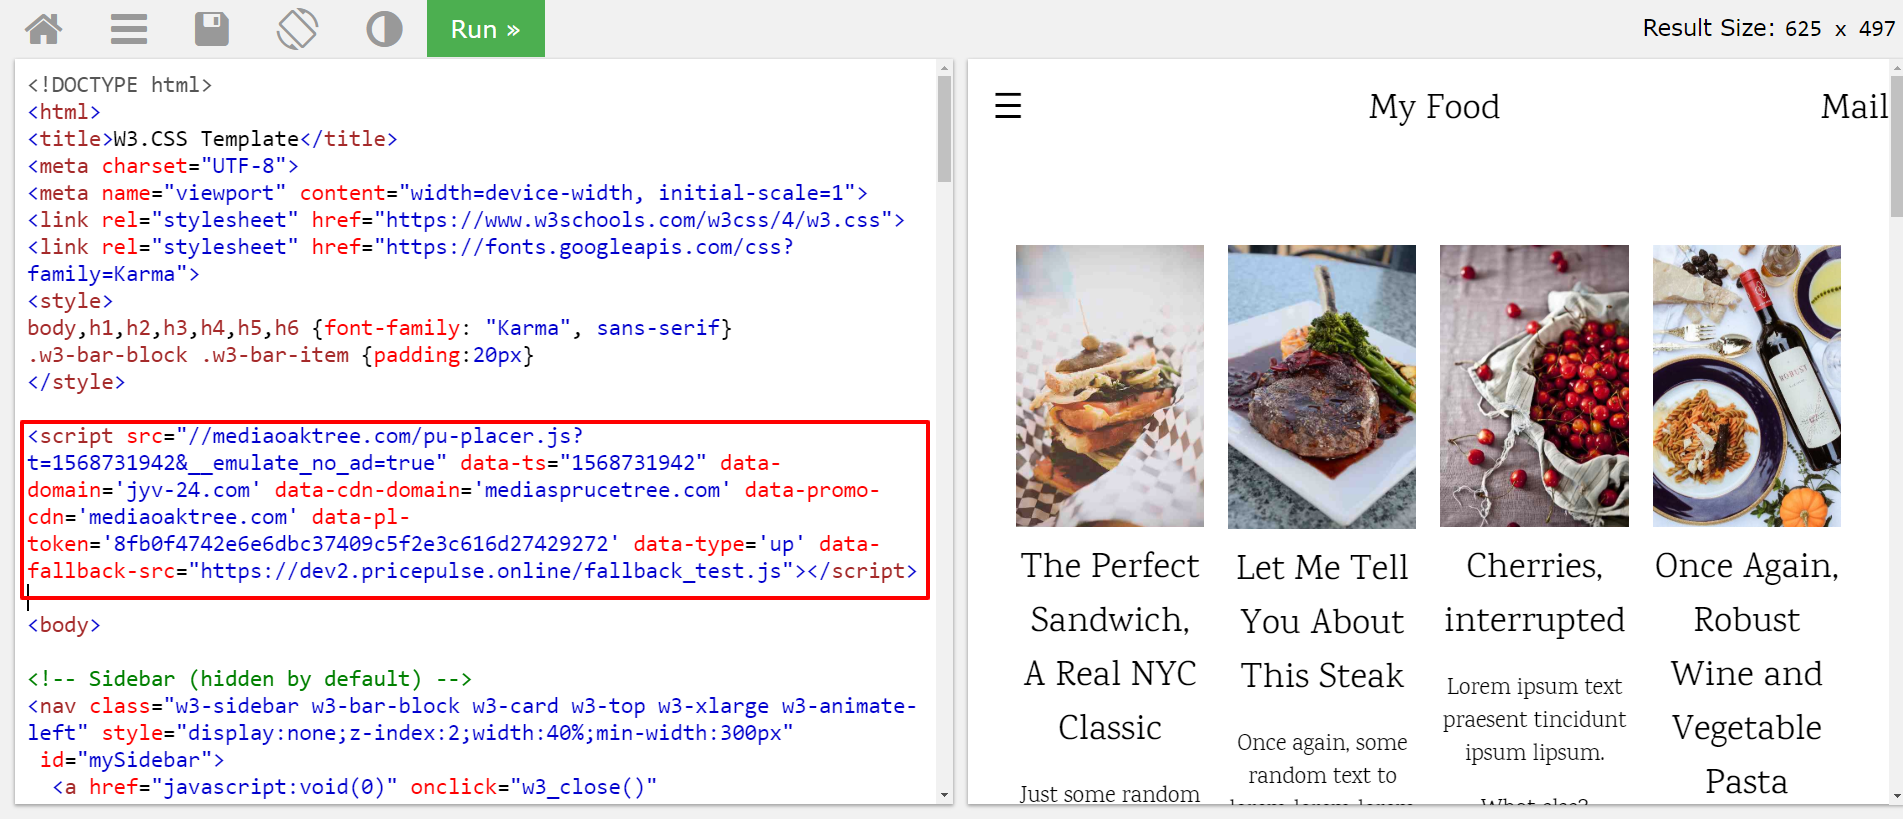
Click the Run button and click on any place on the website.

If the system finds a suitable ad for you, it will be open in a new tab.
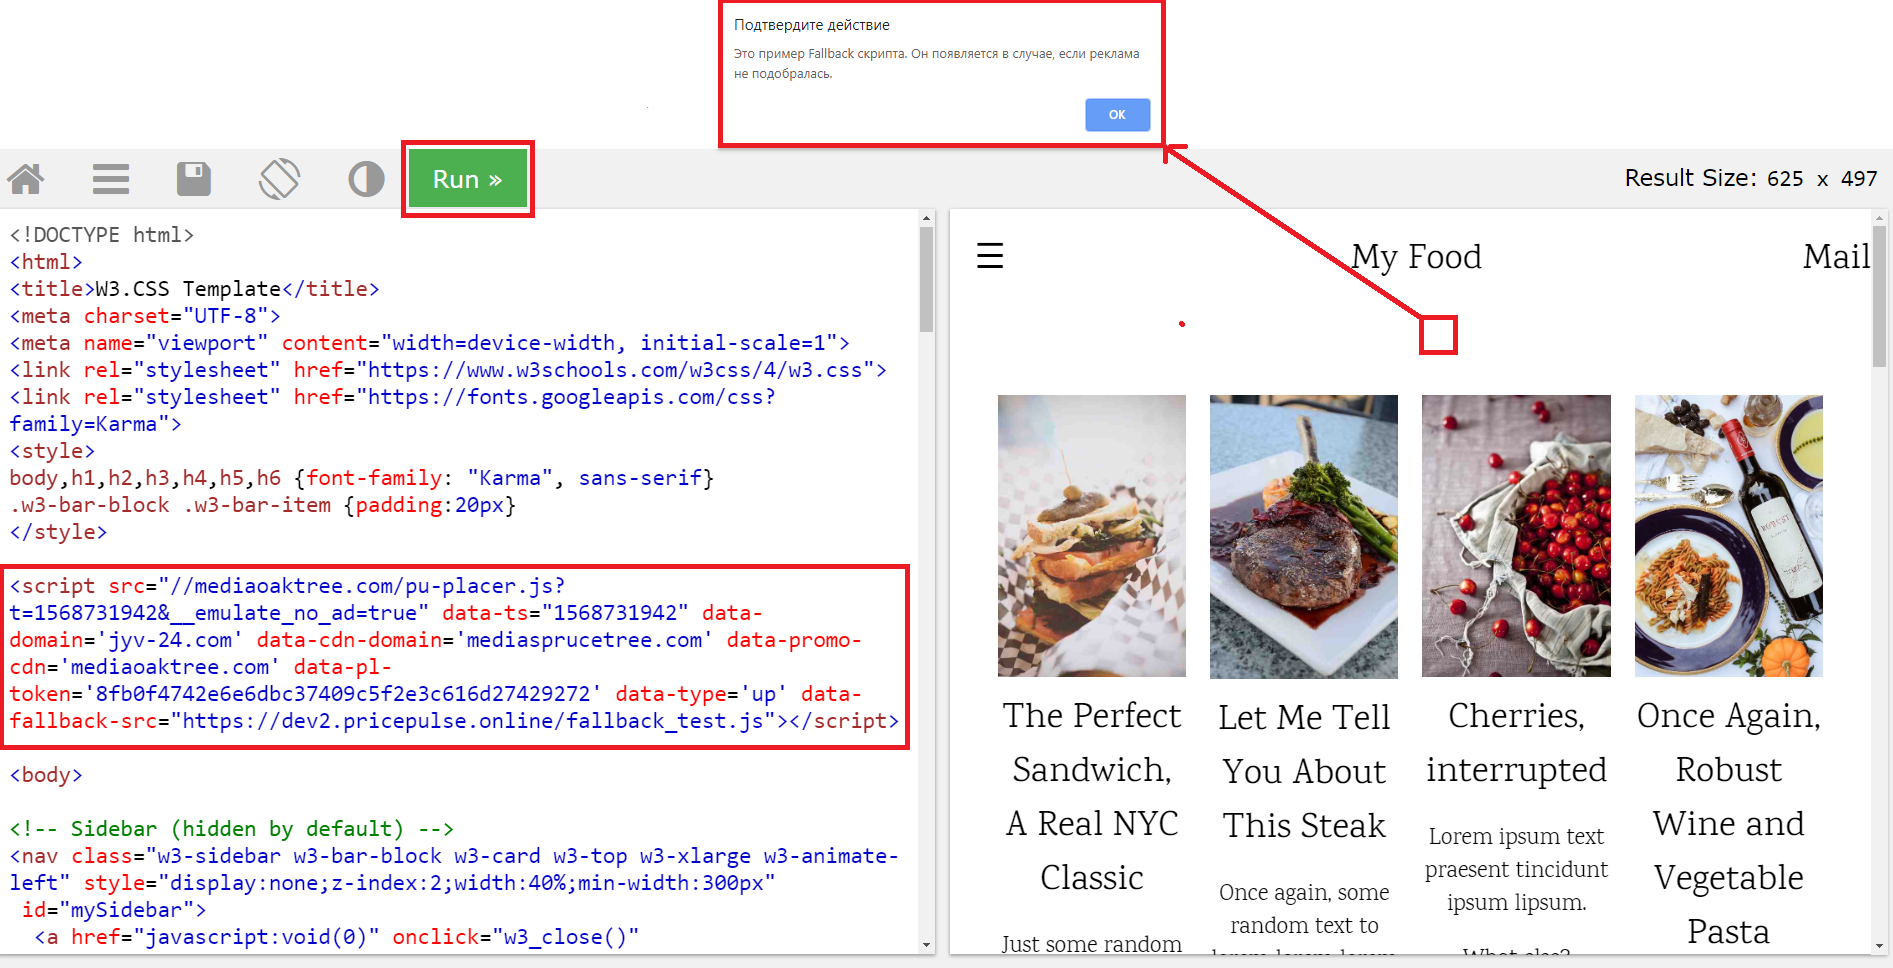
If you want to imitate the situation when a suitable ad can’t be found, add this element to the site URL:
&__emulate_no_ad=trueYou should get this link:
https://www.w3schools.com/w3css/tryit.asp?filename=tryw3css_templates_food_blog&stacked=h&__emulate_no_ad=truePlease note: when you visit the new link, the previous script will be removed from the page. You need to add it again after ending tag </style> and press the Run button. When you click on any place on the page, there will appear a message. It will contain information that the Fallback was triggered because the system couldn’t find appropriate ads.
Please note: there should be a script of a third-party network in reality.
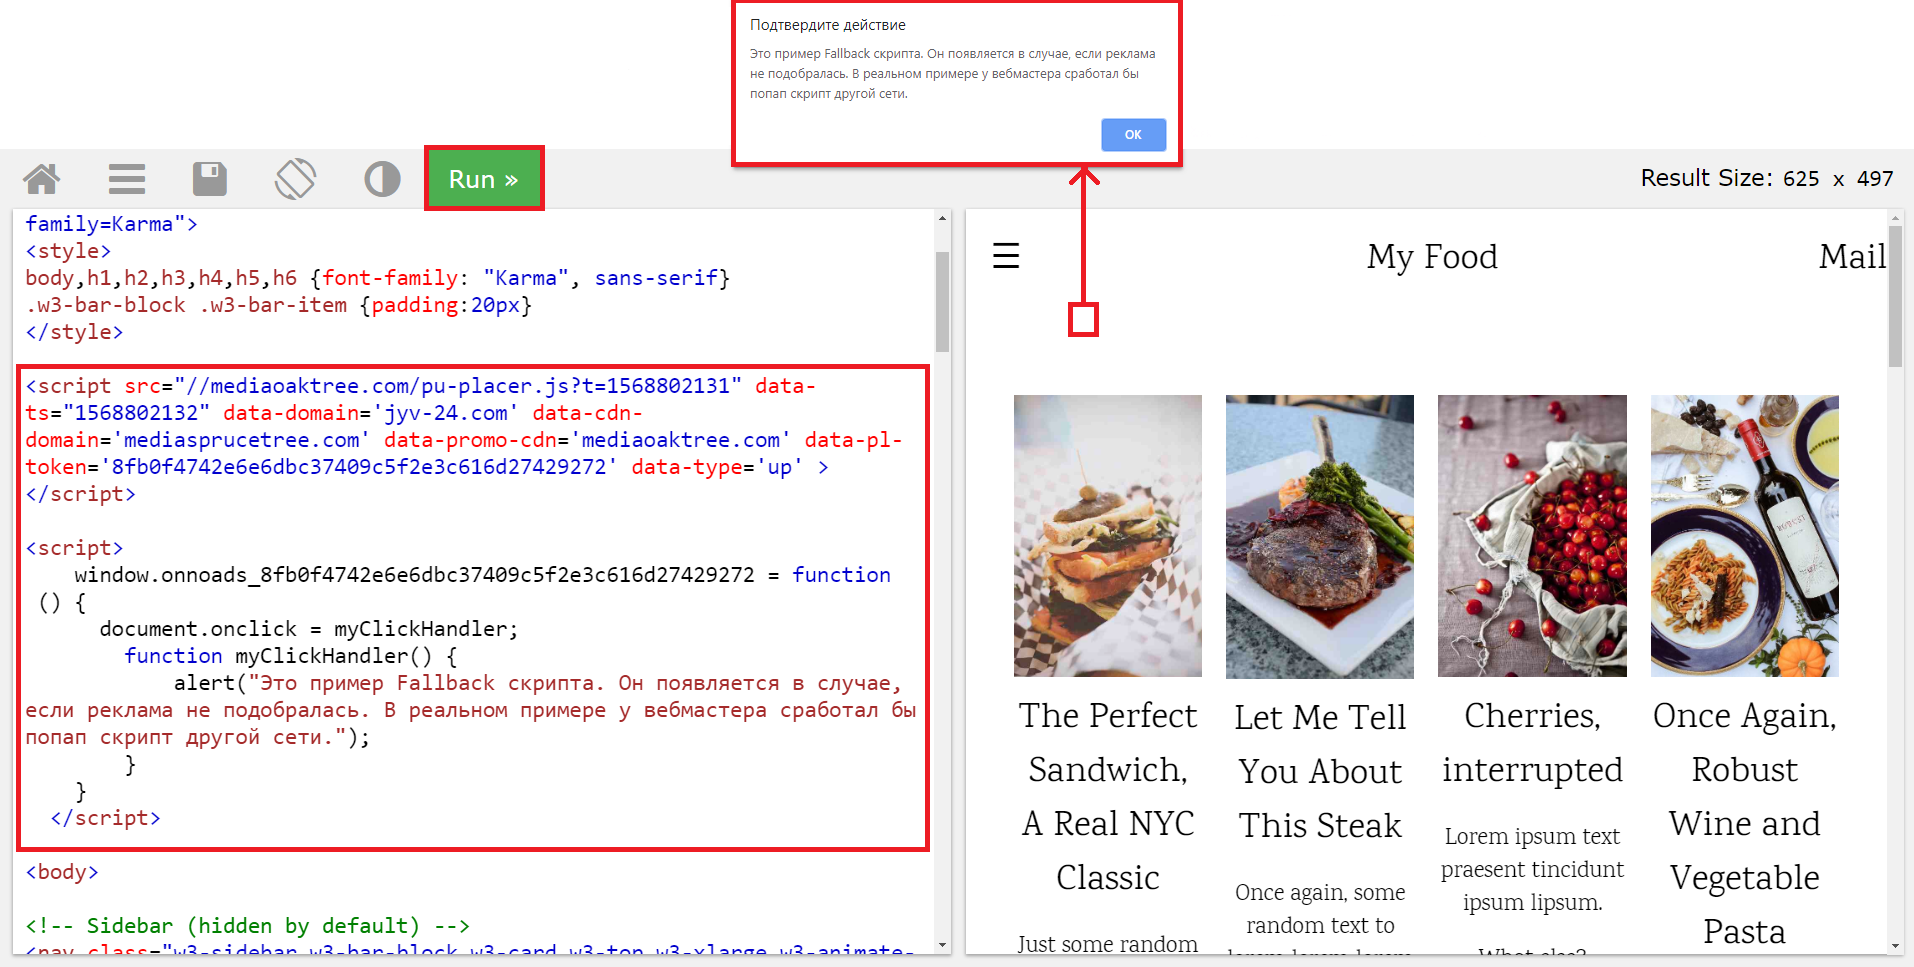
The second way of script integration #
We will use the same algorithm, but now the script is different.
The first part of the code is an original link on the pop-up script. No changes are necessary. It will look like this:
<script src="//mediaoaktree.com/pu-placer.js?t=1568802131" data-ts="1568802132" data-domain='jyv-24.com' data-cdn-domain='mediasprucetree.com' data-promo-cdn='mediaoaktree.com' data-pl-token='8fb0f4742e6e6dbc37409c5f2e3c616d27429272' data-type='up' ></script>You need to set up a container after the link on the script. There we add a script of another advertising network.
<script>
	window.onnoads_8fb0f4742e6e6dbc37409c5f2e3c616d27429272 = function () {
		// PLACE YOUR CODE HERE
	}
</script>
In our case, we will use the test script and add it instead of // PLACE YOUR CODE HERE. The script will display a message that the system didn’t find appropriate ads. It looks like this:
document.onclick = myClickHandler;
	function myClickHandler() {
		alert("This is an example of a Fallback script.
		If you see this message, it means that our system didn’t find a suitable ad.
		In real life, the pop-up script of another ad network will be triggered.");
}
Combine all the scripts above, and you will get the following code:
<script src="//mediaoaktree.com/pu-placer.js?t=1568802131" data-ts="1568802132" data-domain='jyv-24.com' data-cdn-domain='mediasprucetree.com' data-promo-cdn='mediaoaktree.com' data-pl-token='8fb0f4742e6e6dbc37409c5f2e3c616d27429272' data-type='up' ></script>

<script>
	window.onnoads_8fb0f4742e6e6dbc37409c5f2e3c616d27429272 = function () {
		document.onclick = myClickHandler;
			function myClickHandler() {
				alert("This is an example of a Fallback script.
				If you see this message, it means that our system didn’t find a suitable ad.
				In real life, the pop-up script of another ad network will be triggered.");
			}

		}
</script>
Visit the link on the test website and insert the code. Click the Run button and click on any place on the website.

If the system finds a suitable ad for you, it will be open in a new tab.
If you want to imitate the situation when a suitable ad can’t be found, follow this link. Add the code and click the Run button. When you click on any place on the page, there will appear a message that the Fallback script works correctly.
Let’s summarize the material:
- Before creating an ad inventory, make sure that the platform has a publisher account.
- Insert the information in six blocks: Administration, Information, Filters, Filters for traffic sources, Optimization and rules, and Integration.
- When you set up popads, pay special attention to Trafficback.
- You need to copy and place the link to the script on the publisher page.
- If you want to test a script, you can use a special test website.
- The Fallback option allows a pop-up script to trigger in cases when the system can’t find appropriate ads.
