Introduction #
Once you have created a managed advertiser, you need to configure his integration. The integration allows you to receive statistics automatically from the advertiser.
Integration and Target URL Parameters #
Let’s go to the corresponding block of the advertiser’s account. It has the Postback URL. It is a link that an advertiser’s server calls when a conversion is tracked. This is how you get information about conversions.
The advertiser has to add his variables to your Postback URL for the correct work of the postback.
Please note: Postback URL is unique for each advertiser. Do not forget to check the use of the correct link in the Integration section of the advertiser’s settings.
Let’s see what values the advertiser can substitute in the Postback URL.

| Parameters | Description |
|---|---|
| Required | |
| c | click_id is passed to the advertiser in the Target URL in one of the SubID parameters and must be returned unchanged. Each advertiser has rules about substituting this value in the postback. |
| a | action_id is the ID of the action in the admin panel. It is a static parameter. Usually, it is equal to three and you do not need to change it. 1. Registration (lead). 2. First deposit. 3. Rebill. |
| m | advertising_cost means earnings per conversion. Sometimes an advertiser can’t pass this parameter. We will consider below how to deal with this situation. |
| Additional | |
| u | unique_id is a unique identifier of the action in the advertiser’s system. If the advertiser can add this parameter in Postback URL, you should ask for it. Then there will be no duplication of actions in the system. |
| r | currency_code. If the link does not contain it, the amount is specified in USD by default. If an advertiser reports on conversion payments in dollars, skip this option. Remove it from postback. If the advertiser pays in a different currency, then you need to set it in the international abbreviation (USD, EUR). You can find country currency codes here: https://www.iban.com/currency-codes. |
Send the generated Postback URL from the Integration section and explanations for each parameter to the advertiser.
The advertiser inserts his parameters into the Postback URL and sends the final link. Let’s look at the link below:
http://s.welcome-affiliate.com/p/?pk=244fddfb8b6bcd421da5c12440ea4783784de158&c={wsid}&a=3&u={transid}&m={payout}Pay attention to the value of parameter c. In the variable wsid, the advertiser will keep click_id on his side, which will be passed to him after each click on the promotional material. When the target action is completed, it will return the click_id of the person who completed the conversion.
Let’s take a look at the whole process, to understand the general principle of the postback from the display of advertising to the user target action on the advertiser’s website.
Let’s look at the principle using directlink. This is the most striking example of analyzing the integration process between you and the advertiser. The general concept of integration will be similar to other types of promotional materials.
Step 1: Following a link
The user follows directlink on the publisher’s site.
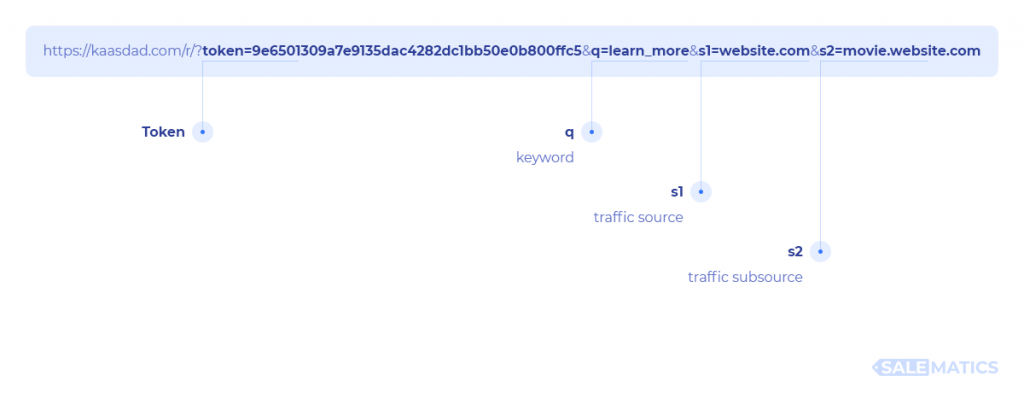
Directlink contains some required and optional parameters that the publisher specifies:
- token is a required parameter. It has encrypted information about the ad inventory to which the link belongs.
- q is an optional parameter. Publishers pass a keyword in it. It allows the system to choose the right advertisement. Advertisers can use the keyword to evaluate the quality of traffic or to personalize their promotional materials.
- s1 and s2 are also optional parameters. They help segment traffic. If the publisher has several large sites, he passes you additional information about the location of directlink on his sites. The traffic quality and profitability depend on the location.
Step 2: Redirecting a user to promotional material
After the user clicks on the link, he redirects to the advertiser’s promotional material.
Target URL is set in the campaign promotional material. Perhaps this will be a link to the advertiser’s landing page. Target URL might look like this:
https://website.com/showcase/The target URL gets parameters. Thanks to them, the advertiser will know the sources from which users come to his site. The parameter that passes click_id must be included in the target link.
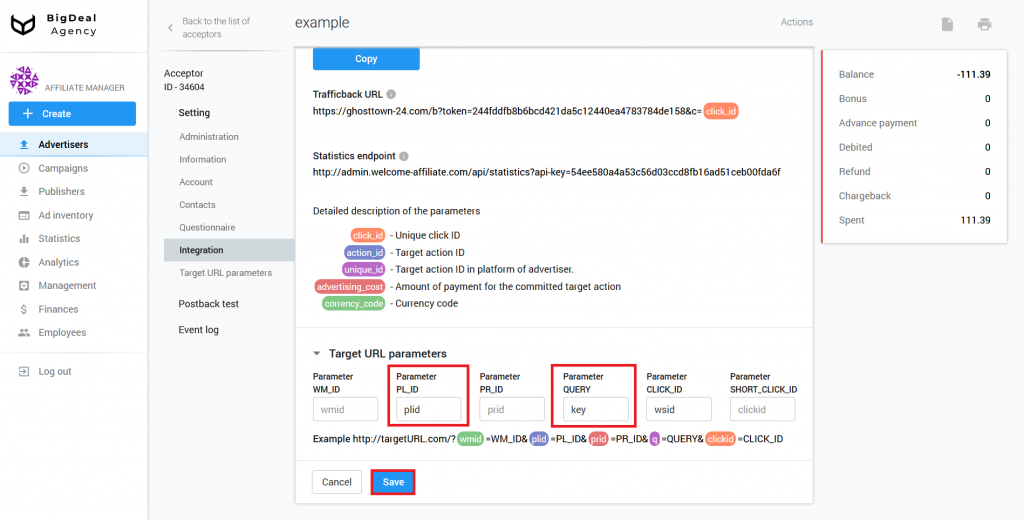
Go to the Target URL parameter block, located in the advertiser profile settings to do this.

Take the value of the c parameter from the link received from the advertiser and paste it into the Parameter CLICK_ID field of the Target URL parameter block. Click Save.

An advertiser may want to receive other data from you. Ask him about it.
It is possible to add the following variables to the target link:
- WM_ID is the publisher ID on the platform.
- PL_ID is the ad inventory ID on the platform.
- PR_ID is the promo material ID on the platform.
- QUERY is the keyword that the publisher passes.
- SHORT_CLICK_ID is a short form of click_id. Normal click_id consists of 32 characters. In some cases, advertisers do not have the technological ability to keep a click_id of this length. Then you can pass the short version. It consists of 19 ± 2 characters.
The variables specified in the Target URL parameters will be automatically substituted into the Target URL of all promotional materials.
Let’s consider the following situation. An advertiser wants you to send him not only click_id but also the keyword and PL_ID. He indicated during the discussion that the values should be passed in the key parameter for the keyword and plid for the publisher’s ad inventory ID.
Enter them in the appropriate fields in the Target URL parameters block and save the changes.
The advertiser also asked you to pass the IP address of the user who will visit his site. The advertiser must tell you which parameter should have the IP address value. In our case, the IP parameter has this value.
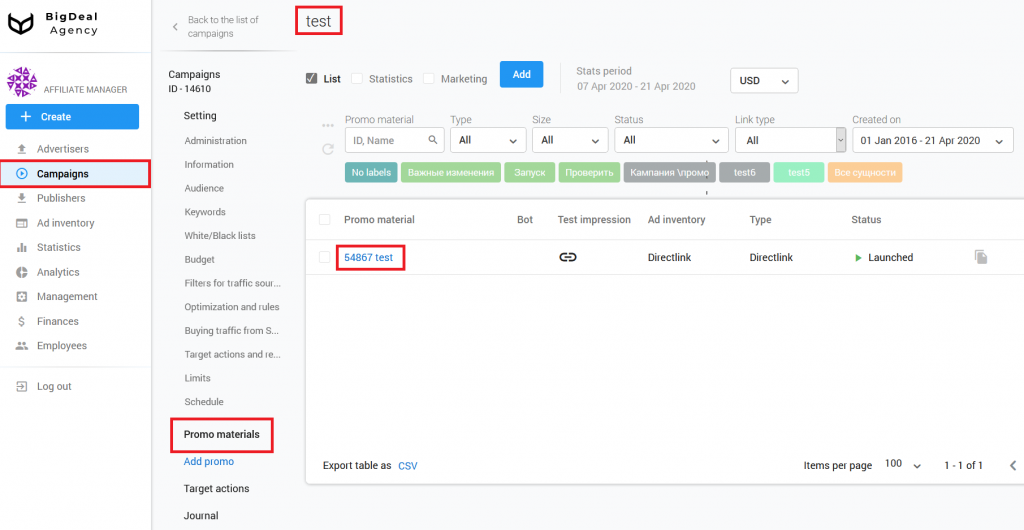
Let’s enter the parameter. Go to the Promo materials block located in a specific advertiser’s campaign. Open the chosen promo.
Add the parameter to the link in the Target page URL block. Click Save.
Please note: you can set up other parameters for the Target URL. Their full list with description is available under the link Dynamic target URL parameters located in the Target page URL block. We have already reviewed them in the article HTML Pre-landing Page Setup for Promotional Materials (coming soon) and mentioned how they help to personalize a pre-landing page.
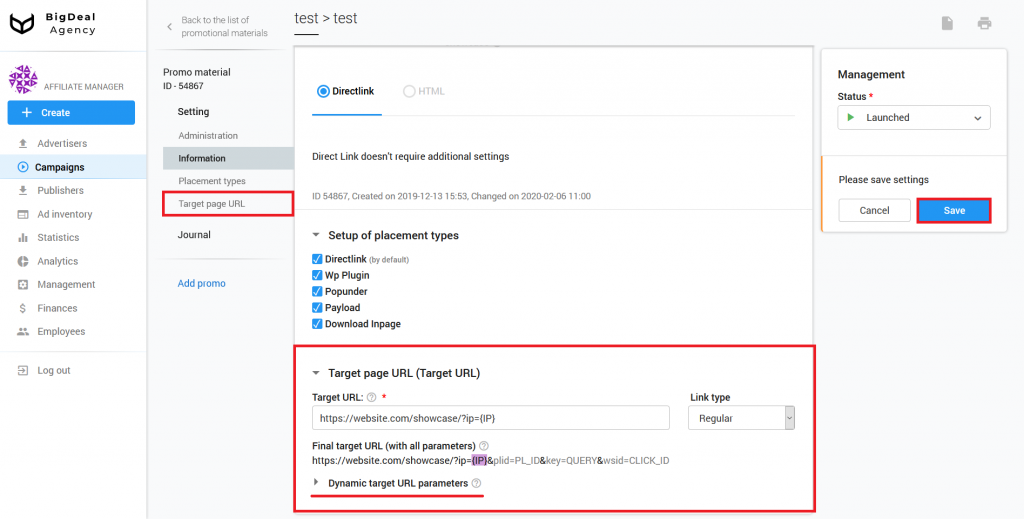
This is the final form of the Target URL for the promotional materials:
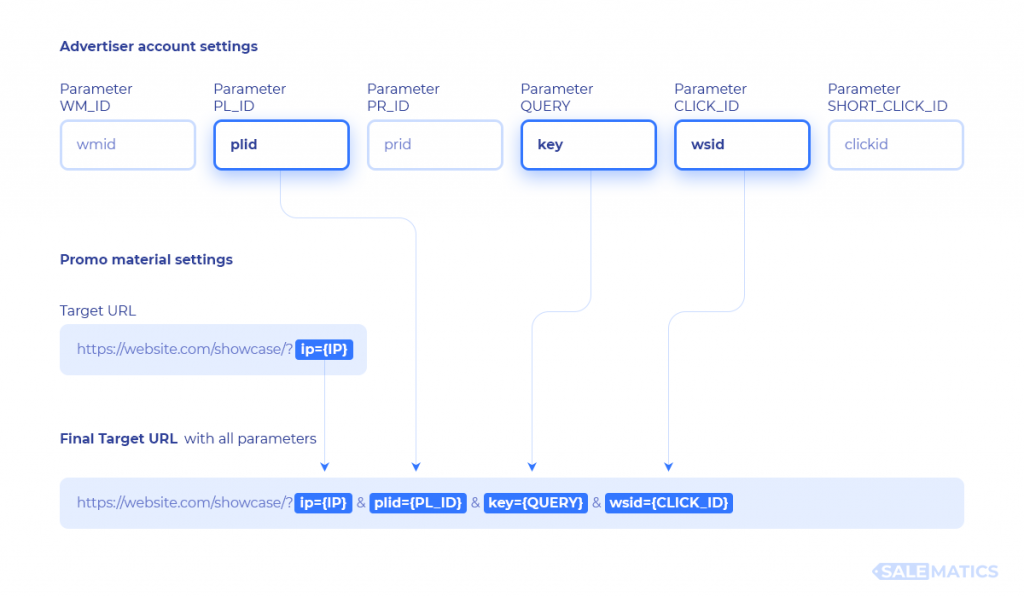
If you make a test, which will be discussed later, the real values will be set instead of the substitution macros: {IP}, {PL_ID}, {QUERY}, {CLICK_ID}.
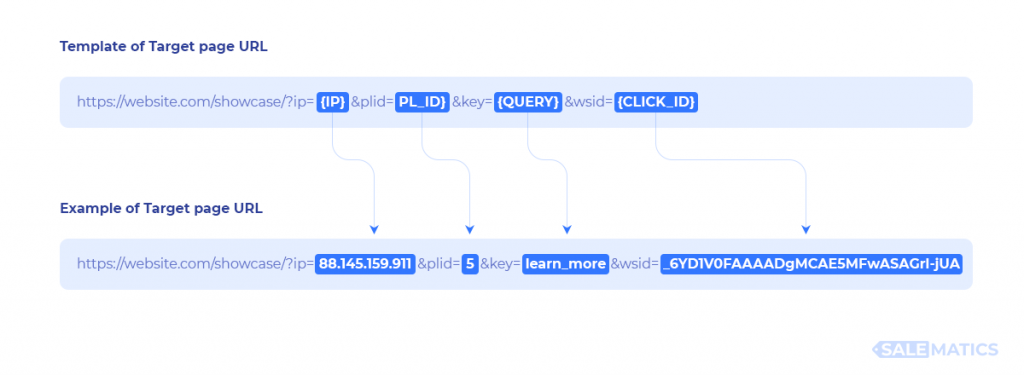
Now the advertiser will be able to receive data about each redirection to his site. His traffic analytics system will parse the parameters in the link and add them to the database for further processing.
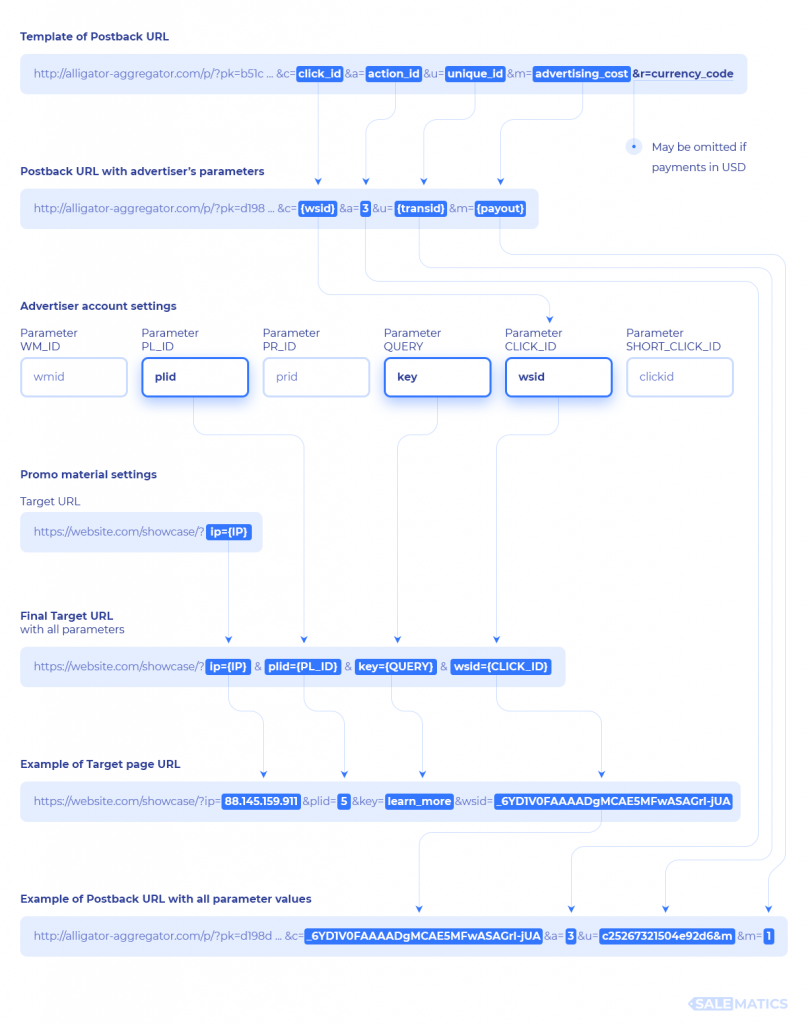
If one of the visitors of the advertiser’s site performs the target action, the advertiser will inform you of this by making a request from his server to the Postback URL:
http://s.welcome-affiliate.com/p/?pk=244fddfb8b6bcd421da5c12440ea4783784de158&c={wsid}&a=3&u={transid}&m={payout}The advertiser will substitute real values for {wsid}, {transid}, and {payout}:

The full data substitution scheme in the postback will look like this:
The postback should work correctly. However, we recommend you to check it just in case.
Postback functional test #
Let’s test to check whether the postback works or not. Create an offer, campaign, and promotional material for the advertiser. You can read here about their creation (coming soon).
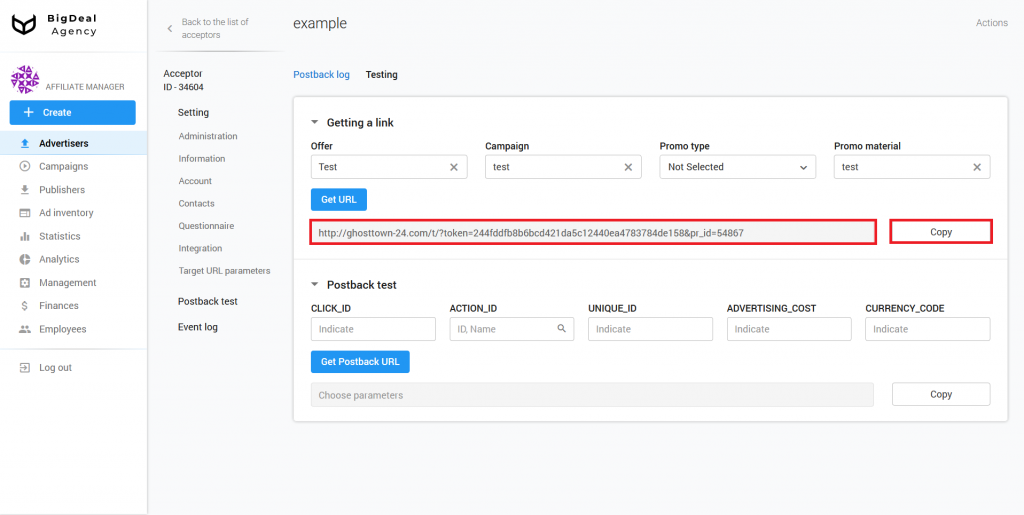
Go to the Postback test – Testing section. You can find it in the advertiser’s settings.
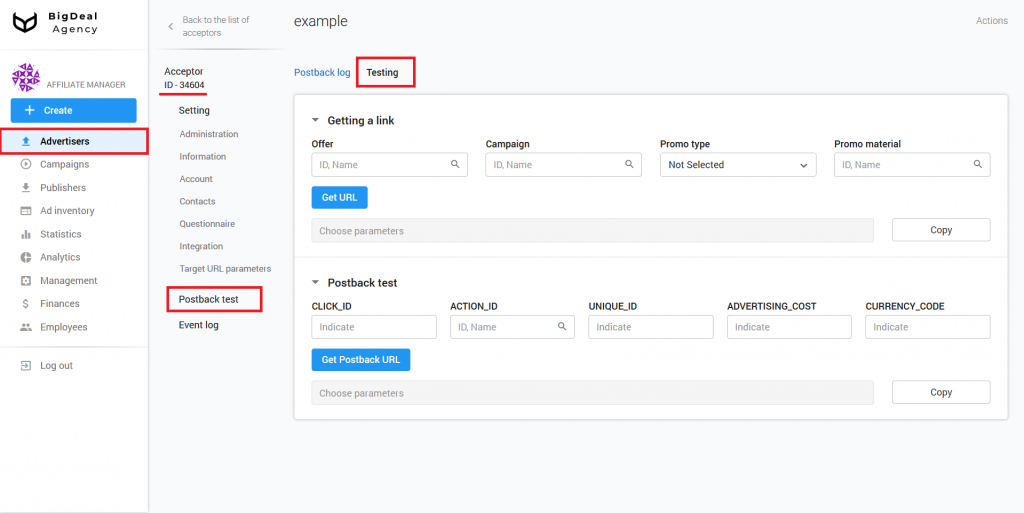
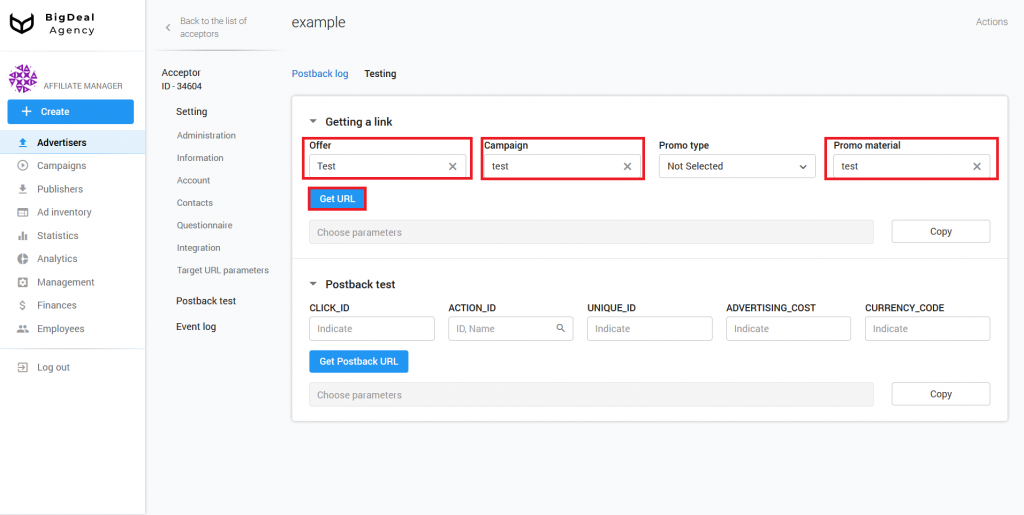
Select the created offer, campaign, and promo material in the Getting a link section. Promo type is an optional field. It will be substituted automatically. Click the Get URL button.

Copy and send the generated link to the advertiser.
As soon as the advertiser receives the link, he will make a test. The link redirects to the Target URL. SubID parameters saved in the advertiser’s profile will be added to it. The corresponding real values will be substituted into them: click ID, ad inventory, etc. The advertiser must perform the target action on the page. After that, the postback will be generated.
Please note: the test takes place regardless of the status of the campaign or promotional material. Do not start a company if you do not want to receive traffic during the test.
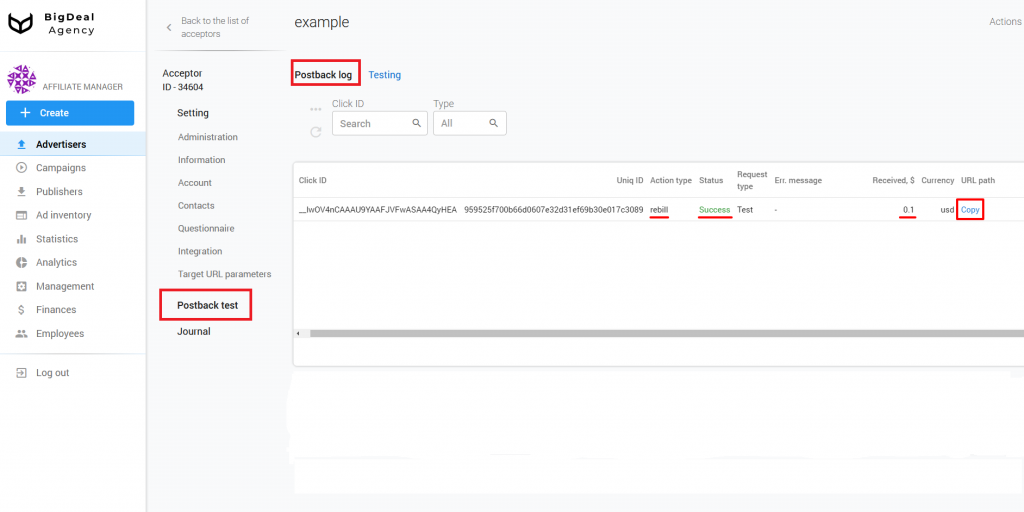
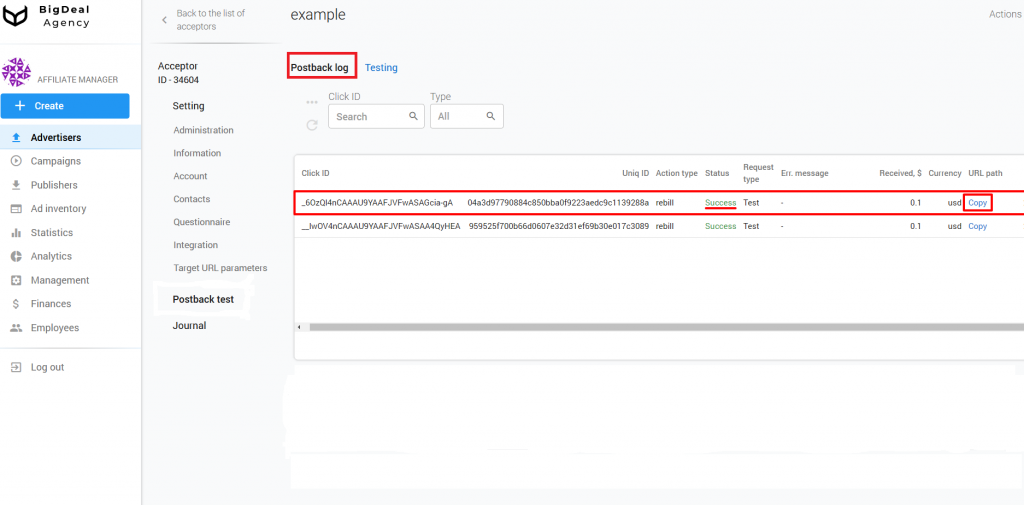
Now let’s check whether it worked or not. Go to the advertiser’s settings page and click on the Postback Test tab.
This section contains a table with the following columns:
- Click ID is the value of the c parameter in a postback.
- Uniq ID is the ID of transaction/conversion. This is the value of the u parameter in a postback. It is also an indicator automatically generated on the platform in case the u parameter is not in a postback because the advertiser doesn’t have the necessary variable.
- Action type is the type of target action, the name corresponding to the numerical value of the parameter a in a postback. For example, a=3 refers to rebill.
- Status is a postback reception status. It can take a positive (Success) or negative (Failure) value.
- Request type displays the postback types: test (Test) or normal (Postback). It is marked as a test when using the Postback test block located in the Postback test – Testing section. The Postback type appears when a postback is actually sent.
- Err. message describes an error if a postback fails. For example, it may be Invalid Click ID.
- Received, $ is the amount of earnings, the value of the parameter m in a postback.
- Currency is the value of the r parameter in a postback or USD when the advertiser did not set the r parameter.
- The URL path allows you to view and copy the original Postback URL path without a domain along with the request method (GET or POST) and protocol (HTTP / 1.1). This column defines the parameters and their values passed to a postback in its unmodified state. For example, you can find out if the u parameter was received from the advertiser or generated on our platform.
- Date is a date of postback receipt.
The table displays the last hundred postbacks that have been accepted. The system does not display conversions marked as a test in statistics.
Keep in mind that testing the Postback URL will end only when the status changes to Success. This will indicate that everything is set up and work correctly both from the platform side (click ID is passed) and from the advertiser side (all necessary postback parameters were substituted).
Action type displays rebill. The platform supports other types. They can be used to build a sales funnel. Action type does not affect the work of the platform and performs an information task.
The column Received, $ assumes the presence of numerical values greater than 0. When the earning capacity is zero, you should contact the advertiser, give him the Click ID and Uniq ID of the transition and find out what exactly he sends you. The zero amount is possible. In this case, you need to deal with the advertiser. Perhaps his sum was too small, and the system rounded it to zero. Then you should not worry.
Analyze the information from the table and click on Copy near the last test. Send the URL path to the advertiser to confirm that the postback is set correctly and the integration is complete.
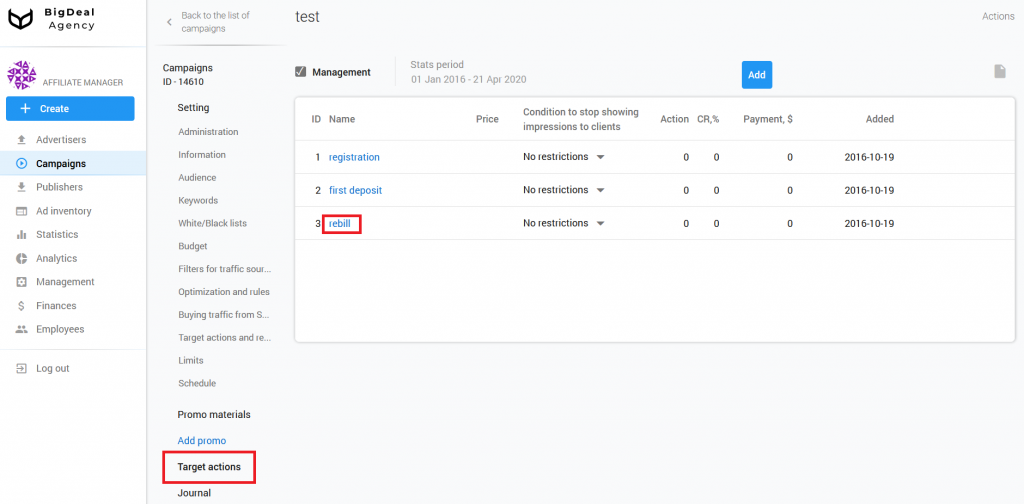
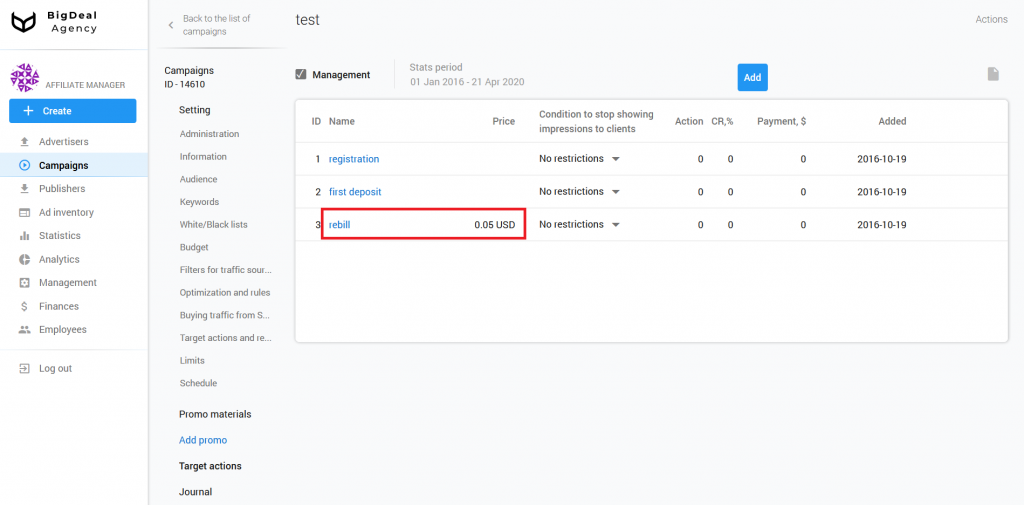
Please note that there may be a situation in which the advertiser can’t pass you the amount of earnings. Then you should set a fixed CPA and remove the m parameter from the postback. Let’s move to the Target Actions section of the chosen campaign and click rebill.
Set the CPA bid indicated by the advertiser, currency, and save the changes.
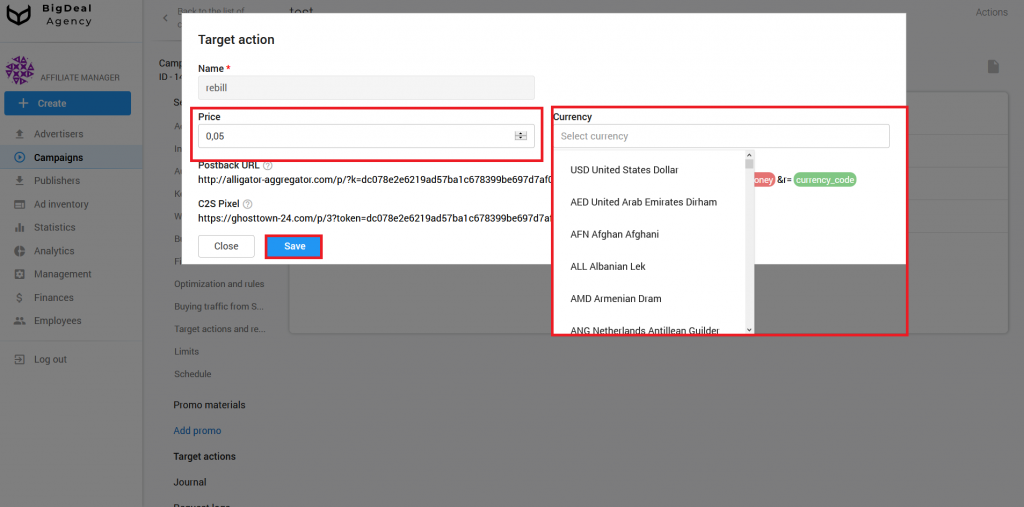
Now rebill is configured.
Postback Functional Self-test #
We recommend you to verify that the postback works correctly on your side. After that, you can send the test link to the advertiser. If the advertiser has problems with the postback setup, you can send him an example of a correctly formed postback message.
Let’s see how to do it. The first steps are the same as for the postback functional test.
Go to the Postback Test – Testing tab located in the advertiser’s settings.

Select the created offer, campaign, and promo material in the Getting a link section. Promo type is an optional field. It will be substituted automatically. Click the Get URL button.
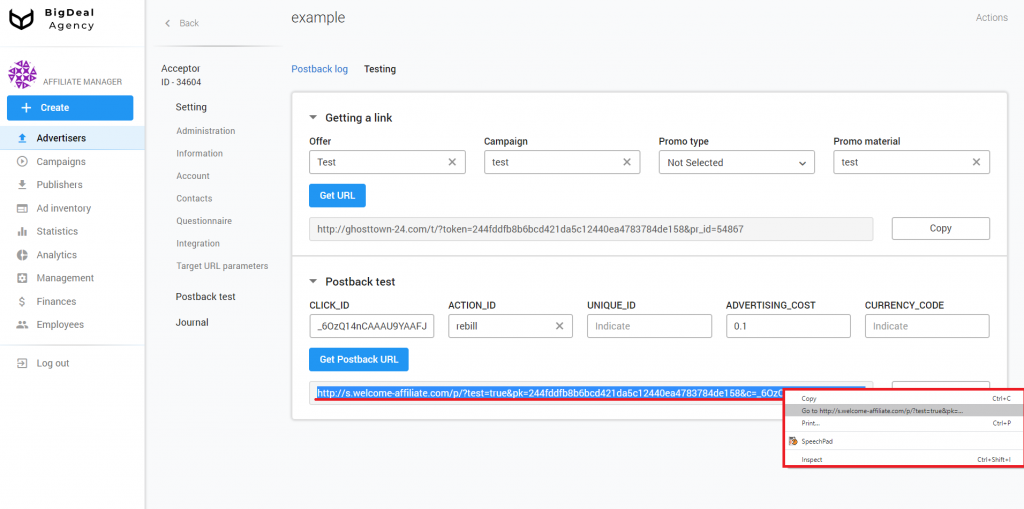
Select the generated link with the mouse, right-click on it and go to this link.
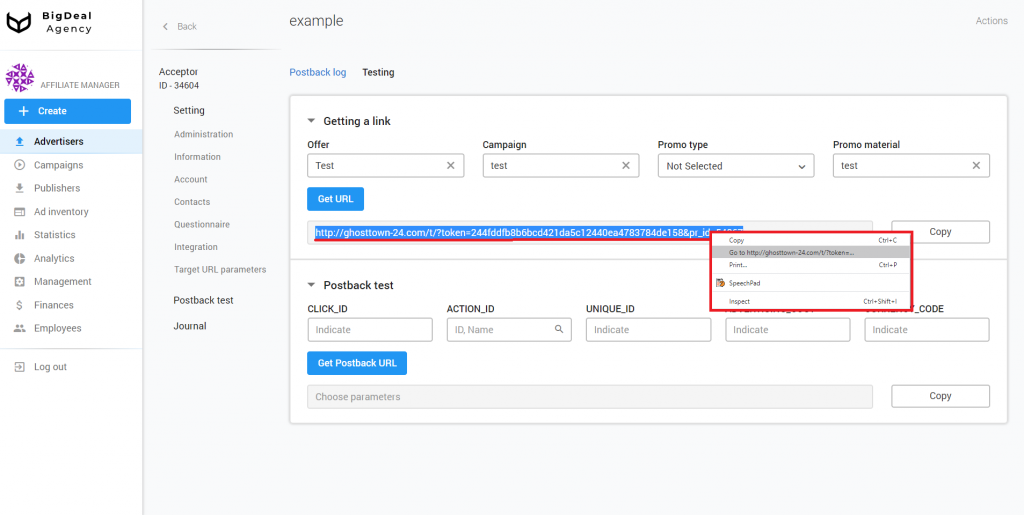
Copy the Click ID in the address bar of the new page. In our case, it is the part between wsid = and &. You can view the value that defines Click ID in the Target URL parameter section of the advertiser’s settings.

Return on the platform to the Postback Check block. Paste the copied value into the CLICK_ID field. Select the type rebill in ACTION_ID and leave UNIQUE_ID empty. Enter the expected CPA in the ADVERTISING_COST column. If the conversion amount is not an integer, write it down using a period. For example, 0.1. Enter the code of the selected currency in СURRENCY_CODE. The system will use it to calculate the conversion. If you use dollars, leave the field blank. The platform will automatically substitute USD. Click the Get Postback URL button after entering the information.
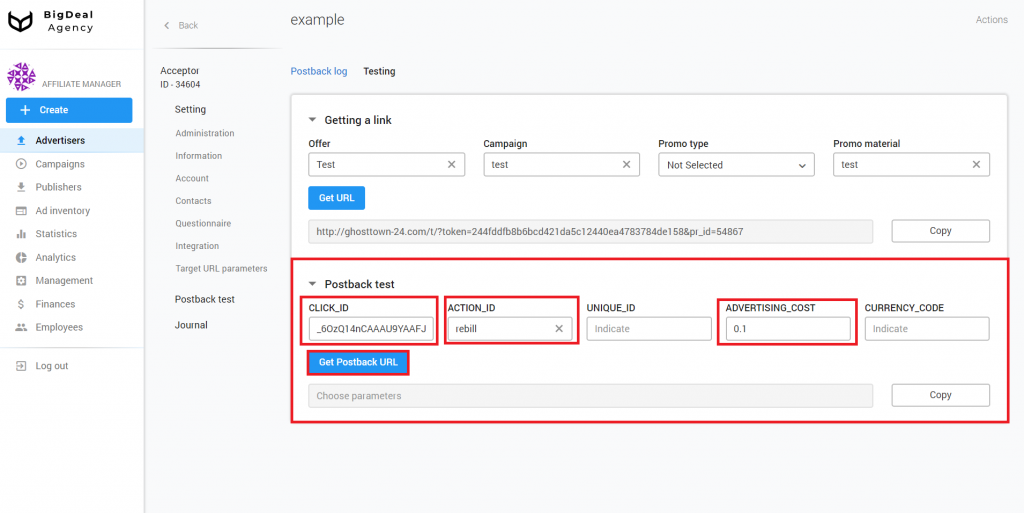
Right-click on the generated Postback URL and go to this link.
Return to the Postback log platform tab. The table displays the status of the sent the postback. If it is not formed correctly, you will see an error message in the column with the same name. If you see the postback status Success, then the test was successful.
You can click on the Copy button in the line with the last successful test and send the URL path to the advertiser as an example of a correctly formed postback message.
Features of setting different conversions’ statuses #
Some advertisers may have different conversion statuses in their dashboards. You can find out about their availability from a personal dashboard located on the side of the advertiser. If this is not possible, contact the advertiser and ask him about it.
For example, let’s take the status of unconfirmed and confirmed. Booking a hotel room refers to unconfirmed. Actual payment refers to confirmed.
It can take time to receive a commission. Therefore, you need to evaluate effectiveness as quickly as possible.
The status unconfirmed helps you to quickly evaluate the advertising campaign. The status confirmed is necessary for the actual estimate of the launched campaign’s profitability
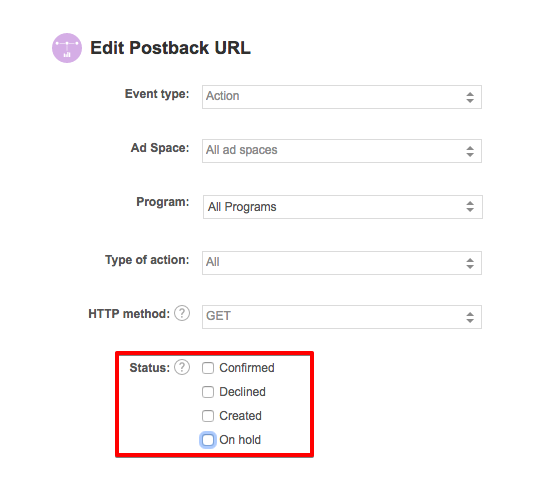
If the advertiser sends you postback with different conversion statuses, you will need an additional setting. In this case, contact your manager.
Let’s summarize the material:
- Once you have created a managed advertiser, you need to configure his integration. It allows you to automatically receive his statistics.
- The first step is to send the Postback URL to the advertiser. He will add his parameters to it. The advertiser sends you the final result back.
- You insert the variables into the target URL parameters from the final link and save the configured postback.
- Then you need to test postback. Before sending a test link to the advertiser, you should make sure that postback works correctly on your side.
- Some advertisers may have different conversion statuses in their dashboards. Contact your manager to properly configure them.
