In the article below, we will take a closer look at the setup JSTDS filters in the campaigns.
Please note: JSTDS filters are available in campaign and ad inventory settings. Here we will talk about the operation of filters using campaign examples. The process of setting them up is similar for ad inventories.
Highlights #
JSTDS filters are tools that help determine the quality of traffic and identify its characteristics. These actions are aimed at optimizing the advertiser’s campaigns and publisher’s ad inventories.
First, let’s consider the features of the landing page for traffic quality control for a better understanding of the filters’ purpose.
Landing page for traffic quality control #
A test landing page allows you to control the quality of the publisher’s traffic. It is a page with a message stating that the user will be redirected to the site after his browser passes the test. The landing page looks like the Cloudflare service’s test page to minimize cases in which users close the landing page during the test.

Traffic from publishers is divided into small segments based on the UTM Source + device bundle. The system selects 1% of visitors to check in each segment.
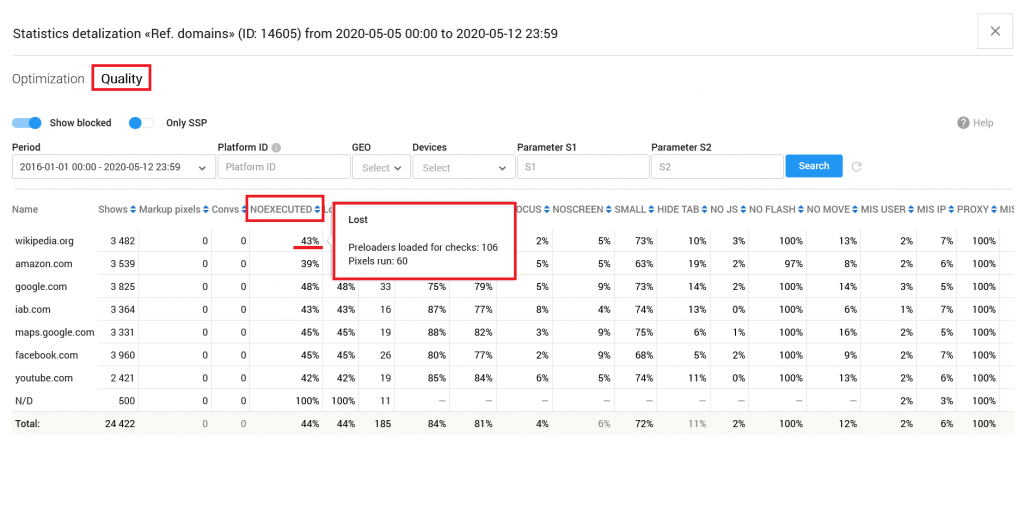
During the display of the landing page, the user is checked against a number of parameters. You can find them in the Quality tab of the campaign or ad inventory settings (White/Blacklists and Filtering blocks):
1. First of all, the system analyzes the possibility to load a tracking pixel. If the download fails, then the traffic will get the value NOEXECUTED. The filter signals that this is bot traffic.
Please note: the rule about using 1% of traffic during the test has an exception. This is a NOEXECUTED filter. If the landing page is loaded, but the pixel does not work, the system will not take into account this impression in a sample based on 1%. For example, when the impression in the 1% test segment ends at the NOEXECUTED stage, the system will take another part of the traffic for analysis.
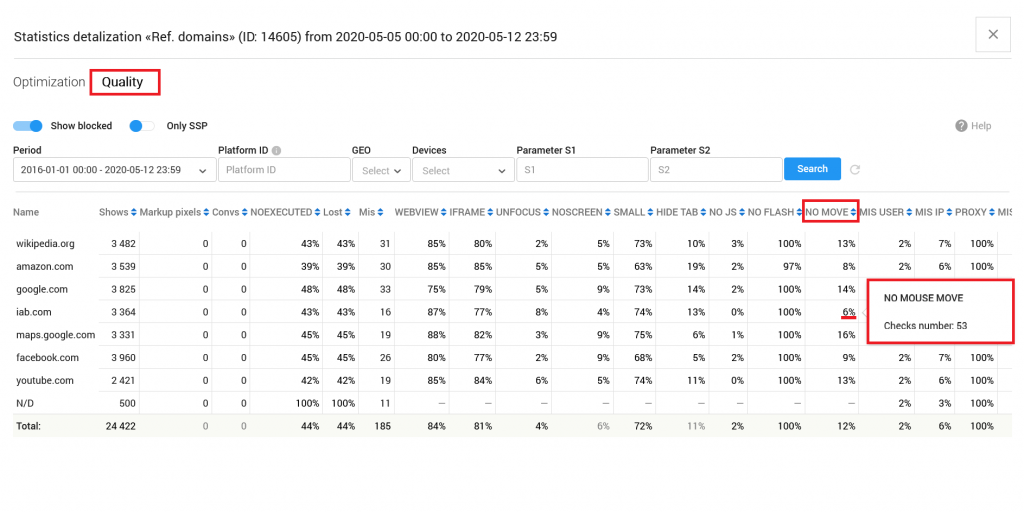
2. If the impression passes the NOEXECUTED check, the rest of the filters will enable: WEBVIEW, IFRAME, UNFOCUS, NOSCREEN, SMALL, HIDE TAB, NO JS, NO FLASH, NO MOVE, MIS USER, MIS IP, PROXY, MIS REF, and HIDDENLINK.
Analysis time does not exceed 2.5 seconds. NO MOVE checks if the user moved the mouse during the demonstration of the landing page. The filter is used for desktop devices only.
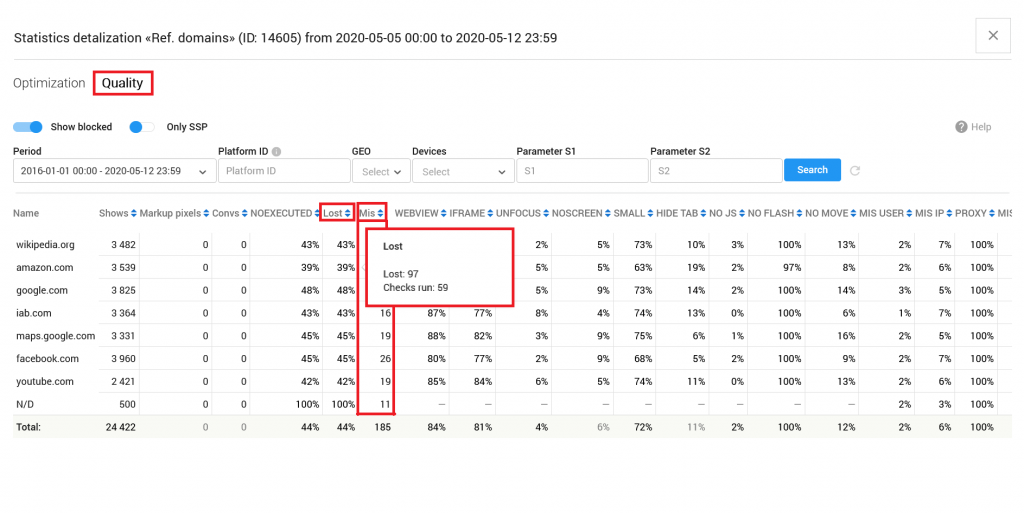
An attempt to redirect a user to one of the real campaigns occurs after 2.5 seconds or earlier if the check ends faster. If the redirect fails, you will see it in the Lost column. The Mis column shows the number of impressions blocked by JSTDS filters.
When you collaborate with DSP advertisers, keep in mind that traffic passing through the test landing page loses the HTTP referer. Note that the system checks only 1% of the traffic from each UTM Source + device segment. Therefore, the loss should not affect the work with the DSP advertiser under normal conditions.
You can learn more about the quality control of the advertiser’s campaigns and publisher ad inventories using the Quality tab in the relevant materials (coming soon).
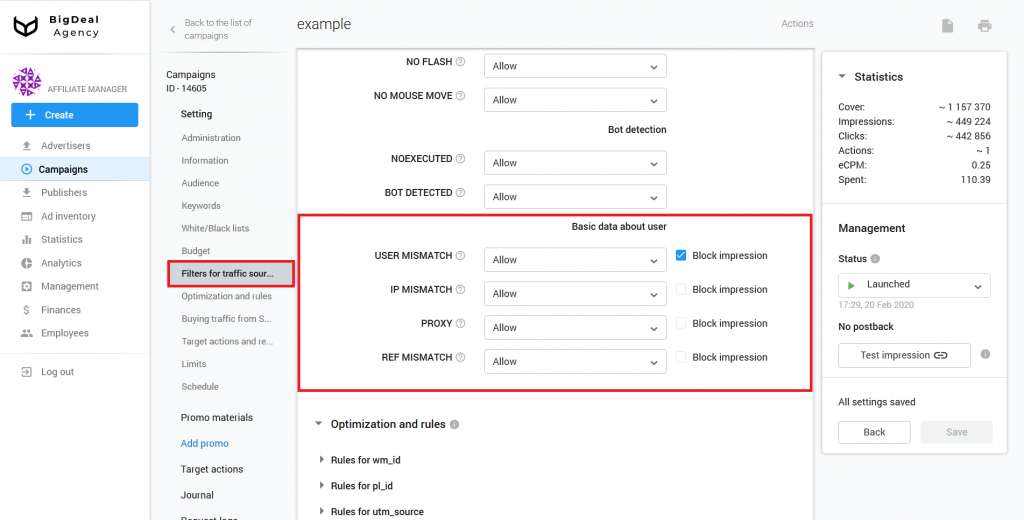
Block filters for traffic sources #
Let’s return to the JSTDS filters. You can find them in the Filters for traffic sources block. Their names are identical to the settings located in the Quality tab. There are 4 categories of filters:
- Ad slot
- WEBVIEW. An ad is placed in Web View applications.
- FRAME. An ad is opened in an iFrame. The iFrame is a component of an HTML element that allows you to embed documents, videos, and interactive media files on a website page.
- UNFOCUSED. Promotional material is opened out of focus.
- NOSCREEN. An ad is not visible or displayed block size is too small.
- SMALL SCREEN. The screen with an opened promo material is smaller than 320×400.
- HIDDEN TAB. Ads appear in an inactive tab. For example, tabunder.
- Technology support
- NO JS shows the situations when the user has javascript disabled.
- NO FLASH identifies if the user’s browser supports Flash or not.
- NO MOUSE MOVE displays the situations when the user doesn’t move the mouse.
- Bot detection
- NOEXECUTED. The tracking pixel failed to load on the test landing page.
- BOT DETECTED. The user follows a hidden link.
- Basic data about user
- USER MISMATCH. User data doesn’t match the claimed by SSP.
- IP MISMATCH. User IP doesn’t match the claimed by SSP.
- PROXY. This option indicates that users use intermediate IP addresses.
- REF MISMATCH. HTTP referer doesn’t match user data from SSP request.
Let us remind you that traffic from publishers is divided into small segments. The system takes 1% for the check. For example, if you have a traffic source (UTM Source + device), which will show that more than 50% of the checked section does not work with one of the JSTDS filters, you can block or leave it. In such situations, we call this blocking of traffic filtering by probability.
You can set filters for the following parameters:
- Allow traffic anyway
- Allow traffic if more than 50% of the analyzed segment is marked by a filter.
- Allow traffic if more than 80% of the analyzed segment is marked by a filter.
- Block traffic if more than 3% of the analyzed segment is marked by a specific filter.
- Block traffic when more than 15% of the analyzed segment is marked by a specificfilter.
- Block traffic when more than 30% of the analyzed segment is marked by a specific filter.
- Block traffic when more than 50% of the analyzed segment is marked by a specific filter.
- Block traffic when more than 75% of the analyzed segment is marked by a specific filter.
- Block traffic when more than 90% of the analyzed segment is marked by a specific filter.
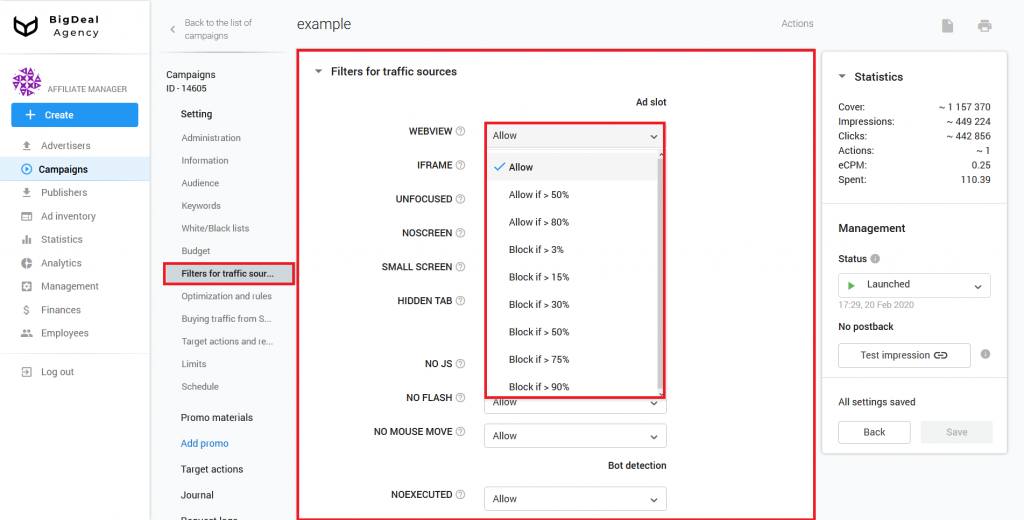
Actual impression blocking is available in the last block Basic data about user. To do this, tick the box Block impression.
Filtering by probability works during the matching. The probability of error is estimated in advance. If the probability is higher than the established threshold, the campaign will not participate in the auction.
Actual impression blocking, unlike limits by probability, occurs when a user is redirected to promotional material. If the user information does not match what the information claimed in the ad request, the user will be redirected to the publisher’s trafficback. When redirection is not possible, the platform searches for an alternative campaign to demonstrate to the user. But this can lead to traffic loss.
Let’s take a look at the following example of using filters. Let’s say there is a campaign that shouldn’t receive bot traffic. Therefore, in the BOT DETECTED column, you must select one of the settings Block if ... The percentage of the analyzed segment depends on how much you want to get rid of such traffic.
However, you can create a campaign for unsolicited traffic, and send there all bot traffic. So it will not “spoil” the statistics.
Or you will find an offer that can bring money on bot traffic. In this case, select the setting Allow, if … The campaign will receive traffic with bots only.
Guidelines for setting up filters #
Below you can find guidelines for setting filters for specific offers, promotional materials, or campaign types. Go to the section Filtering traffic sources, to do this. You can place tighter restrictions later, if necessary.
Guidelines for CPA campaigns
- NOSCREEN — Block if > 15%;
- NOEXECUTED — Block if > 30%;
- BOT DETECTED — Block if > 3%.
Guidelines for Directlink campaign with buying traffic from SSP
- WEBVIEW — Block if > 30%;
- IFRAME — Block if > 30%;
- NOSCREEN — Block if > 15%;
- NOEXECUTED — Block if > 30%;
- BOT DETECTED — Block if > 3%;
- USER MISMATCH — Block if > 15%;
- IP MISMATCH — Block if > 15%;
- PROXY — Block if > 50%.
Guidelines for CPI campaigns (Target URL with the “File” type)
- NOEXECUTED — Block if > 30%;
- BOT DETECTED — Block if > 3%.
Guidelines for Push campaigns
- WEBVIEW — Block if > 30%;
- IFRAME — Block if > 30%”;
- NOEXECUTED — Block if > 30%;
- BOT DETECTED — Block if > 3%.
Guidelines for Directlink \ Popunder campaigns with strict requirements for checking referrer
- WEBVIEW — Block if > 30%;
- IFRAME — Block if > 30%;
- NOSCREEN — Block if > 15%;
- NOEXECUTED — Block if > 30%;
- BOT DETECTED — Block if > 3%;
- USER MISMATCH — Block if > 30%;
- IP MISMATCH — Block if > 30%;
- PROXY — Block if > 75%;
- REF MISMATCH — Block if > 30%.
Guidelines for Directlink \ Popunder campaigns without referrer checking requirements
- WEBVIEW — Block if > 30%;
- IFRAME — Block if > 30%;
- NOSCREEN — Block if > 15%;
- NOEXECUTED — Block if > 30%;
- BOT DETECTED — Block if > 3%;
- USER MISMATCH — Block if > 30%;
- IP MISMATCH — Block if > 30%;
- PROXY — Block if > 75%.
Let’s summarize the material:
- JSTDS filters are tools that help determine the quality of traffic and identify its characteristics. They allow optimizing the advertiser’s campaigns and publisher’s ad inventories.
- A test landing page helps estimate the publisher’s traffic quality.
- Traffic from publishers is divided into small segments based on the UTM Source + device bundle. The system selects 1% of visitors to check in each segment.
- During the display of the landing page, the user is checked against a number of parameters. You can find them in the Quality tab of the campaign or ad inventory settings (White/Blacklists and Filtering blocks). The analysis consists of two stages.
- You can find JSTDS filters in the Filters for traffic sources block. Using them, you can block or allow the use of traffic.
