Highlights #
Push notifications are small messages that pop up on your screen. Notifications appear on the screen in the notification area when it is possible to display received data.
The advertising format for Push Subscriber Script works according to the following principle: the publisher places a code on his site, and visitors subscribe to notifications. Then subscribers receive advertisements of various formats, for example:
Today you can win the new iPhone. Click Next to continue.
After the click, the user visits the advertiser’s landing page, where he performs the target action: type his e-mail or complete a survey. Until the visitor unsubscribes or restores the device’s operating system to the factory settings, he will receive alerts with advertising offers.
Push notifications continue to work, even if the user leaves the site or his browser becomes inactive. Therefore, it becomes possible to send messages to the device screen or to the application at almost any time to attract a subscriber to the advertiser’s site.
Please note: subscriptions may not work on some browsers. You can read more about the compatibility of subscriptions and browsers here.

Creation of Ad Inventory #
Before creating an ad inventory, make sure that the platform has a publisher account. A publisher can independently register an account via the main page of the affiliate program website, or you register it via the Salematics platform.
Click on the Create button to create a new ad inventory.
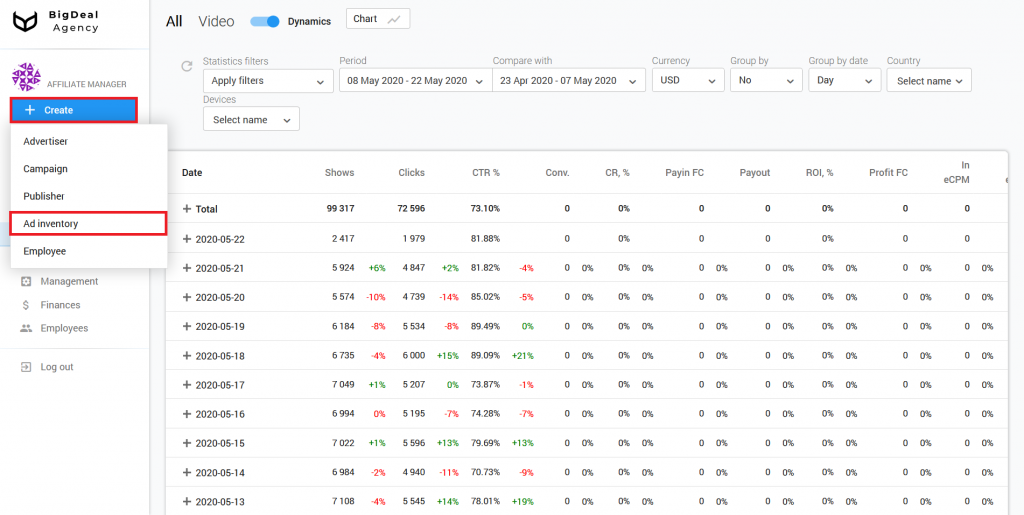
Block Administration #
You will see the settings page. Select the publisher in the block Administration. Indicate his ID or name in the appropriate field. The platform will fill in the line Affiliate program automatically because the publisher will already be tied to one of the programs.
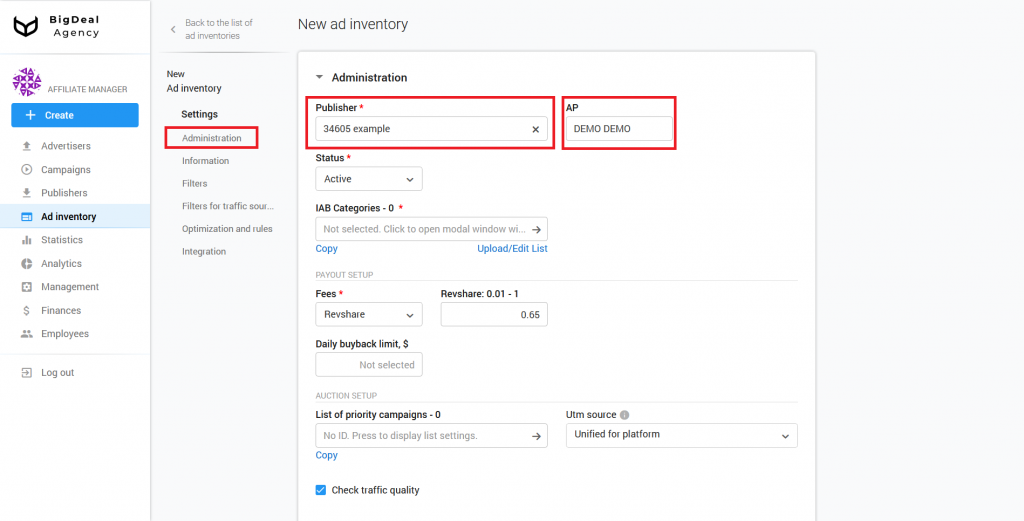
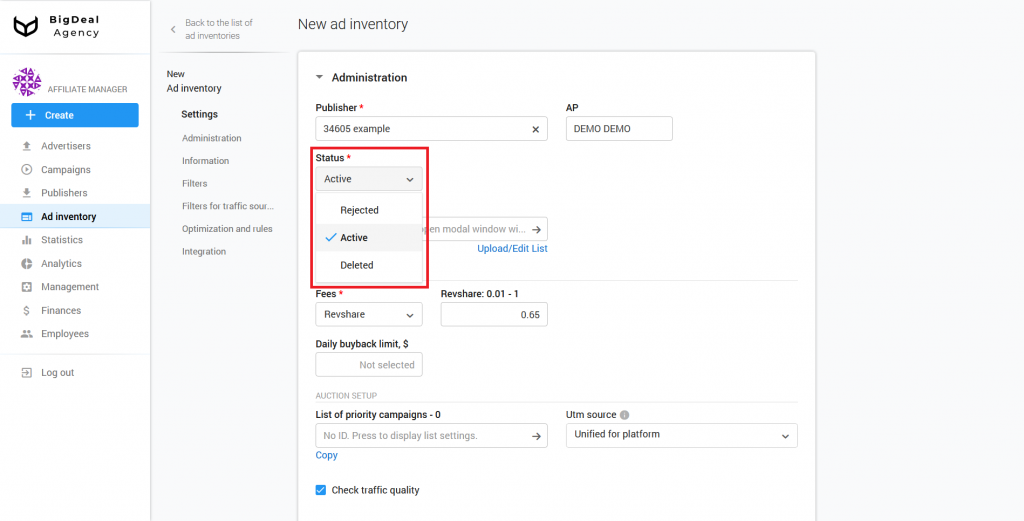
Each new ad inventory has Active status by default. If an ad inventory violates the rules, then after its creation, it can be rejected. The ad inventory will be blocked, and the publisher will not be able to send traffic to it. You can also select the status Deleted. In this case, the ad inventory will be completely deleted from the system.
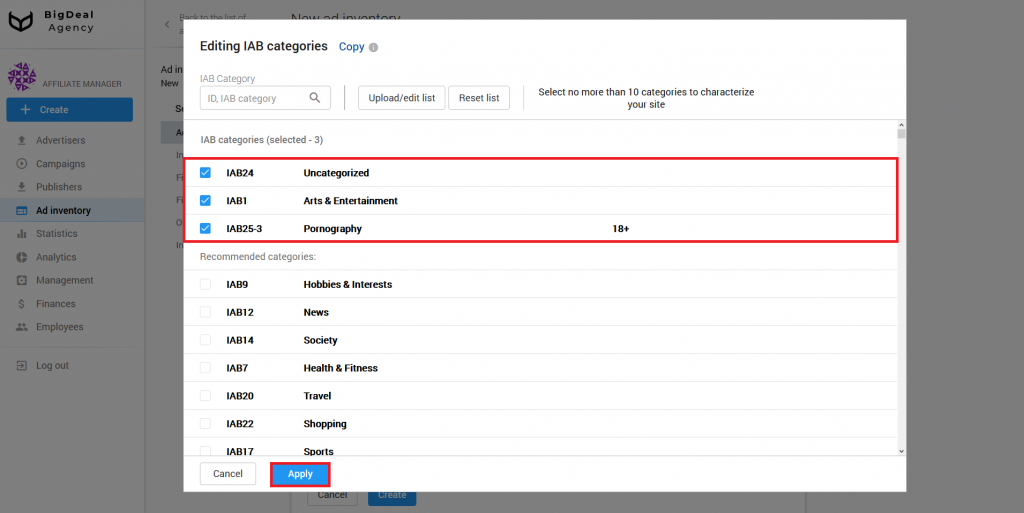
IAB categories is a required setting. Indicate one or a few categories to which the campaign belongs. We recommend selecting no more than 10 categories. IAB categories are required for more precise targeting.
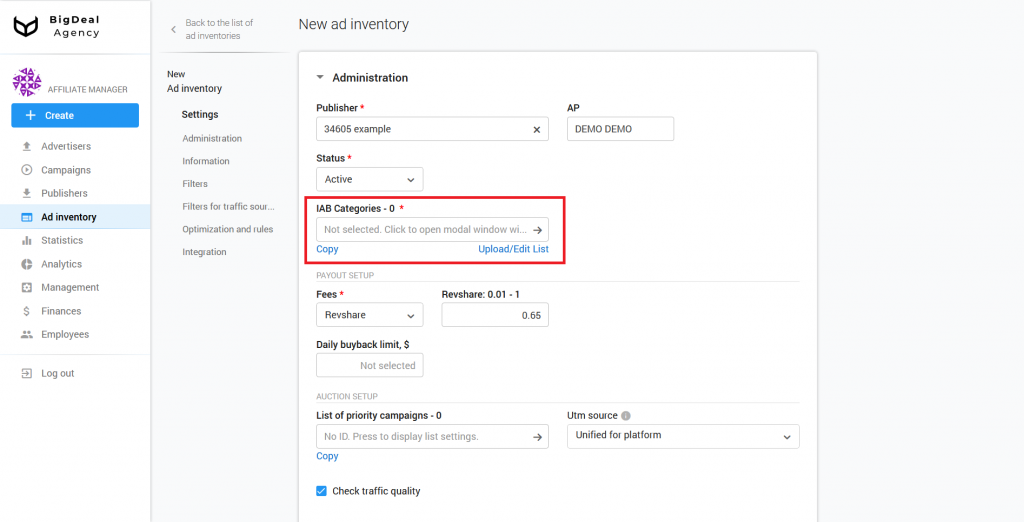
If you can not select a category, set the IAB24 – Uncategorized or IAB1 – Arts & Entertainment, because they have a very broad definition. If the campaign contains sexually explicit material, select IAB25-3 – Pornography. In this case, only adult sites will display the campaign.
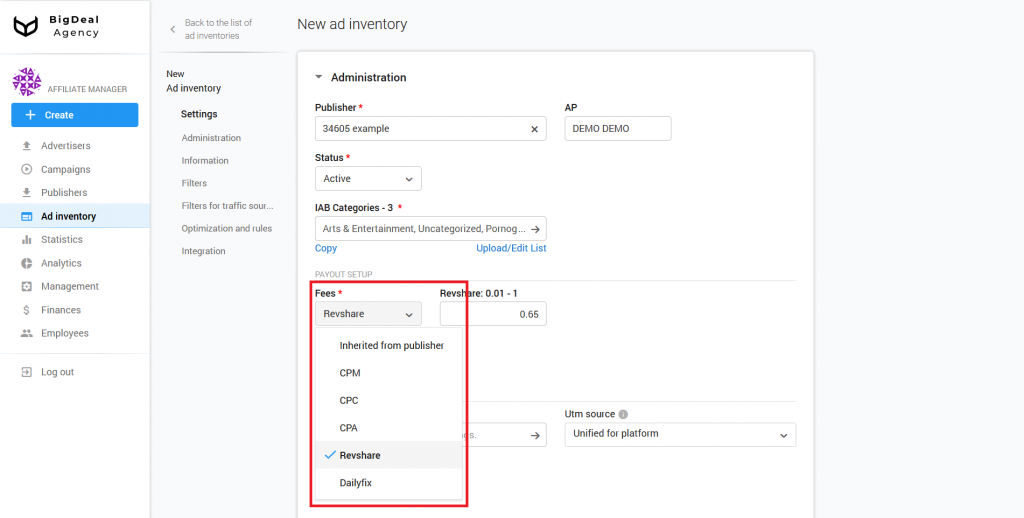
Select your fee: Inherited from publisher, CPM, CPC, CPA, Revshare, or Dailyfix. If the publisher already has a certain fee, use Inherited from publisher. After that, the publisher’s settings will be used for the current ad inventory. We will select RevShare as an example. It is equal to 65% of income by default.
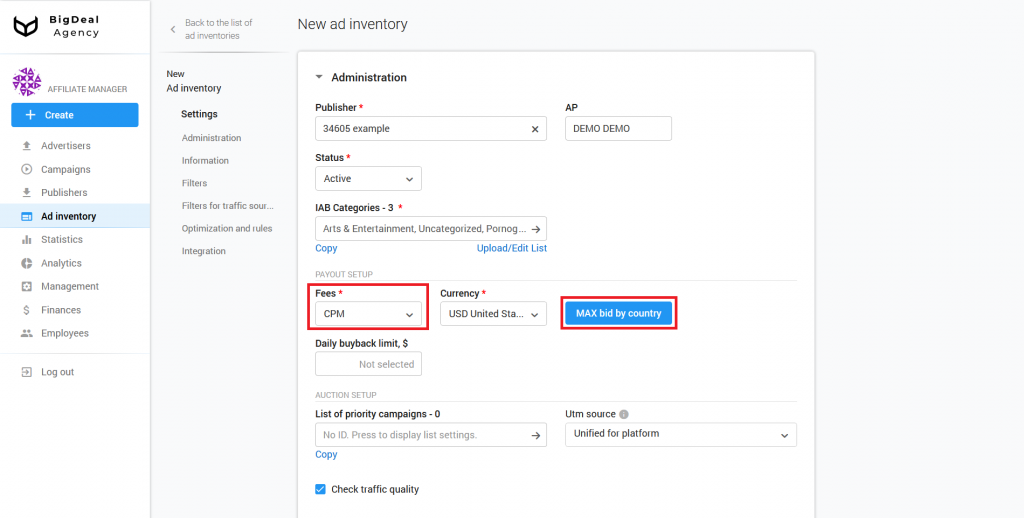
If you selected a fixed payment model (CPM or CPC), we recommend setting the maximum bid for countries via the link with the same name.
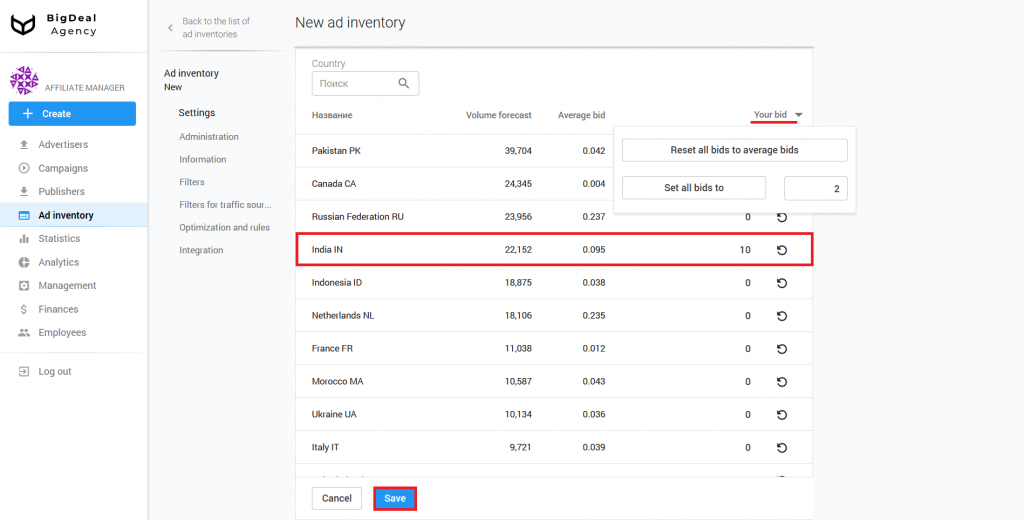
If you click on the link, you can make a bid for each country separately or specify a single bid for all countries. If you need to reset your bids to an average value or set a certain price for all countries, click on the Your bid field. As soon as you insert information, click Save.
Now let’s figure out what makes the earnings of the publisher. The one that sends traffic to campaigns with push subscriptions.
If the publisher receives payouts according to the Revshare model, his income depends on the number of people who read the notifications, click on the links, and perform target actions. The advertiser pays a commission for each completed target action. A publisher, in turn, receives a reward in the amount of chosen Revshare.
When a publisher receives payouts according to the CPA model, his revenue from each subscription is calculated dynamically. The cost will depend on the quality of traffic and its characteristics: geo, devices, and subscription validity.
Read the complicated explanation about earnings
The Salematics platform has statistics of ad inventories that displays the earning capacity of each user’s subscription coming from a particular ad inventory. The statistics period is the last 70 days. You can also see statistics on the number of subscriptions made a certain number of days ago — the last 70 days.
The system uses the following scheme to calculate the subscription cost:
1. First, it considers the total number of subscriptions in the last 70 days (S1).
2. Then the system calculates the earning capacity of subscriptions in the last 70 days (S2). The amount is the earning capacity of the subscription on the N-th day, multiplied by the coefficient of the N-th day (K), which is calculated as follows:
K (N) = amount received from the subscription for 70 days/amount received from the subscription for N-days.
For the K coefficient, the system applies clustering, which consists of a country and a device.
3. Result (subscription cost) = S2 / S1.
If the ad inventory does not have statistics, the system takes the base rate for the country. The rate, in turn, represents the average subscription earning capacity for a particular country.
4. The system multiplies the result by CR for the CPA model. In this case, CR is the ratio of the number of subscriptions to the number of impressions of pre-landing pages. In this case, the system uses clustering, which consists of a promo, source, country, and device.
Thus, the final formula will look like this: Cost = CR * (S2 / S1).
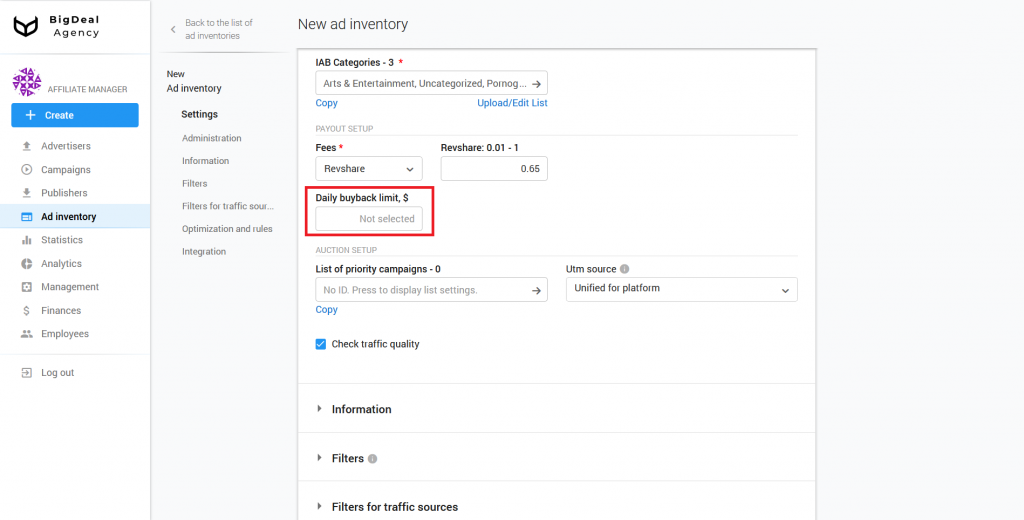
We will not analyze Daily buyback limit on a concrete example. This functionality refers to a complex type of connection. These settings are required for RTB and XML feed. You can read about SSP/Feed ad inventories in this article.
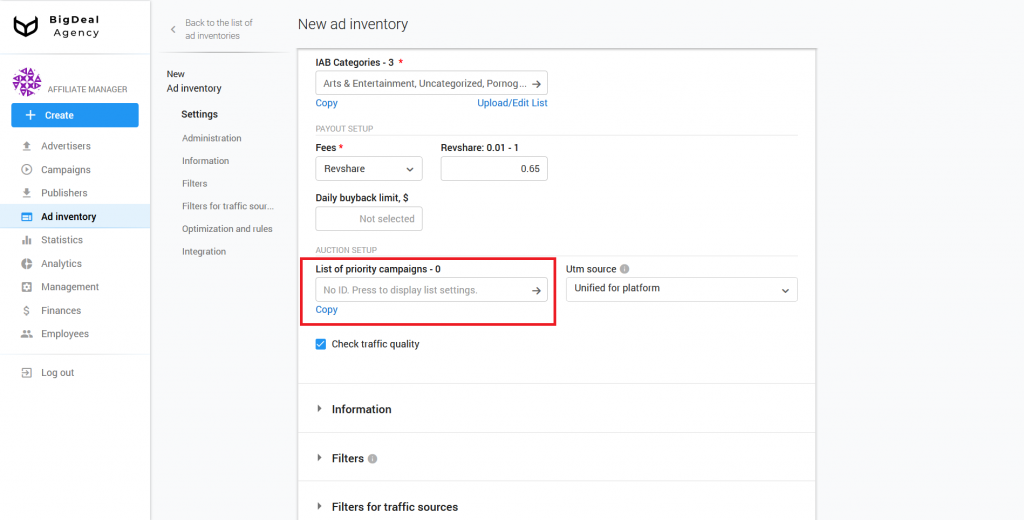
The List of priority campaigns allows you to influence what kind of advertising will be displayed on the ad inventory. Suppose you want users to see mobile offers on an APK website first, and then everything else. In this case, you can specify the ID of advertising campaigns that will be in priority.
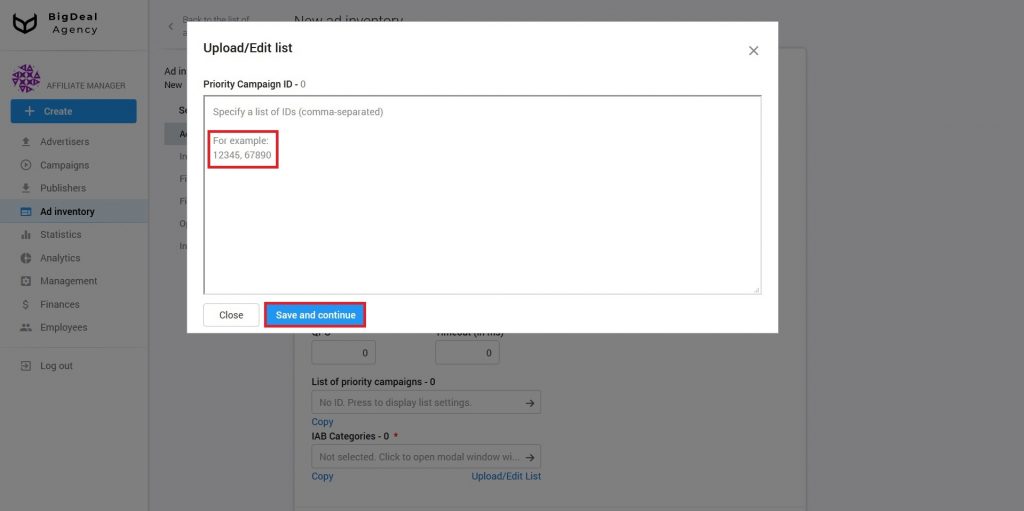
Click on the No ID field to add campaign IDs. Specify a list of IDs (comma-separated) and click Save and continue.
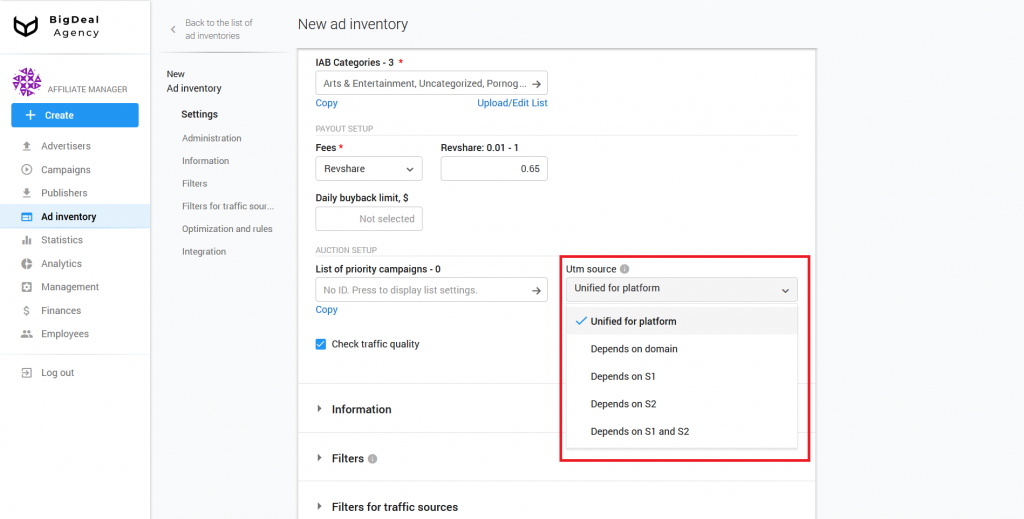
Select the template based on which UTM Source will be generated from the Utm source drop-down list:
- Unified for platform. Select this option if the ad inventory is located on one domain.
- Depends on domain. Select this option if the same ad inventory is placed on a few domains. Make sure that domain names are being passed. You can check it in the Filters — Domains block after the ad inventory will start to receive traffic.
- Depends on S1.
- Depends on S2.
- Depends on S1 and S2.
You can set the type to Unified for platform. However, we recommend that you agree with the publisher to pass the parameters S1 and S2. Below we will tell you more about these parameters.
As soon as you make sure that the publisher passed the parameters, select the appropriate template in Utm source.
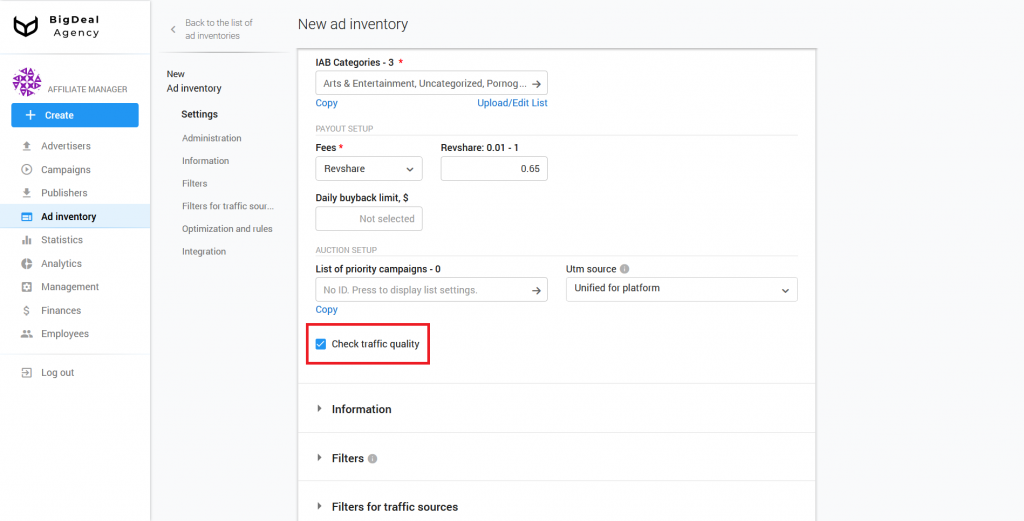
The platform checks traffic quality by default. You can use it to enable and disable the test landing page. If you are sure that the publisher sends high-quality traffic only, untick the box.
Block Information #
The next section is Information. First, specify the appropriate name of the ad inventory in the corresponding field.
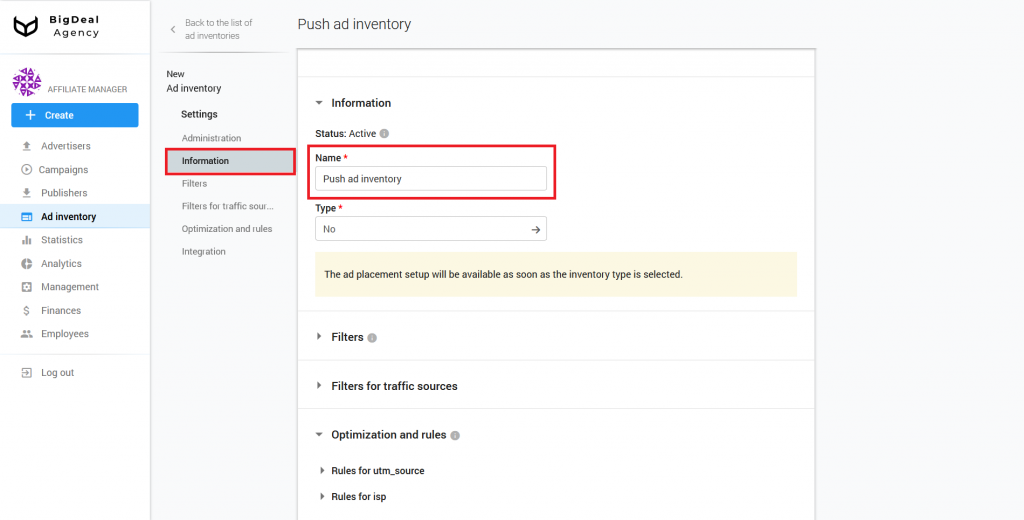
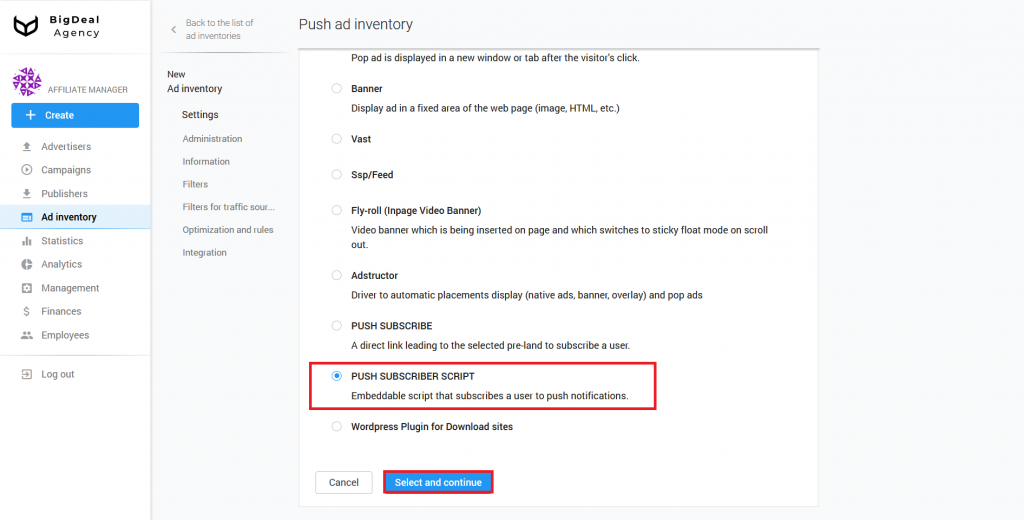
Select inventory for the ad inventory from the drop-down list Type. In our case, select PUSH SUBSCRIBER SCRIPT. Click on the button Select and continue.
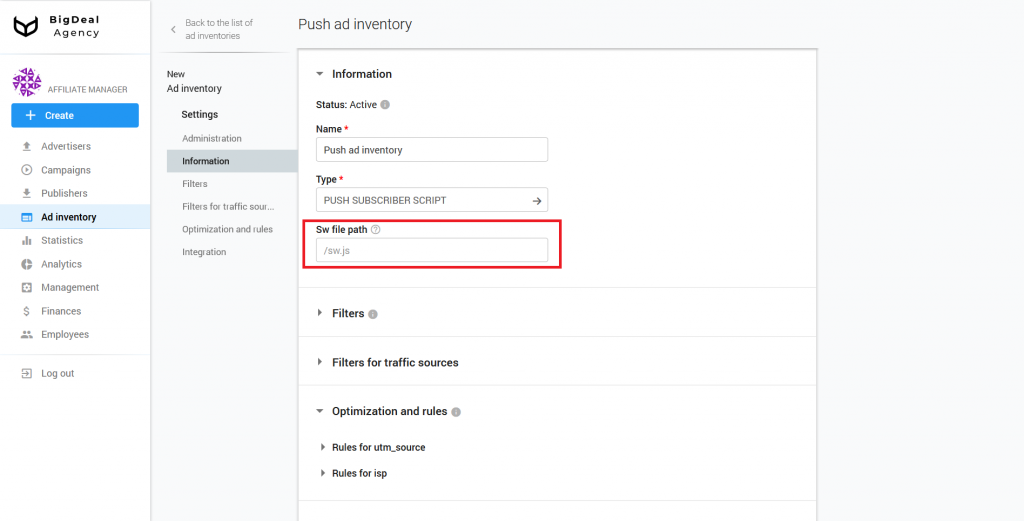
The SW file is always in the website’s root directory of the publisher by default. When the publisher moves the file to another folder, specify the new path to the document in the corresponding field of the platform settings. If the position of the SW file remains unchanged, the line will be empty.
Block Filters #
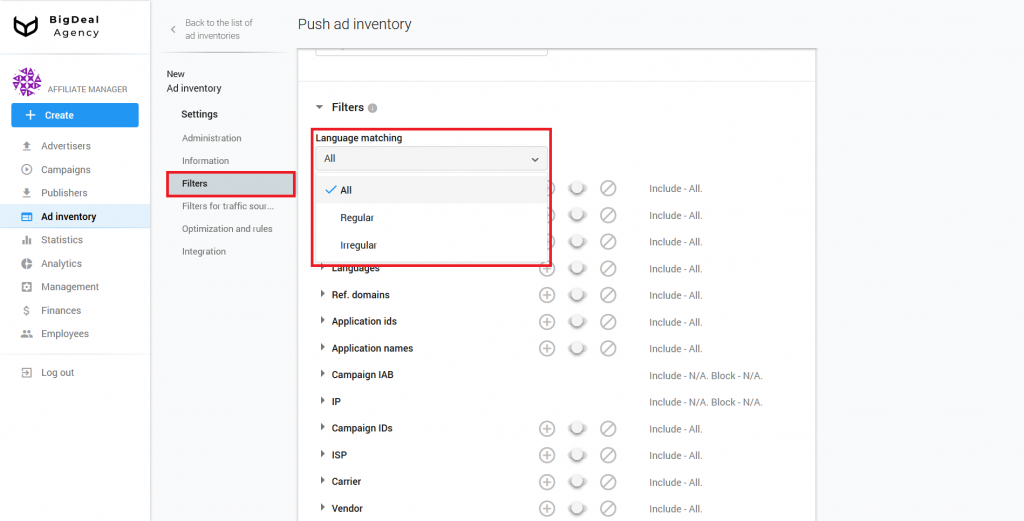
In the section Language matching you can specify the preferred browser language. Let’s say a person is in the UK and uses a browser in English. The language is regular. If under the same conditions, the browser language is Russian, then this is an irregular language. If you want to target only the British, the setting will allow you to avoid, for example, tourists, travelers, or foreigners.
Also, the Filters block contains several settings: Browsers, Devices, GEO, Languages, Ref. domains, Application IDs, Application Names, Campaign IAB, IP, Campaign IDs, ISP, Carrier, Vendor, Device Names, S1 parameter, S2 parameter, and UTM Source. With their help, you can, for example, specify a list of appropriate browsers, domains, or devices from which traffic will or will not be received. When this ad inventory begins to work, in this section, you will be able to analyze its quality. You can learn more about this process in the article Quality control of publisher’s ad inventories using the Quality tab (coming soon).
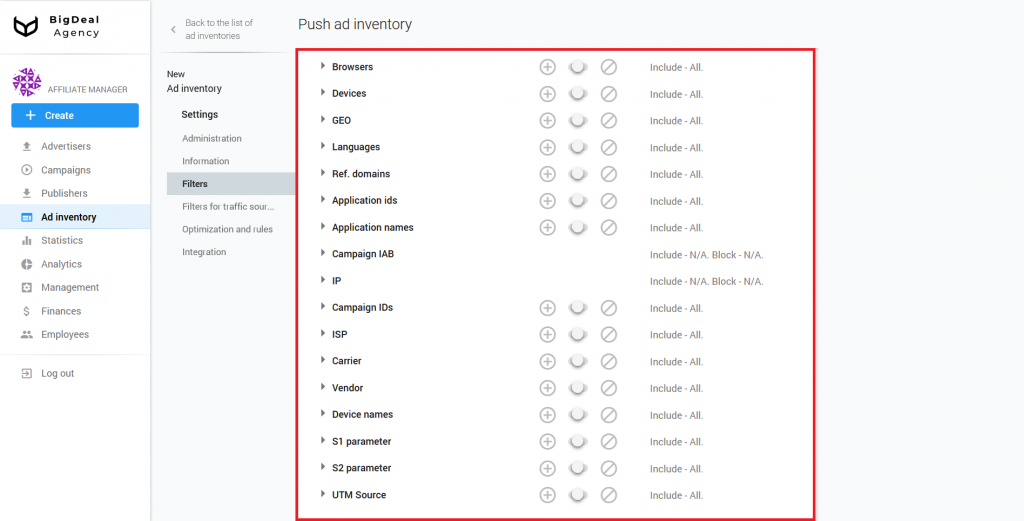
Let’s take a closer look at the special parameters S1 and S2 that are passed with a click.
The S1 parameter is intended to pass a first level Sub ID. The S2 parameter is intended to pass a second level Sub ID. Suppose that the publisher uses this ad inventory on many sites, and he sends the site domain name in the parameters. You have one ad inventory, and you can filter traffic from different sites and domains by passing the specific domain name in the parameters. The database receives this information and sends it to the advertiser for further work. Filtering by the parameters S1 and S2 can be set in the future.
Another parameter is UTM Source. It is a hash sum of values: domain + S1 + S2. You can set the conditions for UTM Source in the Administration block. It can be used for the advanced setting of white/blacklists.
Block Filters for traffic sources #
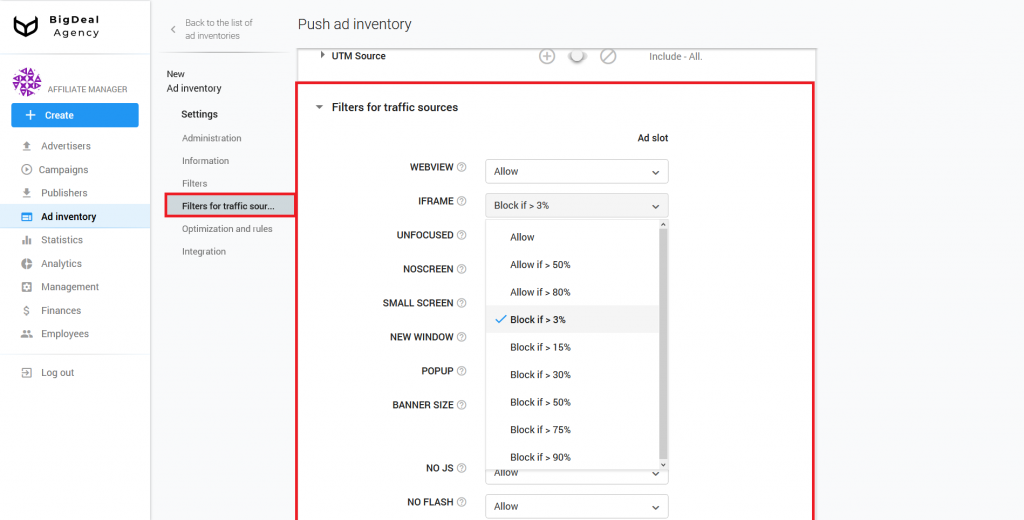
Let’s move to the JSTDS filters. you can find them in the Filters for traffic sources block. With their help, you can block low-quality requests for an ad impression. More information about filters you can find in the article Setup JSTDS filters in campaigns. The process of their setup on ad inventories will be similar.
Block Optimization and rules #
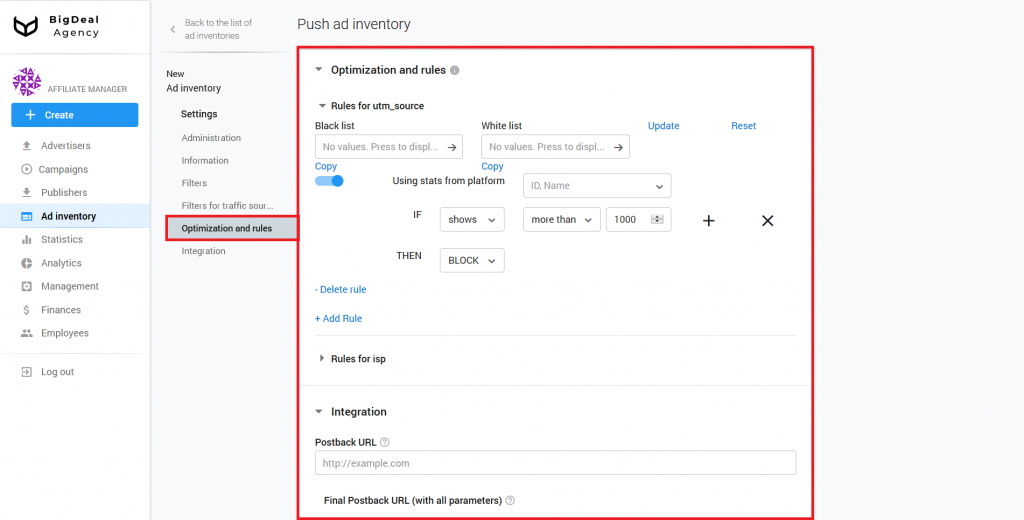
When you work with a large number of publishers whose traffic is constantly changing, manual optimization will be not enough. You will not have time to block unprofitable sources of traffic, because they will appear and disappear faster than you can add them in Black or Whitelists.
To solve this problem, you will need the block Optimization and rules. You can read more about the rules in the article How to set up automated rules in campaign. Setting the rules for ad inventories and campaigns is the same.
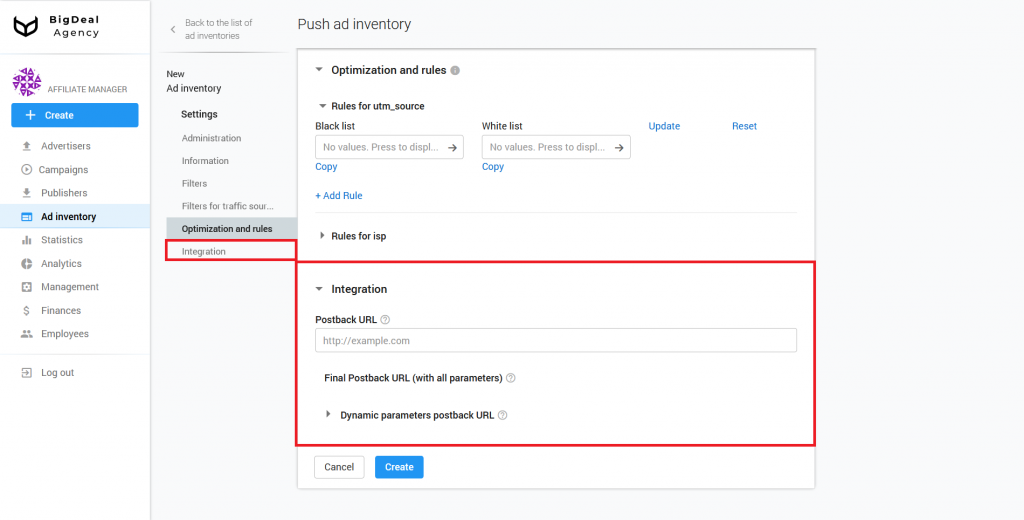
Block Integration #
The Integration block has a Postback URL field. It is used for advanced settings, and most of the publishers do not need to set a postback. Therefore, we will skip it. You can learn more about the postback setup in the article Setup Postback URL for Publisher.
Connection of the script #
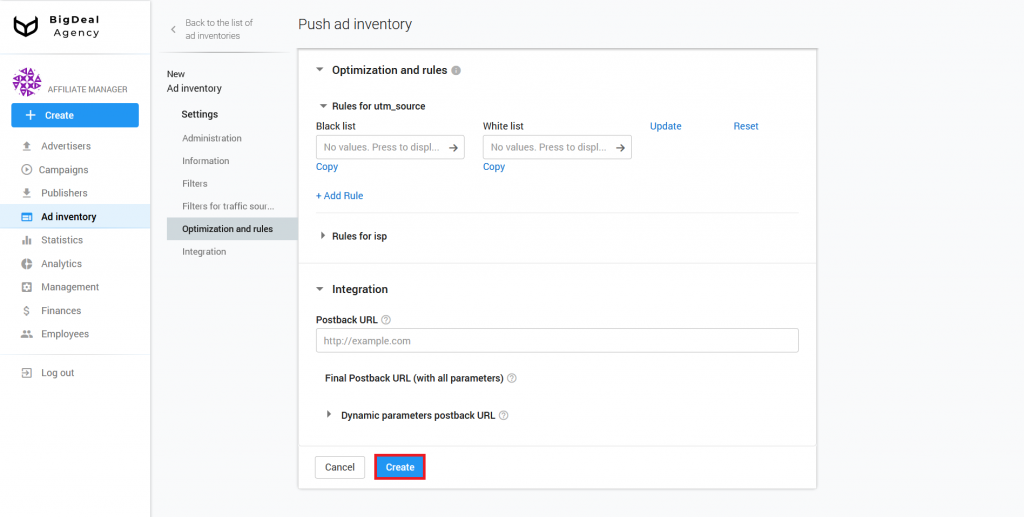
As soon as you inserted all the necessary information, click the Create button.
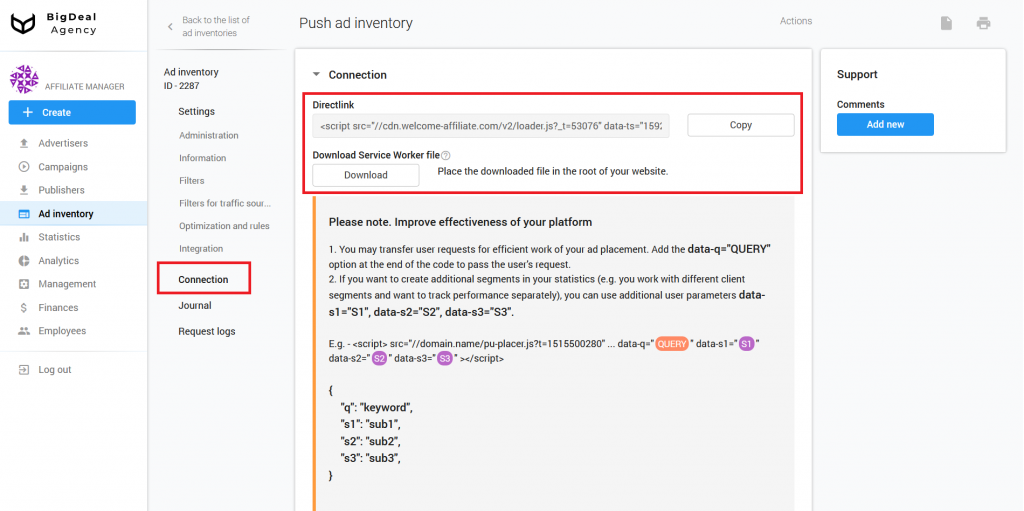
The system will generate a script. You can find it in the new tab Connection. In the case of a banner, the system creates a Link to script and SW file. We will copy and integrate the link to the script on the publisher’s website page.
In order for the code to function, the publisher needs to get to the site server. So the publisher will be able to place the SW file, which should be on the same domain where the subscription will be made.
Adding variables to the script for traffic optimization #
The publisher can add a number of variables to the advertising tag, which he places on his sources for a high-quality selection of advertising. For example:
<script src="//mediaoaktree.com/v2/loader.js?_t=52468" data-ts="1574069688" data-token="9bb42c5f29e5f1a225e4cd606ef25f1602f1637e" data-promo-cdn="mediaoaktree.com" data-q="QUERY" data-s1="S1" data-s2="S2" data-s3="S3"></script>There are several types of variables:
- data-q=QUERY. You need to pass a keyword or phrase in the link instead of QUERY. It will improve targeting. This setting is optional. You can use it if the publisher wants it. Ad scripts take a keyword from the page title automatically.
- data-s1=S1. Instead of S1, you need to substitute the source of the traffic. Do not specify S1 if the script is placed on a specific site. If you add the same script to different sites, you need to type the site domain where the script is located in the S1 parameter.
- «data-s2=S2. You need to add a sub-source of traffic instead of S2. Let’s consider two examples of sub-sources.
In the first case, there is a site with various categories that are located on subdomains. Therefore, in the parameter S1, we indicate the main domain, and in S2 we indicate the subdomain:
<script src="//mediaoaktree.com/v2/loader.js?_t=52468" data-ts="1574069688" data-token="9bb42c5f29e5f1a225e4cd606ef25f1602f1637e" data-promo-cdn="mediaoaktree.com" data-s1="website.com" data-s2="movie.website.com"></script><script src="//mediaoaktree.com/v2/loader.js?_t=52468" data-ts="1574069688" data-token="9bb42c5f29e5f1a225e4cd606ef25f1602f1637e" data-promo-cdn="mediaoaktree.com" data-s1="website.com" data-s2="music.website.com"></script>In the second case, there is an advertising network that sells traffic from various sites. You can substitute the name of the advertising network in S1, and substitute in S2 the domain or ID of the site where the advertising script is located. It will look like this:
<script src="//mediaoaktree.com/v2/loader.js?_t=52468" data-ts="1574069688" data-token="9bb42c5f29e5f1a225e4cd606ef25f1602f1637e" data-promo-cdn="mediaoaktree.com" data-s1="adnetwork.com" data-s2="website_1.com"></script><script src="//mediaoaktree.com/v2/loader.js?_t=52468" data-ts="1574069688" data-token="9bb42c5f29e5f1a225e4cd606ef25f1602f1637e" data-promo-cdn="mediaoaktree.com" data-s1="adnetwork.com" data-s2="website_2.com"></script>- data-s3=S3. If the publisher is going to use postback, you can write click_id instead of {S3}. The publisher sets the values for S3 at will. If the publisher does not specify S3, the platform will generate a click_id.
Use the S1 and S2 parameters when different sites or projects with a large number of content categories contain the same advertising tag. There are no strict usage rules for the S3 and query parameters.
A publisher can place one ad tag on two different sites. If he types the names of sites or their domains in the S1 parameter (data-s1 = website1 and data-s1 = website2), you can find out from which site the traffic and most of the conversions came from. You will also have the opportunity to understand how to optimize each of the sites. Without this information, you will not be able to determine the site with the best result and pick up high-quality advertising.
Let’s move on to the integration of the script on the publisher’s site page. Let’s take a closer look at the process of integration, using CMS WordPress.
Adding Script to CMS WordPress #
You can insert the link to the script in two ways:
- Make changes in the theme of your site on WordPress.
- Use a special plugin.
The easiest and fastest way is to use the plugin. Because of this, we will consider it further.
Go to the admin panel of your site on WordPress. Open the Plugins tab and click Add New.

Search for a plugin «Insert Headers and Footers» Insert Headers and Footers, using the search bar. Click Install Now.

When the plugin is installed, click Activate.

Go to the tab Settings — Insert Headers and Footers.

Insert the link of the script in the field Scripts in Header and click Save.

Open your file manager and transfer the downloaded SW file to the main folder of the site.
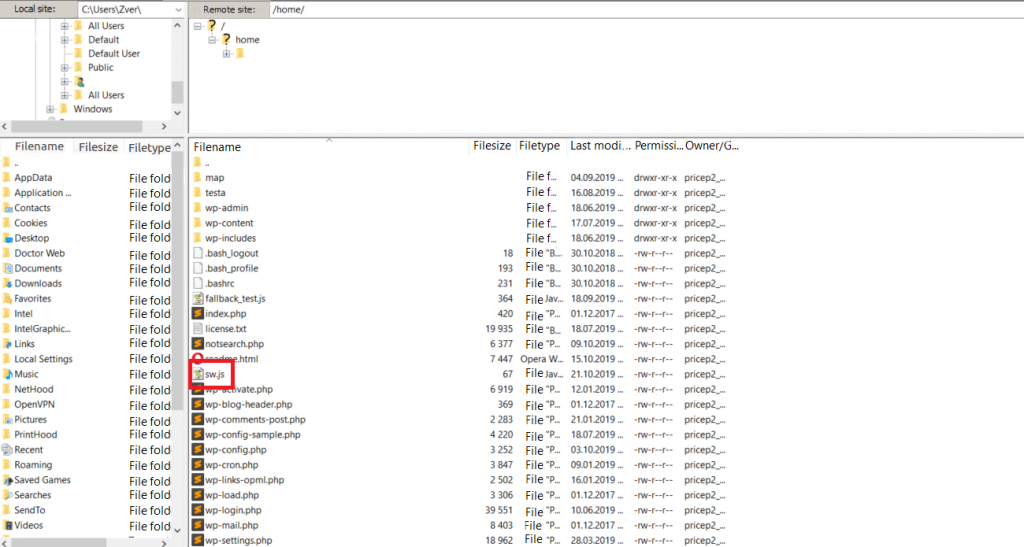
Now, this WordPress site has the Push Subscriber Script.
Please note: there are other plugins for ad placement on the WordPress site. For example, “Ad Inserter — Ad Manager & AdSense Ads”. With its help, you can create a list of pages for script integration and add other settings.
If the platform has just been created, the script may not work on the page. Wait 10-15 minutes, then check it again in another browser.
Let’s summarize the material:
- Before creating an ad inventory, make sure that the platform has a publisher account.
- Insert the information in five blocks: Administration, Information, Filters, Filters for traffic sources, and Optimization and rules.
- Copy the link to the script and SW file, download and place it on the publisher’s website.